Scalextric Cougar Paint project now underway!
32 posts
• Page 2 of 3 • 1, 2, 3
Re: Scalextric Cougar Paint project now underway!
![]() by TuscoTodd » Fri Jan 03, 2014 6:14 pm
by TuscoTodd » Fri Jan 03, 2014 6:14 pm
Yeah - not only was it a great reference photo for figuring out decals (not often you get a nice straight on side shot!) - but it is a pretty wild action shot with ALL FOUR PAWS in the air! :D
-

TuscoTodd - HRW Bouncer
- Posts: 7145
- Joined: Sat Aug 17, 2013 11:25 am
- Location: Rural Ohio
Re: Scalextric Cougar Paint project now underway!
![]() by dreinecke » Fri Jan 03, 2014 7:43 pm
by dreinecke » Fri Jan 03, 2014 7:43 pm
That is a great looking car and I love the pic! That dude knows that is the right way to drive a car like that - flat out!!!
You may have just influenced me to get a white kit for repainting...dang it!
You may have just influenced me to get a white kit for repainting...dang it!
-

dreinecke - King of the Dum-Dums!
- Posts: 7360
- Joined: Wed Aug 08, 2012 5:39 pm
- Location: Colorado
Re: Scalextric Cougar Paint project now underway!
![]() by TuscoTodd » Sat Jan 04, 2014 2:10 pm
by TuscoTodd » Sat Jan 04, 2014 2:10 pm
I little bit of a teaser pic for everyone...

I slipped the tires back on and interior in to shoot this... But not ready for reassembly yet.
Still have to clear in the decals (using Dupli-color acrylic lacquer clear), paint the insets of the wheels black, glue/true the tires, etc. But couldn't resist sharing. :)
I slipped the tires back on and interior in to shoot this... But not ready for reassembly yet.
Still have to clear in the decals (using Dupli-color acrylic lacquer clear), paint the insets of the wheels black, glue/true the tires, etc. But couldn't resist sharing. :)
-
TuscoTodd - HRW Bouncer
- Posts: 7145
- Joined: Sat Aug 17, 2013 11:25 am
- Location: Rural Ohio
Re: Scalextric Cougar Paint project now underway!
![]() by HomeRacingWorld » Sat Jan 04, 2014 5:46 pm
by HomeRacingWorld » Sat Jan 04, 2014 5:46 pm
Yes sir, looking might fine indeed.
-

HomeRacingWorld - HRW Janitor
- Posts: 15569
- Joined: Wed Aug 08, 2012 2:05 pm
- Location: HRW Skunkworks
Re: Scalextric Cougar Paint project now underway!
![]() by Dundee Denny » Sat Jan 04, 2014 6:41 pm
by Dundee Denny » Sat Jan 04, 2014 6:41 pm
The way this is coming together I won't have been able to wait either to catch a first look!!!
Great job!
Dundee Denny
Great job!
Dundee Denny
- Dundee Denny
- HRW SlotCar Veteran!
- Posts: 1636
- Joined: Wed Sep 05, 2012 4:18 pm
Re: Scalextric Cougar Paint project now underway!
![]() by TuscoTodd » Thu Jan 09, 2014 12:37 pm
by TuscoTodd » Thu Jan 09, 2014 12:37 pm
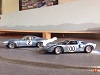
Here is a shot of how she looked headed to the track last night!

I realized after getting up there that I had forgotten to paint the emblem on the nose - but can do that any time. Doing the black inset on the wheels was a PIA, but it turned out well. I used a tooth pick dipped in paint to slowly flow paint over every little nook and cranny of the wheel centers while avoiding getting paint on the silver outer portion. By the eighth wheel, I had gotten fairly efficient at it though... :P
For the screen over the grill that is shown in the photos of the 1 to 1 car, I couldn't get the look I wanted with the gold mesh screen and painting it black. I need thinner paint than what I had on hand in rattle can format as it was just blinding the holes off and kind of killing the look. What I did settle on though, seems to have worked well and that is a piece cut from a set of black nylons from the Dollar Tree store. :)
The material is lightly stretched over the grills and secured on the back side, so it conforms nicely to the profile of the grills, can't be "knocked off" and "looks" like screen. As an added bonus, the factory lights do shine through it when the car is in use. :)
Here is a closer picture with the flash on that shows how the grill looks:

I did have an interesting observation in working on this car that I found when I went to glue/true the tires. The tires are molded with a light offset to them.
If you look closely at the beads/flanges of the tire itself, one side is slightly thicker than the other. With this, you can "slightly" change the track width of the car and/or the location of the tire in the wheel well. For both the silver and blue cars, I mounted all four tires with the thinner bead/flange to the inside, to get the max width/track possible.
I'm not sure if this has been brought up before (I didn't recall seeing it) - if it has, I apologize for the rehash. But prior to finding this difference on the Cougar tires, the only other car I had noticed it on was the front tires on my '70 Frank Gardner #46 Camaro. For those, if you mounted with the thin bead/flange to the rear/inside, it pushed the tires further from the chassis, to the point that they could rub the back side of the wheel well opening as the axle floated back and forth slightly. Reversing the tires so that the thin bead/flange was to the outside pushed the mounted rubber closer to the chassis and resolved any type of interference issue. I thought that maybe this was a fluke - and forgot about posting it on the forum, but it looks as though this is something that Scalextric may be doing on a regular basis moving forward - to allow for differences in "look" and/or as a potential "tuning" tool?
Oh - and for those that are curious, the Cougar's first outing at the track was a respectable mid-pack run, finishing in 4th place out of 8. It was the only car in the field last night that wasn't a '69 Camaro or '69/70 Mustang.
In addition to creating the slight float noted and running the tires at the wider track setting, I added a fair amount of lead over the cover that comes in place of where the digital chip would normally go. This did help settle the front end of the car down while running the magnet in the factory position under the rear axle, however that being said, even with the added lead, I still wasn't able to carry quite as much speed through the corners as the Camaros/Mustangs could.
I'll have to do some additional tuning to it to see if I can't get it a bit closer to that level of performance for the next T/A race. :)
(for reference, the race was held on the fairly high speed, wood/magnabraid, UK Black type road course track at Mark's Model World in Canton, OH - the differences may be less noticeable on a tighter/slower course )
Now just have to work on finishing up the blue car!
:banana-dance:
I realized after getting up there that I had forgotten to paint the emblem on the nose - but can do that any time. Doing the black inset on the wheels was a PIA, but it turned out well. I used a tooth pick dipped in paint to slowly flow paint over every little nook and cranny of the wheel centers while avoiding getting paint on the silver outer portion. By the eighth wheel, I had gotten fairly efficient at it though... :P
For the screen over the grill that is shown in the photos of the 1 to 1 car, I couldn't get the look I wanted with the gold mesh screen and painting it black. I need thinner paint than what I had on hand in rattle can format as it was just blinding the holes off and kind of killing the look. What I did settle on though, seems to have worked well and that is a piece cut from a set of black nylons from the Dollar Tree store. :)
The material is lightly stretched over the grills and secured on the back side, so it conforms nicely to the profile of the grills, can't be "knocked off" and "looks" like screen. As an added bonus, the factory lights do shine through it when the car is in use. :)
Here is a closer picture with the flash on that shows how the grill looks:
I did have an interesting observation in working on this car that I found when I went to glue/true the tires. The tires are molded with a light offset to them.
If you look closely at the beads/flanges of the tire itself, one side is slightly thicker than the other. With this, you can "slightly" change the track width of the car and/or the location of the tire in the wheel well. For both the silver and blue cars, I mounted all four tires with the thinner bead/flange to the inside, to get the max width/track possible.
I'm not sure if this has been brought up before (I didn't recall seeing it) - if it has, I apologize for the rehash. But prior to finding this difference on the Cougar tires, the only other car I had noticed it on was the front tires on my '70 Frank Gardner #46 Camaro. For those, if you mounted with the thin bead/flange to the rear/inside, it pushed the tires further from the chassis, to the point that they could rub the back side of the wheel well opening as the axle floated back and forth slightly. Reversing the tires so that the thin bead/flange was to the outside pushed the mounted rubber closer to the chassis and resolved any type of interference issue. I thought that maybe this was a fluke - and forgot about posting it on the forum, but it looks as though this is something that Scalextric may be doing on a regular basis moving forward - to allow for differences in "look" and/or as a potential "tuning" tool?
Oh - and for those that are curious, the Cougar's first outing at the track was a respectable mid-pack run, finishing in 4th place out of 8. It was the only car in the field last night that wasn't a '69 Camaro or '69/70 Mustang.
In addition to creating the slight float noted and running the tires at the wider track setting, I added a fair amount of lead over the cover that comes in place of where the digital chip would normally go. This did help settle the front end of the car down while running the magnet in the factory position under the rear axle, however that being said, even with the added lead, I still wasn't able to carry quite as much speed through the corners as the Camaros/Mustangs could.
I'll have to do some additional tuning to it to see if I can't get it a bit closer to that level of performance for the next T/A race. :)
(for reference, the race was held on the fairly high speed, wood/magnabraid, UK Black type road course track at Mark's Model World in Canton, OH - the differences may be less noticeable on a tighter/slower course )
Now just have to work on finishing up the blue car!
:banana-dance:
Last edited by TuscoTodd on Thu Jan 09, 2014 12:55 pm, edited 1 time in total.
-
TuscoTodd - HRW Bouncer
- Posts: 7145
- Joined: Sat Aug 17, 2013 11:25 am
- Location: Rural Ohio
Re: Scalextric Cougar Paint project now underway!
![]() by waaytoomuchintothis » Thu Jan 09, 2014 12:52 pm
by waaytoomuchintothis » Thu Jan 09, 2014 12:52 pm
Excellent information. Looks great, too. Do you think Scaley has changed their tire compound?
-

waaytoomuchintothis - "Seasoned SlotRacer"
- Posts: 7576
- Joined: Wed Aug 29, 2012 7:16 pm
- Location: Chesterfield, Virginia
Re: Scalextric Cougar Paint project now underway!
![]() by TuscoTodd » Thu Jan 09, 2014 1:15 pm
by TuscoTodd » Thu Jan 09, 2014 1:15 pm
-
TuscoTodd - HRW Bouncer
- Posts: 7145
- Joined: Sat Aug 17, 2013 11:25 am
- Location: Rural Ohio
Re: Scalextric Cougar Paint project now underway!
![]() by HomeRacingWorld » Thu Jan 09, 2014 4:12 pm
by HomeRacingWorld » Thu Jan 09, 2014 4:12 pm
You are correct, compound has changed. I noticed the grip difference on our track too.
Carrera changed as well, MUCH better tire.
As you said, time will tell how long they last. But I cannot complain about improvements :)
Once again, very nice job. Way to go!
Carrera changed as well, MUCH better tire.
As you said, time will tell how long they last. But I cannot complain about improvements :)
Once again, very nice job. Way to go!
-
HomeRacingWorld - HRW Janitor
- Posts: 15569
- Joined: Wed Aug 08, 2012 2:05 pm
- Location: HRW Skunkworks
Re: Scalextric Cougar Paint project now underway!
![]() by dge467 » Thu Jan 09, 2014 8:02 pm
by dge467 » Thu Jan 09, 2014 8:02 pm
Sharp looking! Nice!
-

dge467 - The King of Foil
- Posts: 3636
- Joined: Tue Sep 04, 2012 9:07 pm
- Location: N.E. Massachusetts
Re: Scalextric Cougar Paint project now underway!
![]() by TuscoTodd » Sun Jan 19, 2014 7:08 pm
by TuscoTodd » Sun Jan 19, 2014 7:08 pm
Finally decided that I was going to go with some decals on the blue car (verses just going the street car route)
Here is a teaser pic as I let the decals dry. (will hopefully be clearing them in tomorrow)
Enjoy!

Here is a teaser pic as I let the decals dry. (will hopefully be clearing them in tomorrow)
Enjoy!
-
TuscoTodd - HRW Bouncer
- Posts: 7145
- Joined: Sat Aug 17, 2013 11:25 am
- Location: Rural Ohio
Re: Scalextric Cougar Paint project now underway!
![]() by Reslotted » Sun Jan 19, 2014 7:50 pm
by Reslotted » Sun Jan 19, 2014 7:50 pm
They look great Todd.
Both great colours that really suit the cougar.
Both great colours that really suit the cougar.
-

Reslotted - HRW SlotCar Veteran!
- Posts: 643
- Joined: Mon Sep 10, 2012 7:04 pm
- Location: Australia
Re: Scalextric Cougar Paint project now underway!
![]() by dreinecke » Sun Jan 19, 2014 10:29 pm
by dreinecke » Sun Jan 19, 2014 10:29 pm
EXCELLENT livery! I love that blue! I'm going to have to do a few of these repaints too, you made me!
-
dreinecke - King of the Dum-Dums!
- Posts: 7360
- Joined: Wed Aug 08, 2012 5:39 pm
- Location: Colorado
Re: Scalextric Cougar Paint project now underway!
![]() by ListerStormGT » Tue Jan 21, 2014 6:41 am
by ListerStormGT » Tue Jan 21, 2014 6:41 am
That looks great in the blue!
-
ListerStormGT - HRW SlotCar Veteran!
- Posts: 1196
- Joined: Sun Sep 02, 2012 11:24 pm
- Location: Florida
32 posts
• Page 2 of 3 • 1, 2, 3
Who is online
Users browsing this forum: No registered users and 2 guests

Powered by phpBB® Forum Software © phpBB Group