Harder than I thought...
53 posts
• Page 3 of 4 • 1, 2, 3, 4
Re: Harder than I thought...
![]() by FootScoot » Tue Mar 05, 2013 9:12 pm
by FootScoot » Tue Mar 05, 2013 9:12 pm
No pics yet. I worked on the body mounts, and got those sorted out, I think. They just need some minor adjustment. :)
-
FootScoot - Mini Model Master
- Posts: 1655
- Joined: Wed Sep 05, 2012 8:18 pm
- Location: Evansville, IN
Re: Harder than I thought...
![]() by waaytoomuchintothis » Tue Mar 05, 2013 10:41 pm
by waaytoomuchintothis » Tue Mar 05, 2013 10:41 pm
I finally got the headlights modified and the headlight doors, etc, fabricated and then got busy and never got back to it. We have a big storm going now, so tomorrow I may get to do more.
-

waaytoomuchintothis - "Seasoned SlotRacer"
- Posts: 7576
- Joined: Wed Aug 29, 2012 7:16 pm
- Location: Chesterfield, Virginia
Re: Harder than I thought...
![]() by Florida_Slotter » Tue Mar 05, 2013 11:13 pm
by Florida_Slotter » Tue Mar 05, 2013 11:13 pm
Waay,
Never did this on a slot car. Years ago I noticed that the brake light on my motorcycle was not too visible. I removed the cover and noticed that the housing was simply plated with some dull aluminum color. No reflection whatsoever.
I went in the house to get cold water and my wife was doing some cooking. That's when I saw it . . . . Aluminum Foil!
One side was dull, the other side quite shiny!
I sprayed some glue into the housing, cut some foil - shiny side out - and then burnished it with some soft rag. When I put the cover back on and tested it, the difference in the visibility of the brake light was amazing.
I bet that would work for your headlight buckets?
-

Florida_Slotter - Scratch Build Guru
- Posts: 1941
- Joined: Wed Sep 05, 2012 4:08 pm
- Location: Florida
Re: Harder than I thought...
![]() by waaytoomuchintothis » Wed Mar 06, 2013 8:40 am
by waaytoomuchintothis » Wed Mar 06, 2013 8:40 am
Tailights don't usually have reflectors beyond silver paint on the bucket. The red lens concentrates and refracts the light from the clear bulb (until dumb-looking LED tailights). From my old 1941 Ford, through many motorcycles, cars and even my tractor, none of them has ever had a real reflector, just silver paint, usually flat.
I painted the headlight buckets with chrome silver and didn't notice when the paint was dry that it was much more dull than I wanted (lesson: I shouldn't be in a hurry to squeeze some slot car in when I'm in a hurry). I glued the headlights in place, and when I came back to check on them, I saw that I had created a dull aluminum bucket with chrome rimmed headlights in them, because the putty and scrap styrene I made the bucket from would have needed a second coat. I'm hoping it turns out okay when I get the home made clear covers on, because I hope I have started over on this thing for the last time.
I painted the headlight buckets with chrome silver and didn't notice when the paint was dry that it was much more dull than I wanted (lesson: I shouldn't be in a hurry to squeeze some slot car in when I'm in a hurry). I glued the headlights in place, and when I came back to check on them, I saw that I had created a dull aluminum bucket with chrome rimmed headlights in them, because the putty and scrap styrene I made the bucket from would have needed a second coat. I'm hoping it turns out okay when I get the home made clear covers on, because I hope I have started over on this thing for the last time.
-
waaytoomuchintothis - "Seasoned SlotRacer"
- Posts: 7576
- Joined: Wed Aug 29, 2012 7:16 pm
- Location: Chesterfield, Virginia
Re: Harder than I thought...
![]() by TsgtRet » Wed Mar 06, 2013 9:52 am
by TsgtRet » Wed Mar 06, 2013 9:52 am
That shiny metal, peel-off backed tape they use for sealing duct work works great in lieu of the foil mentioned above. It also works great to fix cracked plastic "chrome" on 1:1 cars and not bad for emergency rust repair on beaters. Used it on several slots for "chrome".
Waay, I have come across a few taillights that have polished reflectors behind the bulb, though it was separate from the housing. Just saying.
Waay, I have come across a few taillights that have polished reflectors behind the bulb, though it was separate from the housing. Just saying.
-
TsgtRet - HRW SlotCar Veteran!
- Posts: 2096
- Joined: Thu Sep 06, 2012 11:32 pm
- Location: Ft Bragg area of NC
Re: Harder than I thought...
![]() by waaytoomuchintothis » Wed Mar 06, 2013 10:56 am
by waaytoomuchintothis » Wed Mar 06, 2013 10:56 am
I'm sure they work, and they are out there, but I've never seen one. My VW's would benefit from a polished reflector, especially the side marker lamps, which are now so weathered and old they are actually fading toward a clear lens. My oldest VW had glass tail light lenses as did the '41 Ford. Heavy suckers.
-
waaytoomuchintothis - "Seasoned SlotRacer"
- Posts: 7576
- Joined: Wed Aug 29, 2012 7:16 pm
- Location: Chesterfield, Virginia
Re: Harder than I thought...
![]() by FootScoot » Thu Mar 07, 2013 7:31 am
by FootScoot » Thu Mar 07, 2013 7:31 am
Well got the body mounts figured out for the most part, but I don't have the interior in yet so they could change. I don't know why I did that. I should have known better, but I'm hoping everything is good. I couldn't check for interior fit as I was waiting for the glue to set up. I'll give it a go today. :)
-
FootScoot - Mini Model Master
- Posts: 1655
- Joined: Wed Sep 05, 2012 8:18 pm
- Location: Evansville, IN
Re: Harder than I thought...
![]() by FootScoot » Thu Mar 07, 2013 6:32 pm
by FootScoot » Thu Mar 07, 2013 6:32 pm
I had to modify the interior a little bit, which was accomplished by adding a piece of styrene to the top of the interior by the rear window. I just filed it flat and glued the piece to the interior, when set, I just took a piece out of the bottom by the rear tires for clearance. Here's the pics so far. Looks a bit low in the rear to me, but maybe it's just me. :)


-
FootScoot - Mini Model Master
- Posts: 1655
- Joined: Wed Sep 05, 2012 8:18 pm
- Location: Evansville, IN
Re: Harder than I thought...
![]() by waaytoomuchintothis » Thu Mar 07, 2013 7:33 pm
by waaytoomuchintothis » Thu Mar 07, 2013 7:33 pm
I don't know, Dennis. Think of Rocky's Vette. Its a '64. If you hung it that low it wouldn't be able to steer. The racing height for Vettes isn't all that low. Revell got it just about perfect with their Grand Sport series.
-
waaytoomuchintothis - "Seasoned SlotRacer"
- Posts: 7576
- Joined: Wed Aug 29, 2012 7:16 pm
- Location: Chesterfield, Virginia
Re: Harder than I thought...
![]() by FootScoot » Tue Mar 12, 2013 6:42 pm
by FootScoot » Tue Mar 12, 2013 6:42 pm
I decided to raise the rear of the body just a tad. Looks better to me. I also decided to remove the front turn signals which makes it look a little sleeker in the front. Besides that it's a race car what do you need turn signals for? :lol: Post some more pics soon. :)
-
FootScoot - Mini Model Master
- Posts: 1655
- Joined: Wed Sep 05, 2012 8:18 pm
- Location: Evansville, IN

Re: Harder than I thought...
![]() by FootScoot » Fri Mar 15, 2013 7:51 pm
by FootScoot » Fri Mar 15, 2013 7:51 pm
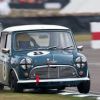
I removed the front turn signal housings which I think makes it look cleaner in front. A little more body work and it'll be ready for some color. :) Almost looks like our fearless leader behind the wheel. :)


-
FootScoot - Mini Model Master
- Posts: 1655
- Joined: Wed Sep 05, 2012 8:18 pm
- Location: Evansville, IN
Re: Harder than I thought...
![]() by waaytoomuchintothis » Fri Mar 15, 2013 8:23 pm
by waaytoomuchintothis » Fri Mar 15, 2013 8:23 pm
Looking good. What color are you thinking about? Racer or custom?
-
waaytoomuchintothis - "Seasoned SlotRacer"
- Posts: 7576
- Joined: Wed Aug 29, 2012 7:16 pm
- Location: Chesterfield, Virginia
Re: Harder than I thought...
![]() by FootScoot » Fri Mar 15, 2013 9:06 pm
by FootScoot » Fri Mar 15, 2013 9:06 pm
Not really sure about the color, but it will be a racer. Maybe an SCCA type car. :)
-
FootScoot - Mini Model Master
- Posts: 1655
- Joined: Wed Sep 05, 2012 8:18 pm
- Location: Evansville, IN
Re: Harder than I thought...
![]() by FootScoot » Mon Mar 18, 2013 8:19 pm
by FootScoot » Mon Mar 18, 2013 8:19 pm
Oh yeah! 6 taillights! I remember back in the day when some owners did this simple modification. I always thought it looked cool. 8-)

-
FootScoot - Mini Model Master
- Posts: 1655
- Joined: Wed Sep 05, 2012 8:18 pm
- Location: Evansville, IN
53 posts
• Page 3 of 4 • 1, 2, 3, 4
Who is online
Users browsing this forum: No registered users and 6 guests

Powered by phpBB® Forum Software © phpBB Group