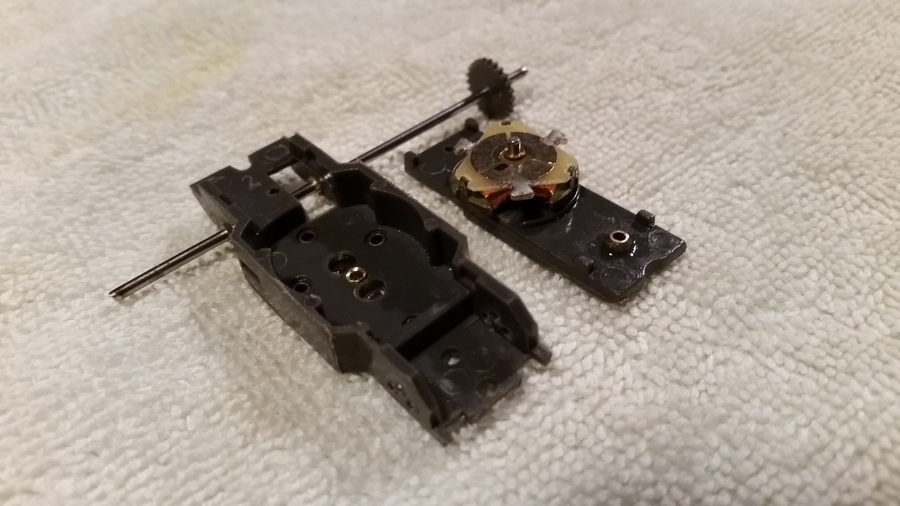
To be more precise, I decided to install brass bushings (Ok, brass tubing...) in the rear axle holes and in the gear plate front and rear.
Pictures later. I also stuffed a bushing into the lower armature hole.
I hope that this is worth the trouble. I have never done this before but wanted to try.
Scott
Taking the slop out of a JL chassis.
16 posts
• Page 1 of 2 • 1, 2
Taking the slop out of a JL chassis.
![]() by noddaz » Fri May 24, 2019 11:52 am
by noddaz » Fri May 24, 2019 11:52 am
-

noddaz - HRW SlotCar Veteran!
- Posts: 672
- Joined: Wed Sep 19, 2012 6:21 am
- Location: Arnold, Maryland
Re: Taking the slop out of a JL chassis.
![]() by Austin » Fri May 24, 2019 6:58 pm
by Austin » Fri May 24, 2019 6:58 pm
Nice, please let us know how it all works out, If it does we can all start doing it. WOW
- Austin
- HRW SlotCar Veteran!
- Posts: 1253
- Joined: Thu Sep 06, 2012 4:08 am
- Location: Merrimack, NH
Re: Taking the slop out of a JL chassis.
![]() by noddaz » Fri May 24, 2019 7:49 pm
by noddaz » Fri May 24, 2019 7:49 pm
I have bushing in the upper and lower armature holes, rear axle and driven gear hole. Now I need to assemble it and see how it works.
Scott
-
noddaz - HRW SlotCar Veteran!
- Posts: 672
- Joined: Wed Sep 19, 2012 6:21 am
- Location: Arnold, Maryland
Re: Taking the slop out of a JL chassis.
![]() by model murdering » Fri May 24, 2019 10:28 pm
by model murdering » Fri May 24, 2019 10:28 pm
Hi Scott,
I have pix somewhere.
I did a pair of black AW Studes waaaaay back when in the HT dayz for the charity auctions. Mostly for giggles. It's kinda blurry; but it suffices to say that one thing led to another. I bushed the rear axle, then the armature and driven gear holes in the gear plate, and the armature hole in in the comm pit. Along the way, I changed all the gears to t-jet style, dropped to a nine tooth, eventually scrapped the rotten toothed early crown gear, the play-dough axles, and switched to Thunderbrushes instead of the dumbed ... er ... domed brushes, because they dont "cant" and bind in the guides.
Obviously everything was hand fit. The AW plastic is pretty gooshy and will move a lot if you press in something with too chubby of an OD for the selected bore size. I spun my bushing stock down in the dremel with a file and 320 paper to help ease the plastic distortion, but still keep a good impinge fit. I also champfered the leading side of bushing and smoothed it on some 600, to help them glide in when pressed. I used my RTHO presses, and what I couldnt wrangle with those; I used my small mini drill press.
You'll have to size a drill blank or what have you, to suit your chosen rear axle bushing stock. The differential between OD of the AW axle spline and the smooth journal portion is great enough that by the time you get your new bushing over the spline hump, the slop quotient wont be spectacularly improved when you drop back onto the journal.
At the time I was goofing around with this, one of the main issues was that the armature shaft and the pinion shaft werent vertically parallel to one another when the gear plate and the chassis were together. Generally, the arm was leaned back towards the idler, and the pinion bore in the chassis tail plate has to move back a skoshe. Honestly, I never bothered to see if I could get a better fit by mixing and matching components, like you would with a T-jet build.
You have to leave the armature hole in the chassis pit where it is. There really isnt a whole lot of room to work with. Spacing here is critical. The OD of the bushing cant be so great that pressing it in distorts the edge of the brush guide holes where they face the shaft (center). Some AW chassis arent particularly forgiving with the brush to guide clearance, so ya gotta watch it. If you bone it, you can shave the offending curl off the bore with a fresh #11 blade and a minimum of caffiene.
For the gear plate, I flute reamed the armature hole using my pinvise, concentrating my efforts to push the bore forward (back towards plumb). Then I re-bored the hole a shade over and pressed the bushing in. The result was that the armature gear now addresses the idler gear properly (level). The rub is that it pulls the gear centers apart, fractionally. Regardless, it loosened the drive train up nicely. I left the cluster gear bore as is, over-bored slightly, and just pressed the insert. Same flute ream trick for the tail plate bore where the pinion shaft drops in, but instead of moving forward towards the guide like the armature hole, you push it back ward towards the rear screw post.
All in all, the whole enchilada wasnt so jerky and weirdly stiff anymore, such that they were. Even with the grabbier magnets, the coast-fly-wheel effect was much improved, with smooth acceleration and deceleration. The brass bushings will be more thirsty than the conventional arrangement. Like a big scale slot they'll talk and clatter at you when oiling is required. In the end, I threw a lot of parts and effort at it for the halibut. I still think the best bang for the buck tweak for the JLTO, is to re-arch the shoe hook and take about 87 tons of excess pressure out.
-

model murdering - HRW SlotCar Veteran!
- Posts: 160
- Joined: Mon Mar 06, 2017 8:08 pm
Re: Taking the slop out of a JL chassis.
![]() by RichD » Sat May 25, 2019 6:44 am
by RichD » Sat May 25, 2019 6:44 am
The axle and armature shaft holes in a Johnny Lightning chassis are often too big, but it is not necessary to add bushings. It is possible to close up the holes, the procedure to do that is included in this article: https://drive.google.com/file/d/1sLokTZ ... sp=sharing
-

RichD - HRW SlotCar Veteran!
- Posts: 1885
- Joined: Thu Sep 06, 2012 7:41 am
- Location: East Haven, CT
Re: Taking the slop out of a JL chassis.
![]() by RV Racing » Sat May 25, 2019 8:18 am
by RV Racing » Sat May 25, 2019 8:18 am
- RV Racing
- HRW SlotCar Veteran!
- Posts: 196
- Joined: Thu Sep 06, 2012 4:01 pm
Re: Taking the slop out of a JL chassis.
![]() by HO RacePro » Sat May 25, 2019 4:55 pm
by HO RacePro » Sat May 25, 2019 4:55 pm
Brass bushings in HO chassis go WAY the heck back! I was making them out of brass tubing back in the '60's.
For axle bushings a better alternative is brass eyelets. They have a flange, which helps seat them square, but more important they have a draft -- a taper. What that does is make alignment of the eyelets less critical. It also provides a small clearance between the axle and the inside of the eyelet which acts as an oil reservoir.
Finding the right size eyelet is a chore. And you may want to ream the ID to size. You can "line bore' them -- ream both eyelets after installation, running the reamer through both simultaneously. But on total they should require less fussing overall.
Ed Bianchi
PS - Stimpson is the go-to company for eyelets. An unbelievable variety. And if you tell them you want "engineering samples", they might send you a hundred or so for free. Devious? Underhanded? Oh my yes. Don't tell anyone where you heard this!
- HO RacePro
- Posts: 22
- Joined: Sun Mar 03, 2019 7:41 am
Re: Taking the slop out of a JL chassis.
![]() by model murdering » Sat May 25, 2019 7:11 pm
by model murdering » Sat May 25, 2019 7:11 pm
The 60's Ed?
Eyelets ... ?
so then, that would have been the eighteen sixties.
I presume y'all lubricated with rendered bear fat that you killed with your flintlock. :lol:
********
Nice clean work Scott!
You snuck in while I was blathering on about the trix I used and details you might need. Waiting to hear how it runs out and your observations.
-
model murdering - HRW SlotCar Veteran!
- Posts: 160
- Joined: Mon Mar 06, 2017 8:08 pm
Re: Taking the slop out of a JL chassis.
![]() by noddaz » Sat May 25, 2019 7:50 pm
by noddaz » Sat May 25, 2019 7:50 pm
MM, Ed knows what he is talking about. And now I know where to go for eyelets.

That would have made things easier. Shame I didn't have any. Damn the torpedoes! Full speed ahead!
Scott
That would have made things easier. Shame I didn't have any. Damn the torpedoes! Full speed ahead!
Scott
-
noddaz - HRW SlotCar Veteran!
- Posts: 672
- Joined: Wed Sep 19, 2012 6:21 am
- Location: Arnold, Maryland
Re: Taking the slop out of a JL chassis.
![]() by model murdering » Sat May 25, 2019 8:17 pm
by model murdering » Sat May 25, 2019 8:17 pm
Other than the rear axle, Im not seeing how a flanged eyelet works for the either of the armature bores, or the driven bore; where the flange height would occupy the needed real-estate normally reserved for clearance.
-
model murdering - HRW SlotCar Veteran!
- Posts: 160
- Joined: Mon Mar 06, 2017 8:08 pm
Re: Taking the slop out of a JL chassis.
![]() by RichD » Sun May 26, 2019 6:56 am
by RichD » Sun May 26, 2019 6:56 am
Here is a list that includes most of my articles with clickable links: https://drive.google.com/file/d/1LR17Ht ... sp=sharing
-
RichD - HRW SlotCar Veteran!
- Posts: 1885
- Joined: Thu Sep 06, 2012 7:41 am
- Location: East Haven, CT
Re: Taking the slop out of a JL chassis.
![]() by RV Racing » Sun May 26, 2019 8:37 am
by RV Racing » Sun May 26, 2019 8:37 am
- RV Racing
- HRW SlotCar Veteran!
- Posts: 196
- Joined: Thu Sep 06, 2012 4:01 pm
Re: Taking the slop out of a JL chassis.
![]() by HO RacePro » Sun May 26, 2019 10:22 am
by HO RacePro » Sun May 26, 2019 10:22 am
That would be the 1760's, when Playcraft HO slotcars had to be smuggled into the colonies to avoid the punitive English slotcar tariffs -- a prime motivation for the American Revolution.
And one of my speed secrets was using 'possum grease instead of bear grease. (These days I only use Mobil 1 Full Synthetic 'Possum Grease.)
As I mentioned above, eyelets are made in almost any dimensions imaginable. There are eyelets with a barrel length of only 1/16" (1.6mm). Flanges can be flat or clipped (mostly removed). Since the metal thicknesses range from 0.007 inches on up, a flat flange will take up very little space.
Finding the exact spec eyelets you want is still an exercise -- I can't point you to any one source. But I do remember that at one time someone sold eyelets for the express purpose of using them as HO slotcar bushings. It could be they had them custom made.
Ed Bianchi
- HO RacePro
- Posts: 22
- Joined: Sun Mar 03, 2019 7:41 am
Re: Taking the slop out of a JL chassis.
![]() by Norman » Mon May 27, 2019 6:45 pm
by Norman » Mon May 27, 2019 6:45 pm
Nice clean install on those bushing, Scott! :music-rockout:
Bet you'll get the most bang for your buck with the rear axle bushings, some of the chassis have a lot of slop there.
Bet you'll get the most bang for your buck with the rear axle bushings, some of the chassis have a lot of slop there.
- Norman
- HRW SlotCar Veteran!
- Posts: 108
- Joined: Mon Nov 02, 2015 5:28 pm
- Location: New Hampshire
Re: Taking the slop out of a JL chassis.
![]() by noddaz » Wed May 29, 2019 4:41 pm
by noddaz » Wed May 29, 2019 4:41 pm
-
noddaz - HRW SlotCar Veteran!
- Posts: 672
- Joined: Wed Sep 19, 2012 6:21 am
- Location: Arnold, Maryland
16 posts
• Page 1 of 2 • 1, 2
Who is online
Users browsing this forum: No registered users and 60 guests

Powered by phpBB® Forum Software © phpBB Group