[phpBB Debug] PHP Warning: in file [ROOT]/includes/bbcode.php on line 543: preg_replace(): The /e modifier is no longer supported, use preg_replace_callback instead
[phpBB Debug] PHP Warning: in file [ROOT]/includes/bbcode.php on line 543: preg_replace(): The /e modifier is no longer supported, use preg_replace_callback instead
[phpBB Debug] PHP Warning: in file [ROOT]/includes/bbcode.php on line 543: preg_replace(): The /e modifier is no longer supported, use preg_replace_callback instead
[phpBB Debug] PHP Warning: in file [ROOT]/includes/bbcode.php on line 543: preg_replace(): The /e modifier is no longer supported, use preg_replace_callback instead
[phpBB Debug] PHP Warning: in file [ROOT]/includes/bbcode.php on line 543: preg_replace(): The /e modifier is no longer supported, use preg_replace_callback instead
[phpBB Debug] PHP Warning: in file [ROOT]/includes/bbcode.php on line 543: preg_replace(): The /e modifier is no longer supported, use preg_replace_callback instead
[phpBB Debug] PHP Warning: in file [ROOT]/includes/bbcode.php on line 543: preg_replace(): The /e modifier is no longer supported, use preg_replace_callback instead
[phpBB Debug] PHP Warning: in file [ROOT]/includes/bbcode.php on line 543: preg_replace(): The /e modifier is no longer supported, use preg_replace_callback instead
[phpBB Debug] PHP Warning: in file [ROOT]/includes/bbcode.php on line 543: preg_replace(): The /e modifier is no longer supported, use preg_replace_callback instead
[phpBB Debug] PHP Warning: in file [ROOT]/includes/bbcode.php on line 543: preg_replace(): The /e modifier is no longer supported, use preg_replace_callback instead
[phpBB Debug] PHP Warning: in file [ROOT]/includes/bbcode.php on line 543: preg_replace(): The /e modifier is no longer supported, use preg_replace_callback instead
[phpBB Debug] PHP Warning: in file [ROOT]/includes/bbcode.php on line 543: preg_replace(): The /e modifier is no longer supported, use preg_replace_callback instead
[phpBB Debug] PHP Warning: in file [ROOT]/includes/bbcode.php on line 543: preg_replace(): The /e modifier is no longer supported, use preg_replace_callback instead
[phpBB Debug] PHP Warning: in file [ROOT]/includes/bbcode.php on line 543: preg_replace(): The /e modifier is no longer supported, use preg_replace_callback instead
[phpBB Debug] PHP Warning: in file [ROOT]/includes/bbcode.php on line 543: preg_replace(): The /e modifier is no longer supported, use preg_replace_callback instead
[phpBB Debug] PHP Warning: in file [ROOT]/includes/bbcode.php on line 543: preg_replace(): The /e modifier is no longer supported, use preg_replace_callback instead
[phpBB Debug] PHP Warning: in file [ROOT]/includes/bbcode.php on line 543: preg_replace(): The /e modifier is no longer supported, use preg_replace_callback instead
[phpBB Debug] PHP Warning: in file [ROOT]/includes/bbcode.php on line 543: preg_replace(): The /e modifier is no longer supported, use preg_replace_callback instead
[phpBB Debug] PHP Warning: in file [ROOT]/includes/bbcode.php on line 543: preg_replace(): The /e modifier is no longer supported, use preg_replace_callback instead
[phpBB Debug] PHP Warning: in file [ROOT]/includes/bbcode.php on line 543: preg_replace(): The /e modifier is no longer supported, use preg_replace_callback instead
[phpBB Debug] PHP Warning: in file [ROOT]/includes/bbcode.php on line 543: preg_replace(): The /e modifier is no longer supported, use preg_replace_callback instead
[phpBB Debug] PHP Warning: in file [ROOT]/includes/bbcode.php on line 543: preg_replace(): The /e modifier is no longer supported, use preg_replace_callback instead
[phpBB Debug] PHP Warning: in file [ROOT]/includes/bbcode.php on line 543: preg_replace(): The /e modifier is no longer supported, use preg_replace_callback instead
[phpBB Debug] PHP Warning: in file [ROOT]/includes/bbcode.php on line 543: preg_replace(): The /e modifier is no longer supported, use preg_replace_callback instead
[phpBB Debug] PHP Warning: in file [ROOT]/includes/bbcode.php on line 543: preg_replace(): The /e modifier is no longer supported, use preg_replace_callback instead
[phpBB Debug] PHP Warning: in file [ROOT]/includes/bbcode.php on line 543: preg_replace(): The /e modifier is no longer supported, use preg_replace_callback instead
[phpBB Debug] PHP Warning: in file [ROOT]/includes/bbcode.php on line 543: preg_replace(): The /e modifier is no longer supported, use preg_replace_callback instead
[phpBB Debug] PHP Warning: in file [ROOT]/includes/bbcode.php on line 543: preg_replace(): The /e modifier is no longer supported, use preg_replace_callback instead
[phpBB Debug] PHP Warning: in file [ROOT]/includes/bbcode.php on line 543: preg_replace(): The /e modifier is no longer supported, use preg_replace_callback instead
[phpBB Debug] PHP Warning: in file [ROOT]/includes/bbcode.php on line 543: preg_replace(): The /e modifier is no longer supported, use preg_replace_callback instead
[phpBB Debug] PHP Warning: in file [ROOT]/includes/bbcode.php on line 543: preg_replace(): The /e modifier is no longer supported, use preg_replace_callback instead
[phpBB Debug] PHP Warning: in file [ROOT]/includes/bbcode.php on line 543: preg_replace(): The /e modifier is no longer supported, use preg_replace_callback instead
[phpBB Debug] PHP Warning: in file [ROOT]/includes/bbcode.php on line 543: preg_replace(): The /e modifier is no longer supported, use preg_replace_callback instead
[phpBB Debug] PHP Warning: in file [ROOT]/includes/bbcode.php on line 543: preg_replace(): The /e modifier is no longer supported, use preg_replace_callback instead
[phpBB Debug] PHP Warning: in file [ROOT]/includes/bbcode.php on line 543: preg_replace(): The /e modifier is no longer supported, use preg_replace_callback instead
[phpBB Debug] PHP Warning: in file [ROOT]/includes/bbcode.php on line 543: preg_replace(): The /e modifier is no longer supported, use preg_replace_callback instead
[phpBB Debug] PHP Warning: in file [ROOT]/includes/bbcode.php on line 543: preg_replace(): The /e modifier is no longer supported, use preg_replace_callback instead
[phpBB Debug] PHP Warning: in file [ROOT]/includes/bbcode.php on line 543: preg_replace(): The /e modifier is no longer supported, use preg_replace_callback instead
[phpBB Debug] PHP Warning: in file [ROOT]/includes/bbcode.php on line 543: preg_replace(): The /e modifier is no longer supported, use preg_replace_callback instead
[phpBB Debug] PHP Warning: in file [ROOT]/includes/bbcode.php on line 543: preg_replace(): The /e modifier is no longer supported, use preg_replace_callback instead
[phpBB Debug] PHP Warning: in file [ROOT]/includes/bbcode.php on line 543: preg_replace(): The /e modifier is no longer supported, use preg_replace_callback instead
[phpBB Debug] PHP Warning: in file [ROOT]/includes/bbcode.php on line 543: preg_replace(): The /e modifier is no longer supported, use preg_replace_callback instead
[phpBB Debug] PHP Warning: in file [ROOT]/includes/bbcode.php on line 543: preg_replace(): The /e modifier is no longer supported, use preg_replace_callback instead
[phpBB Debug] PHP Warning: in file [ROOT]/includes/bbcode.php on line 543: preg_replace(): The /e modifier is no longer supported, use preg_replace_callback instead
[phpBB Debug] PHP Warning: in file [ROOT]/includes/bbcode.php on line 543: preg_replace(): The /e modifier is no longer supported, use preg_replace_callback instead
[phpBB Debug] PHP Warning: in file [ROOT]/includes/bbcode.php on line 127: preg_replace(): The /e modifier is no longer supported, use preg_replace_callback instead
[phpBB Debug] PHP Warning: in file [ROOT]/includes/functions.php on line 4773: Cannot modify header information - headers already sent by (output started at [ROOT]/includes/functions.php:3887)
[phpBB Debug] PHP Warning: in file [ROOT]/includes/functions.php on line 4775: Cannot modify header information - headers already sent by (output started at [ROOT]/includes/functions.php:3887)
[phpBB Debug] PHP Warning: in file [ROOT]/includes/functions.php on line 4776: Cannot modify header information - headers already sent by (output started at [ROOT]/includes/functions.php:3887)
[phpBB Debug] PHP Warning: in file [ROOT]/includes/functions.php on line 4777: Cannot modify header information - headers already sent by (output started at [ROOT]/includes/functions.php:3887)
Home Racing World • View topic - Re-framed Porsche 904 GTS

Re-framed Porsche 904 GTS

Share your build process step by step
Forum rules
Open to ALL SCALES!

1. Pictures of your starting materials. Choice of body, Chassis type and material (brass, plastic etc.)
2. Pictures of the tools you will be using, and any alternative ways to do the same thing. for example, tubing bender versus bent around a screwdriver handle. etc.
3. List where parts come from, or where they can be purchased from, or if they are homemade.
4. As many pictures of the build during the whole process as you can.

Re-framed Porsche 904 GTS

Postby gascarnut » Mon Jan 30, 2017 11:07 am

Here's my contribution to this new forum, I hope you will all find it interesting and informative.

Tony Palmer (BrumosRSR) asked me to build a brass frame to fit under a Carrerra Porsche 904 body, so this will be the subject of the thread.

I started work on this project Saturday in my garage, but most of the work will be done in my hotel room as I am travelling on business at present. I will take some photos of my mobile workshop tonight!

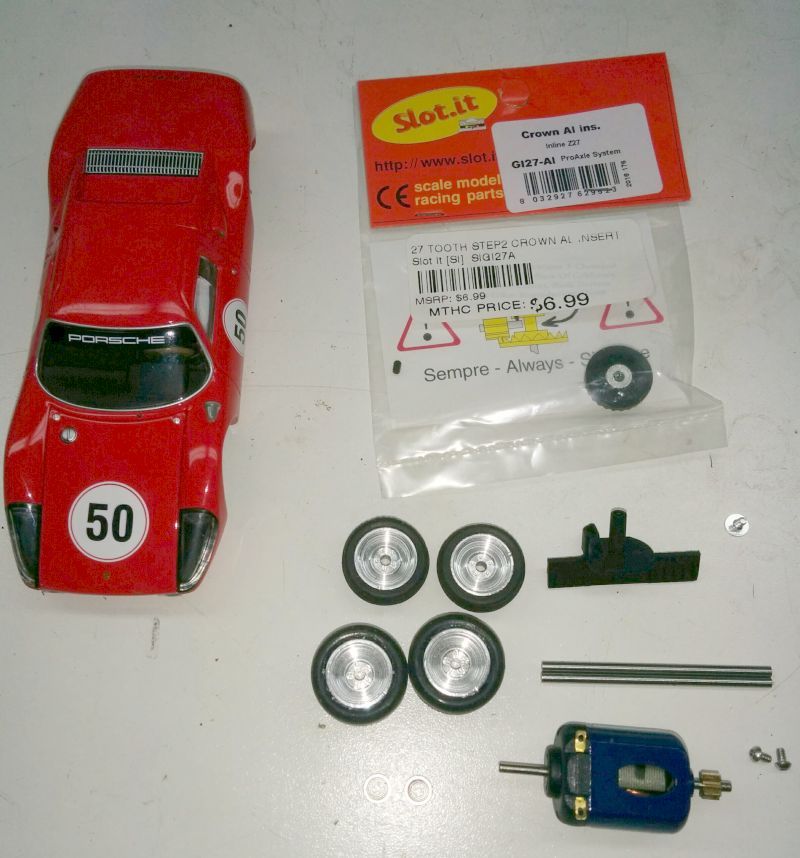
Tony sent me a bunch of parts:
Image

The CBD Steelies will suit the car very well, but the width of the rear tires combined with the narrowness of the body restricts the frame to an inline.

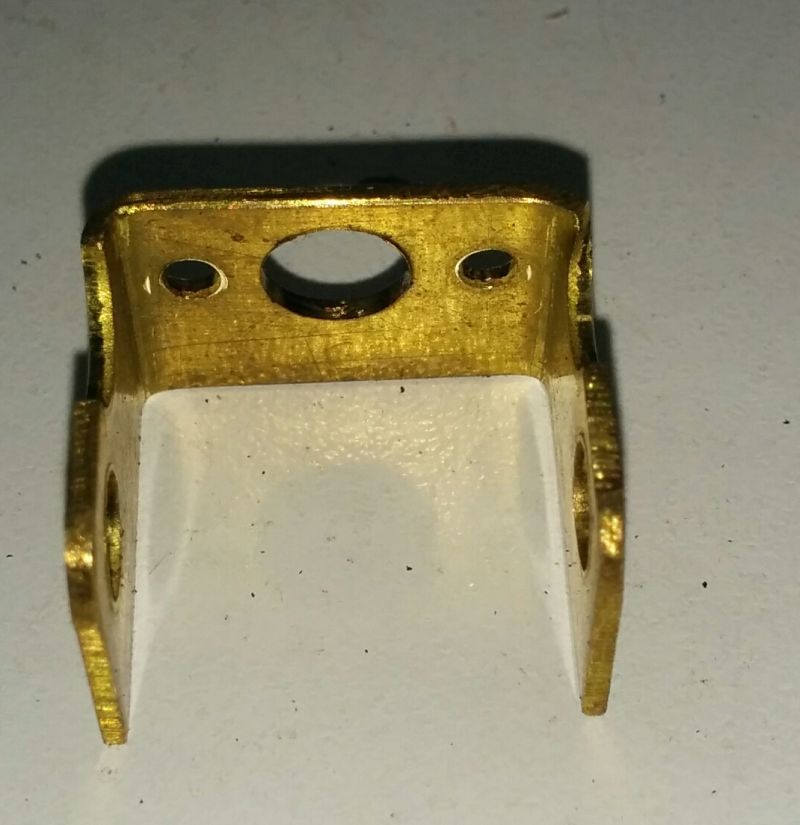
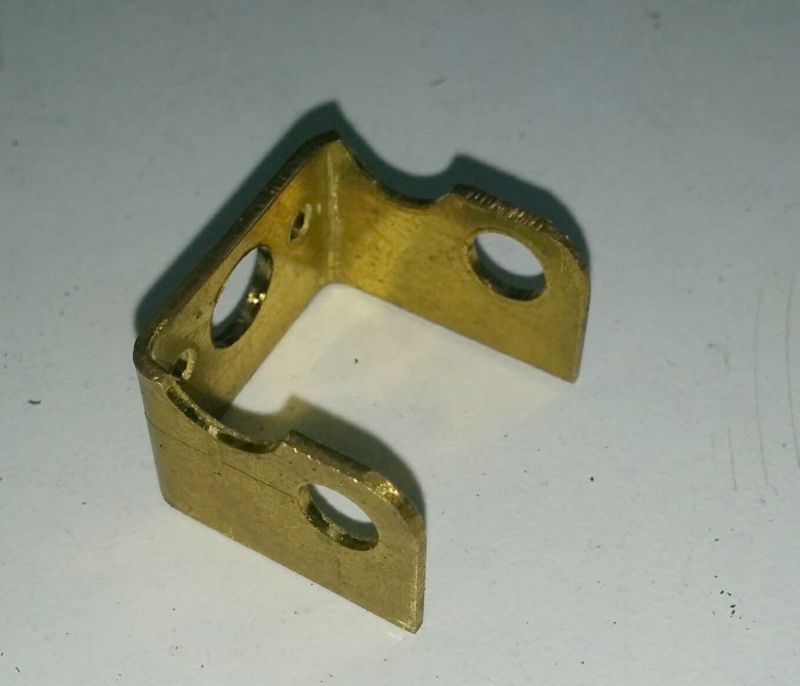
So, that being said, I made up a motor bracket. I make a lot of these for the 1/24 scale retro racing frames I build, so I have the process pretty well nailed by now. I will document that in a separate thread at some point. The bracket is 3/4" wide and the rear axle bearings will fit directly in the bracket's 3/16 holes, no axle tubes on this one.
Image

Image

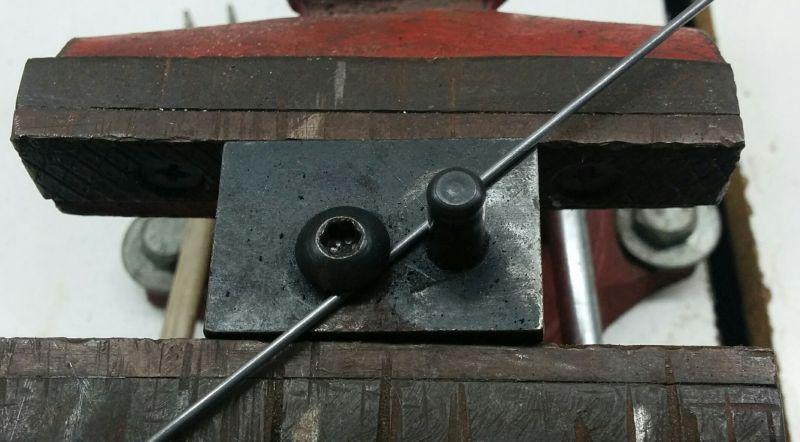
Then I made up a main rail for the frame. I normally use piano wire for this, and in a small car like this, on rubber tires, I settled for a single rail of .055 diameter wire each side. The trick here is to combine the rails with a brace for the motor bracket, by bending the two rails all in one piece. For this I use a simple K&S wire bender, held in a bench vise. I mark a spot on the wire to give the length of one side of the rail, leaving some extra that can be trimmed off later, then clamp the wire in the bender:
Image

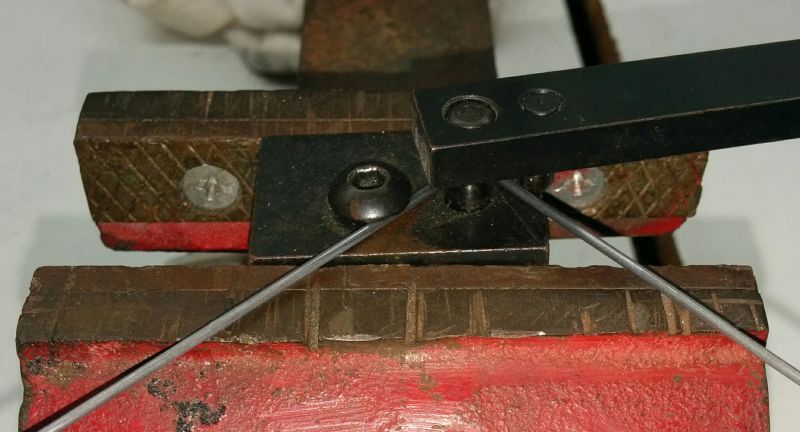
Using the lever of the bender, bend the first 90-degree bend:
Image

This is where things get tricky, to make sure the second bend is where it needs to be to fit around the outside of the bracket. I measure the bracket width:
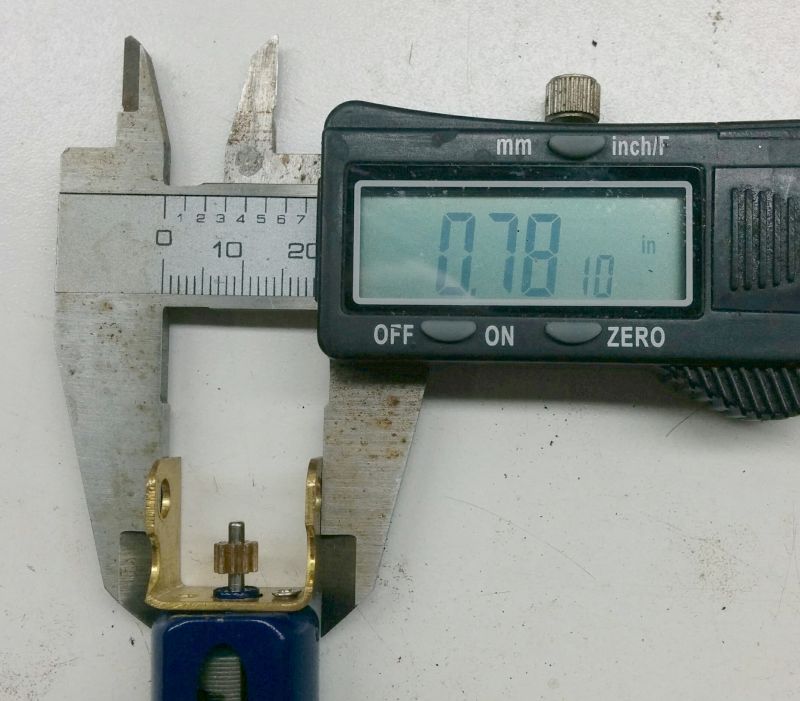
Image

Then, I close down the caliper by half of the wire thickness, to allow for the spring-back of the wire when bending. This setting is then transferred to the wire while it is in the bender and clamped again:
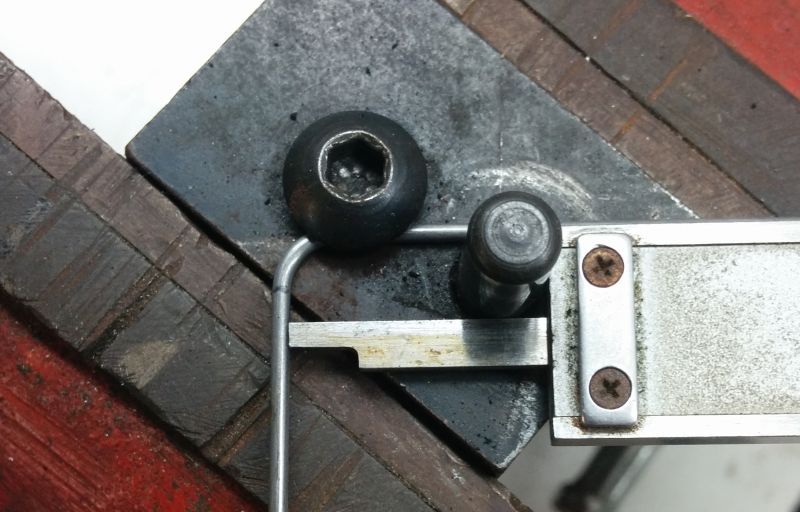
Image

Then I make the second 90-degree bend:
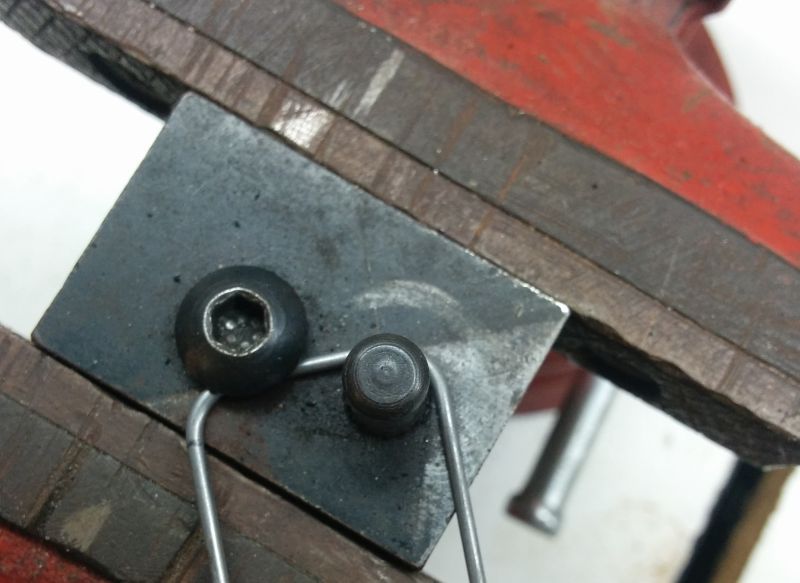
Image

With a little tweaking to get the two legs parallel and flat, and cut to the same length, the final rail looks like this:
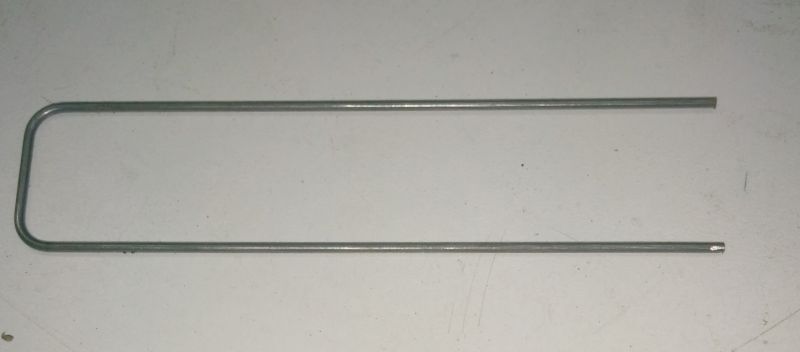
Image

And with a little more tweaking it should fit nicely around the outside of the bracket:
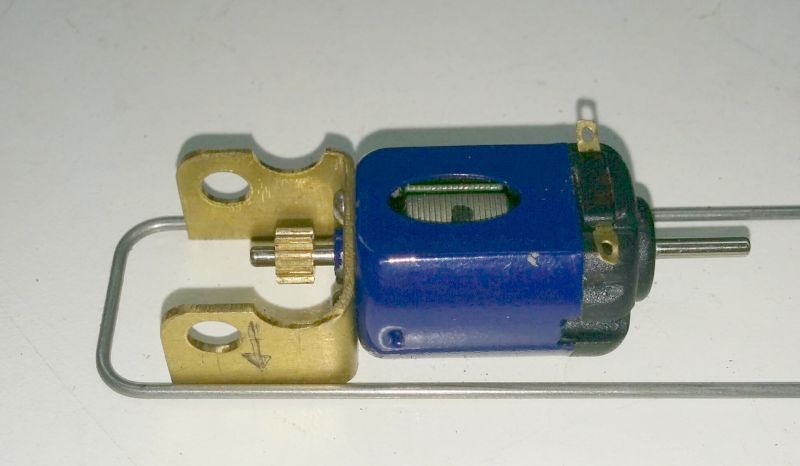
Image

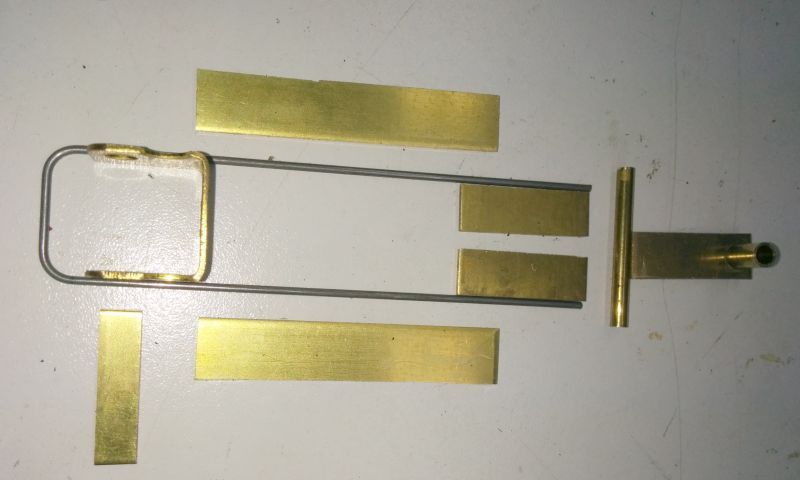
The next step for me was to cut some brass to make pans and the front end. I cut pieces of .062" thick brass and some 3/32" ID tubing, and will do the final cutting and filing as I start the soldering process tonight. Right now, I have all this ready to go:
Image

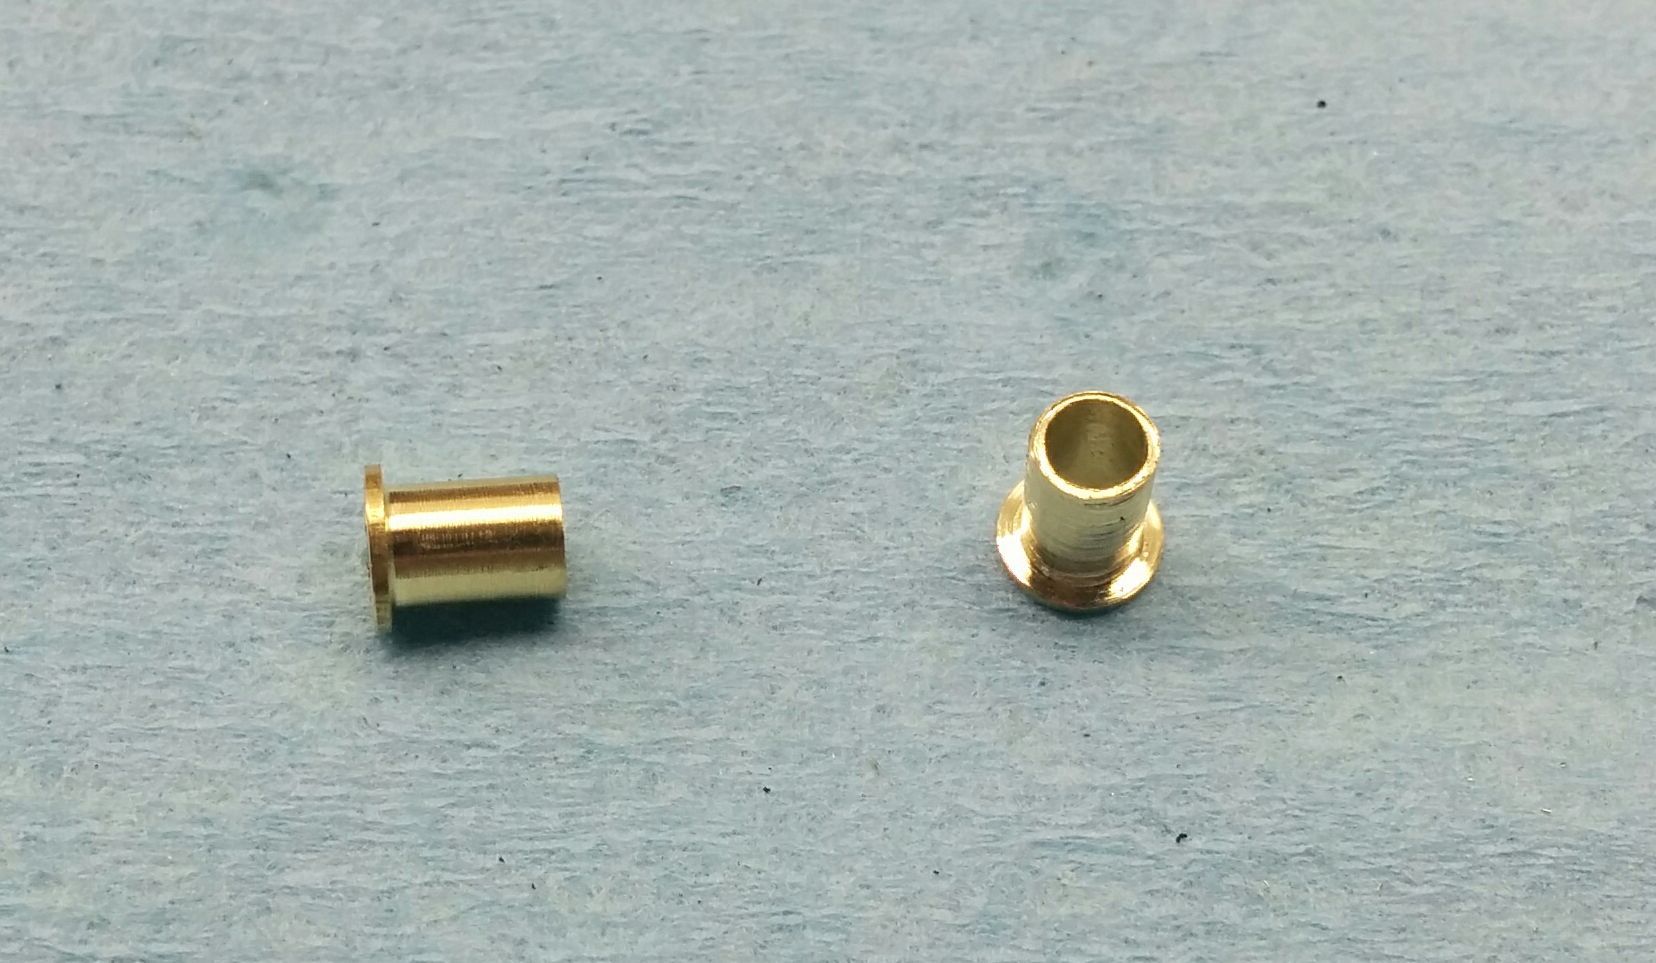
I forgot to take detail photos of the guide mounting system, so more of those tomorrow. I will be using a special guide mounting tube that I plan to have made in quantity and sell to anyone interested:
Image

They will be available with different size holes for the various aftermarket guides that are available, notably the ScaleAuto (2 sizes), Sloting Plus, TSRF, and Slot.it wood guides, and you will be able to specify exactly the size you want when ordering. But more of that in a separate thread.

Onward to the building phase tonight!

Dennis
Last edited by gascarnut on Wed Feb 01, 2017 10:02 am, edited 1 time in total.
User avatar
gascarnut
HRW SlotCar Veteran!
 
Posts: 611
Joined: Thu Sep 06, 2012 6:35 pm
Location: Irvine California

Re: Re-framed Porsche 904 GTS

Postby DaveKennedy » Mon Jan 30, 2017 12:12 pm

I'll be following this build closely!
User avatar
DaveKennedy
Master Shutterbug
 
Posts: 1583
Joined: Tue Sep 04, 2012 6:57 am

Re: Re-framed Porsche 904 GTS

Postby Dogsbody » Mon Jan 30, 2017 1:54 pm

I'll be following too! Dennis does some awesome and competitive (on the track) work. This is the 3rd one he's built for me over the years. It's an AutoArt C-type to run with the local Vintage group ('54 - '65 Le Mans). Motor is a Scaleauto 20K, rims are by Racer, and a Slot it guide.

Image

Image
User avatar
Dogsbody
HRW SlotCar Veteran!
 
Posts: 403
Joined: Sun Jan 12, 2014 10:47 am

Re: Re-framed Porsche 904 GTS

Postby SuperSlab » Mon Jan 30, 2017 2:31 pm

I can only shake my head and marvel at skills and creativity. Genius!
User avatar
SuperSlab
HRW SlotCar Veteran!
 
Posts: 687
Joined: Wed Sep 05, 2012 6:27 pm
Location: Richmond, BC, Canada

Re: Re-framed Porsche 904 GTS

Postby Audi1 » Mon Jan 30, 2017 2:43 pm

Nice how-to! I'll be interested to see how the SC-020 motor does with the narrow 904 GTS chassis. That motor spools up very quickly with the ball bearings and has a considerable amount of torque. Looks good though. The 1/2 wire diameter bend is one very useful trick to know; said the person who usually has to bend 3-4 wire U-frames to get one good one..............!

One of my all-time favorite 1:1 racers!

Allan
User avatar
Audi1
HRW SlotCar Veteran!
 
Posts: 4223
Joined: Fri Nov 01, 2013 7:25 am
Location: Merrimac, MA

Re: Re-framed Porsche 904 GTS

Postby gascarnut » Tue Jan 31, 2017 10:38 am

Well, my first night's work in my hotel room was less productive than I had hoped, as I was late returning from work and a bottle of Newcastle Brown Ale with dinner did not help my enthusiasm much!

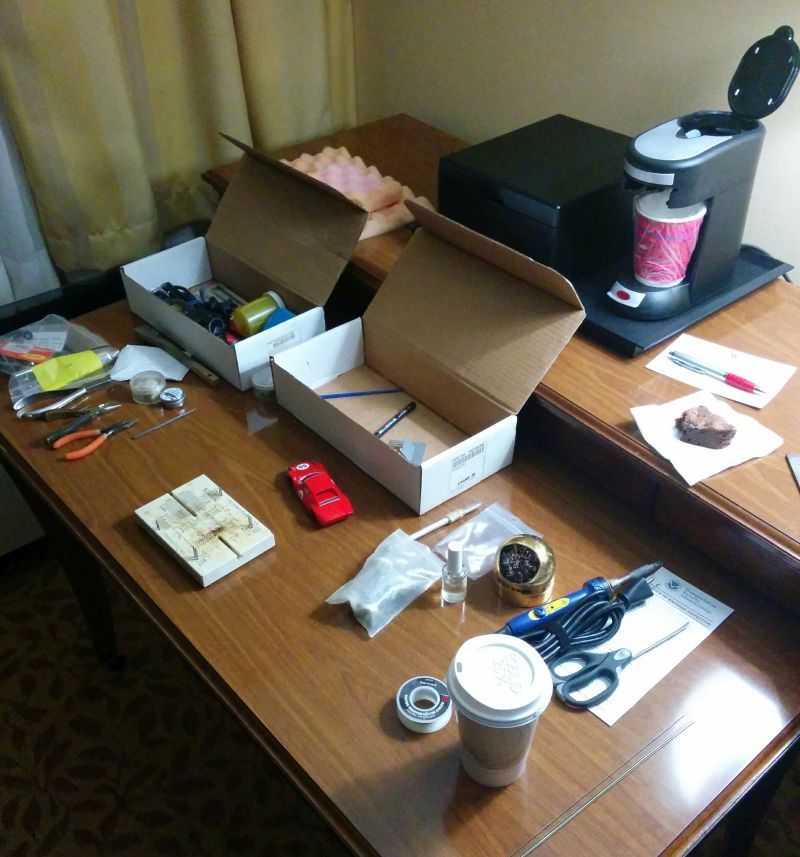
But, I did get some stuff done. Here's the setup:

Image

The two cardboard boxes carry everything and go in my checked bag on the airplane. The TSA sometimes open the bag but generally they let it go. I would think by now they would recognize the stuff, I have been doing this for years through the same airport.

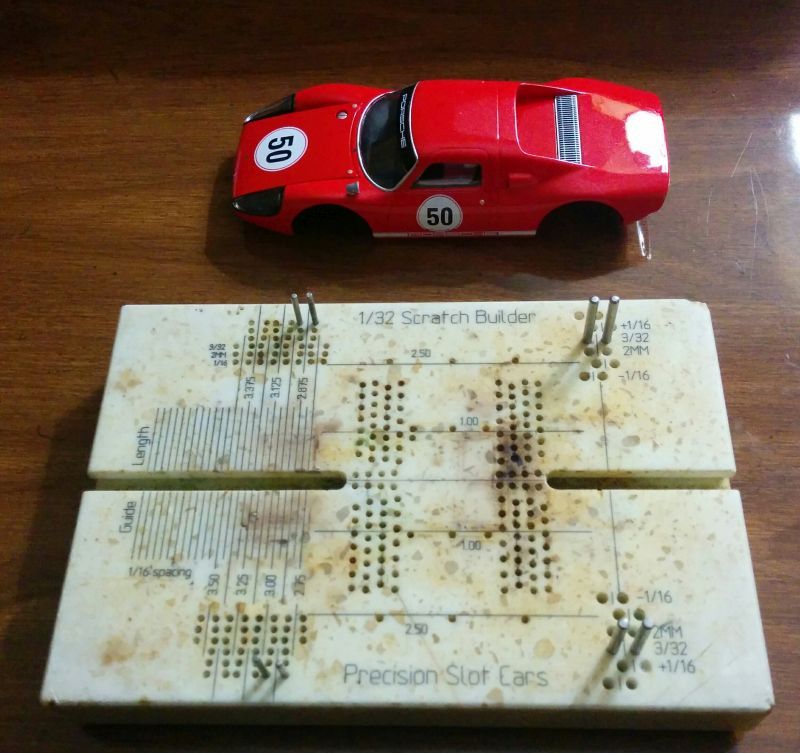
Here's my 1/32 build jig, with the axle pins set to the required wheelbase for the body:

Image

I started to build the frame by first off soldering the bearings into the bracket in such a way that the whole rear end is nice and square. I like to solder bearings in, as that allows me to adjust the holes in the bracket with a file to get perfect alignment. My brackets, being hand-made, are not always exactly right first time. Unfortunately I forgot to take a photo, so will do that tonight before I continue.

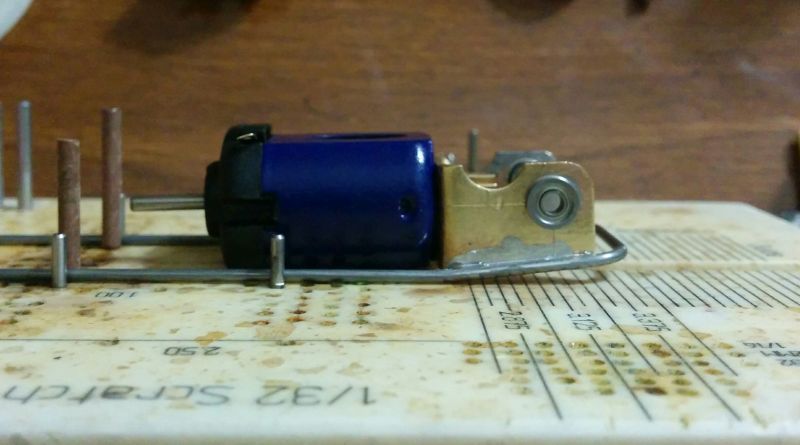
The motor bracket has no hypoid offset, the motor shaft and the axle are on the same plane. This means that when I set everything up with jig wheels that will provide about .040" clearance on the roughly .790" diameter rear tires, the motor will slope down towards the front of the car. To ensure a good solder joint between the main rail and the bracket, I put a slight bend in the main rail before soldering it all together:

Image

And that's about all I got done, other than thoroughly cleaning the acid flux off the solder joints under running water with a steel brush, and then removing the excess solder with my Dremel tool and one of these useful attachments:

Image

More tomorrow...

Dennis
User avatar
gascarnut
HRW SlotCar Veteran!
 
Posts: 611
Joined: Thu Sep 06, 2012 6:35 pm
Location: Irvine California

Re: Re-framed Porsche 904 GTS

Postby gascarnut » Wed Feb 01, 2017 8:32 am

Last night was a bit more productive!

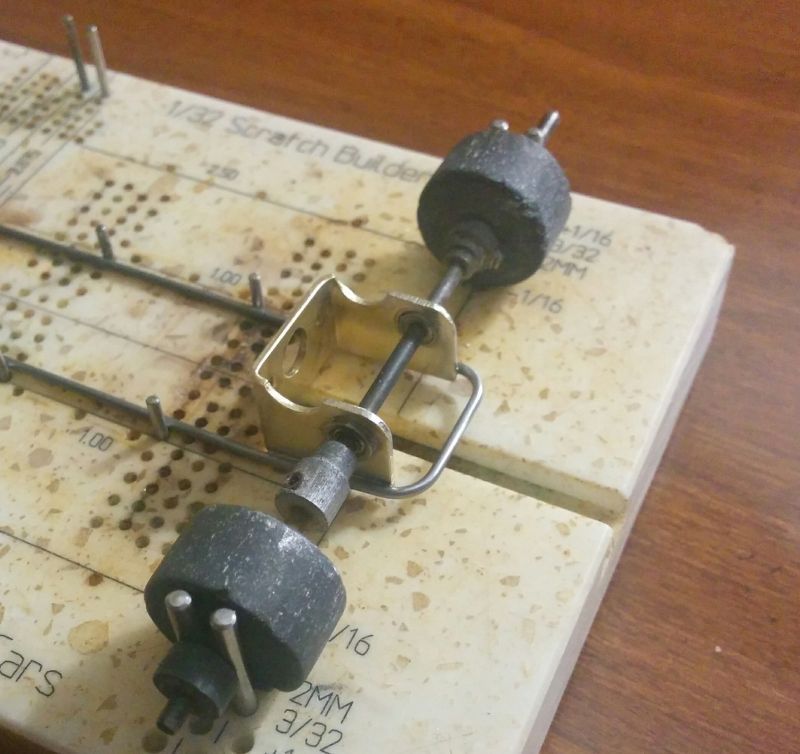
Here's the photo of the installation of the rear bearings in the motor bracket:

Image

The jig wheels are .710" diameter, which will give .040" clearance when used with .790" rear tires. When I soldered the bearings in, I had a motor screwed into the bracket and the whole bracket/motor assembly held nice and square and centered in the jig. A little acid flux applied around the bearing OD will flow into the whole joint space. Hold a clean soldering iron tip to the joint and heat it all up until the flux starts to boil, then apply a small amount of solder right at the interface between the bearing and the bracket on the inside of the bracket. Hold the iron on the joint long enough to allow the solder to flow all the way around the bearing. Once both bearings are in place, wash the whole assembly under running water to get rid of excess acid and blow it dry. The bearings have grease in them, so you should not get much if any acid or water inside, but it pays to wash it well and add some light oil to the bearings.

Onward to the front end of the frame. I got so involved in bending and filing and soldering I forgot to take photos during the process, but here's the final result:

Image

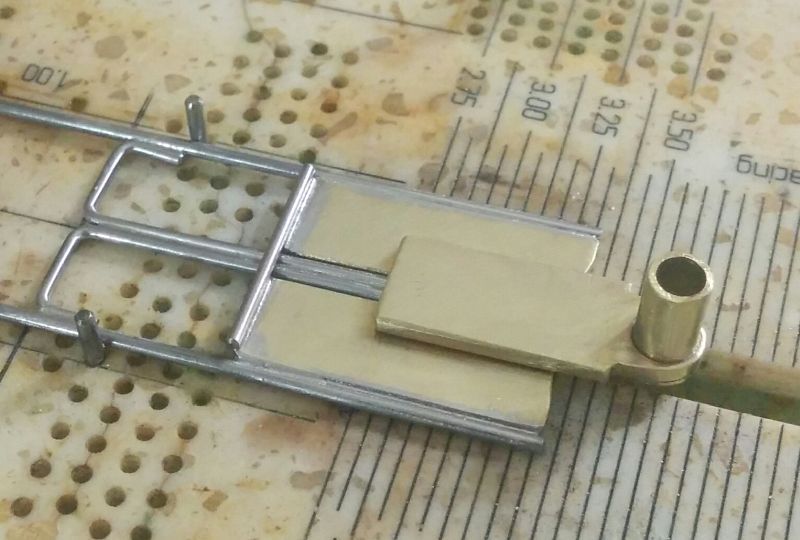
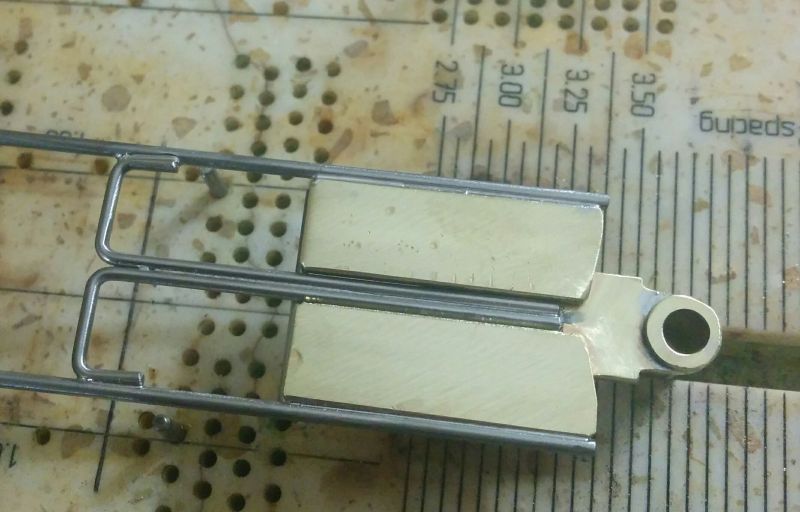
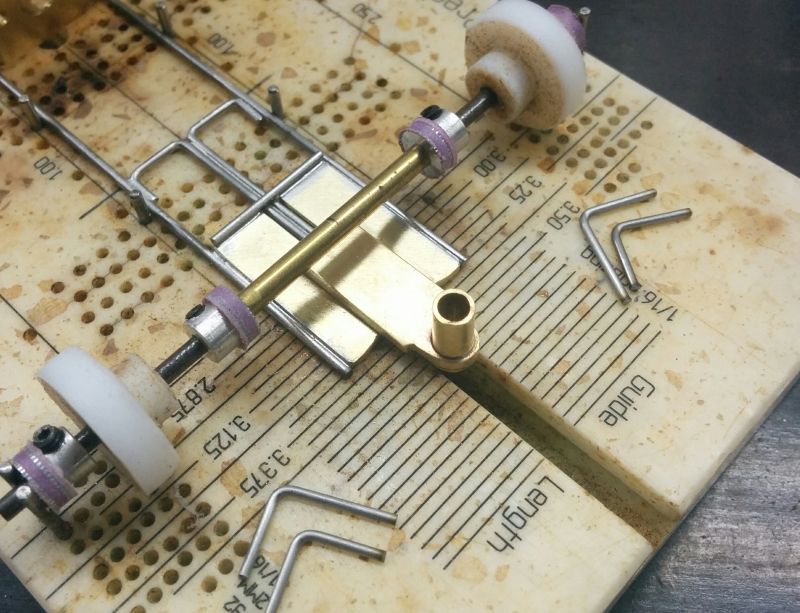
I have been using this design for a while now, with good results. The guide tube and the piece of brass it is soldered to are soldered on top of two pieces of .047" diameter piano wire that have bends in them to fit in between the main rails at the rear, just in front of the motor. You can see my Sharpie mark on the jig that shows where the wires have to be soldered. I make up the wire assembly first, two pieces with two bends each soldered together all the way down the long length. Then this is soldered to the underside of the guide plate.

Once that is done, I solder in the two .062" thick plates that will limit the side-to-side movement of the guide mount, then solder the whole guide mount system onto the main rails. The main rails and front plates are joined by short length of .047 wire across the top, note that this is not soldered to the guide wires. From underneath it looks like this:

Image

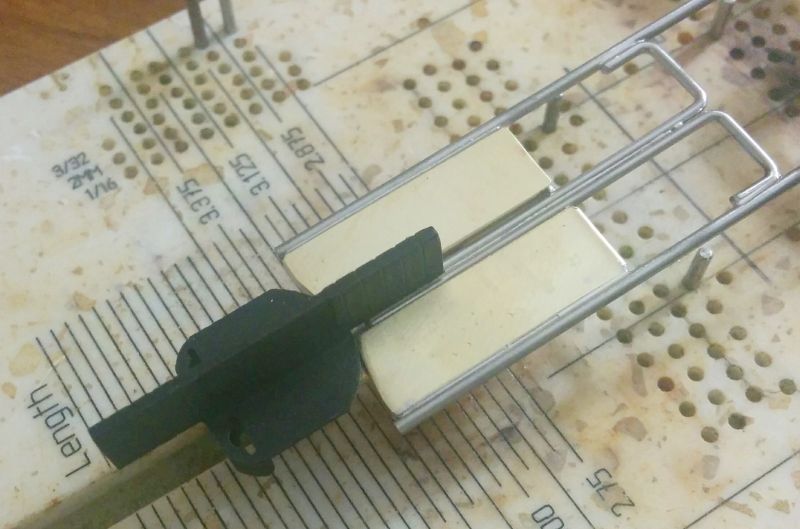
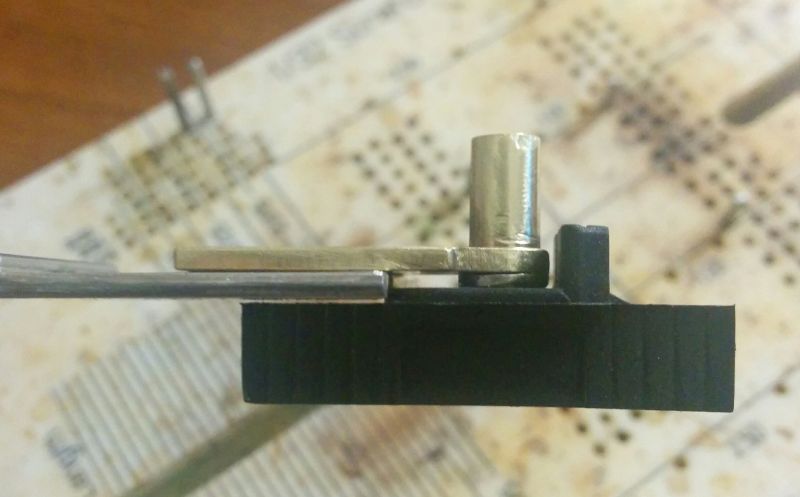
Once this is done, I check that the guide has clearance and free movement:

Image

Image

Tonight the rear end of the guide wires will be reinforced and I will start working on the side pans for the frame. I will try to remember to take more photos!

Dennis
Last edited by gascarnut on Wed Feb 01, 2017 10:06 am, edited 1 time in total.
User avatar
gascarnut
HRW SlotCar Veteran!
 
Posts: 611
Joined: Thu Sep 06, 2012 6:35 pm
Location: Irvine California

Re: Re-framed Porsche 904 GTS

Postby Audi1 » Wed Feb 01, 2017 2:31 pm

Looks good. What's the benefit to the side-to-side movement of the guide mount?

Allan
User avatar
Audi1
HRW SlotCar Veteran!
 
Posts: 4223
Joined: Fri Nov 01, 2013 7:25 am
Location: Merrimac, MA

Re: Re-framed Porsche 904 GTS

Postby gascarnut » Wed Feb 01, 2017 3:20 pm

The idea is that it absorbs some of the shock of the guide hitting the edge of the slot as the car enters a turn, and that this in turn slows down the break-away of the rear wheels.

At least, that is what Brian Saunders told me about this feature in the spring steel frame of his that I used in my entry for the NA Group 5 proxy.
User avatar
gascarnut
HRW SlotCar Veteran!
 
Posts: 611
Joined: Thu Sep 06, 2012 6:35 pm
Location: Irvine California

Re: Re-framed Porsche 904 GTS

Postby Audi1 » Wed Feb 01, 2017 5:25 pm

User avatar
Audi1
HRW SlotCar Veteran!
 
Posts: 4223
Joined: Fri Nov 01, 2013 7:25 am
Location: Merrimac, MA

Re: Re-framed Porsche 904 GTS

Postby gascarnut » Thu Feb 02, 2017 7:43 am

Well, no more last night, I apologize. Work got in the way in a sense - a team dinner in a nice Italian restaurant is classed as "work", right? I got back to the hotel too late and too full of quite good Chianti to reasonably attempt any further building.

Tonight I fly home, so the next chance for progress will be Friday afternoon.

Expect some updates over the weekend, I am going to try to finish this build before I leave again Sunday.

Dennis
User avatar
gascarnut
HRW SlotCar Veteran!
 
Posts: 611
Joined: Thu Sep 06, 2012 6:35 pm
Location: Irvine California

Re: Re-framed Porsche 904 GTS

Postby gascarnut » Sun Feb 05, 2017 5:37 pm

So, here we go again. It's Sunday evening, and while you are all settling down to watch the SuperBowl, I am in O'Hare airport on my way back to Albany NY for another week of work!

BUT, I did manage to finish Tony's little Porsche, so while I wait for a flight, here's the update.

Previously on this thread we had done most of the rear of the car, so the next job was to get the front axle set up done. I decided to give this car a simple independently rotating wheel system, by using an axle tube instead of soldering the axle directly to the rest of the frame as I often do on my own cars. With the tube, one wheel is attached to the axle, the other is loose on the axle, retained by a soldered-on washer.

Here are the parts:

Image

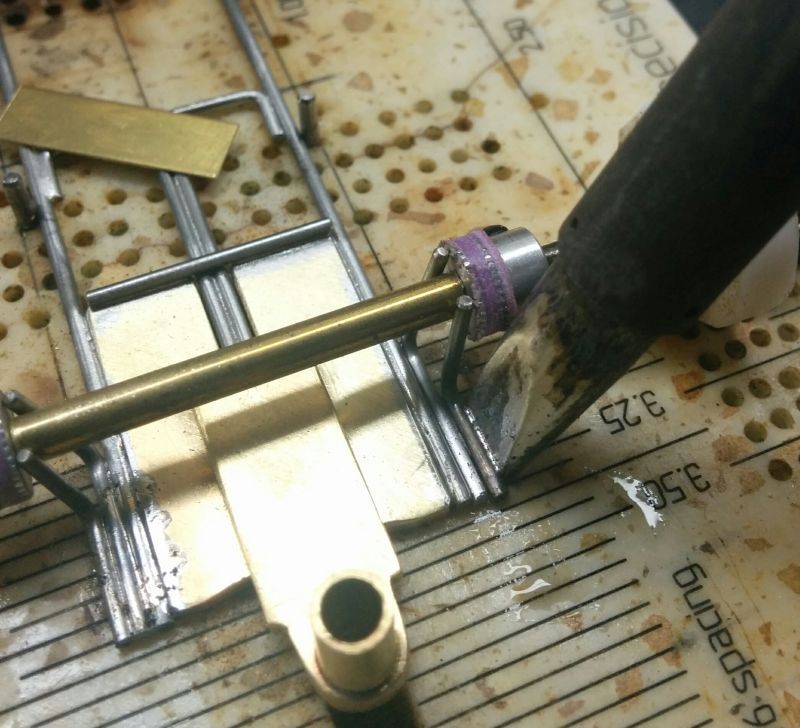
The tube was cut so that the wheels will fit under the body, and then it is set up with jig wheels to provide .040 clearance under the front with the .740" tires that were provided. The wire mounts are bent from .047 wire. The tube is centered over the frame and held in place by some collars made from old 1/24 gears that have been turned down. (I never throw anything away!) Positioning the wire mounts is a little tricky, but lots of acid flux helps to keep things in place. Heat up the wire and apply solder:

Image

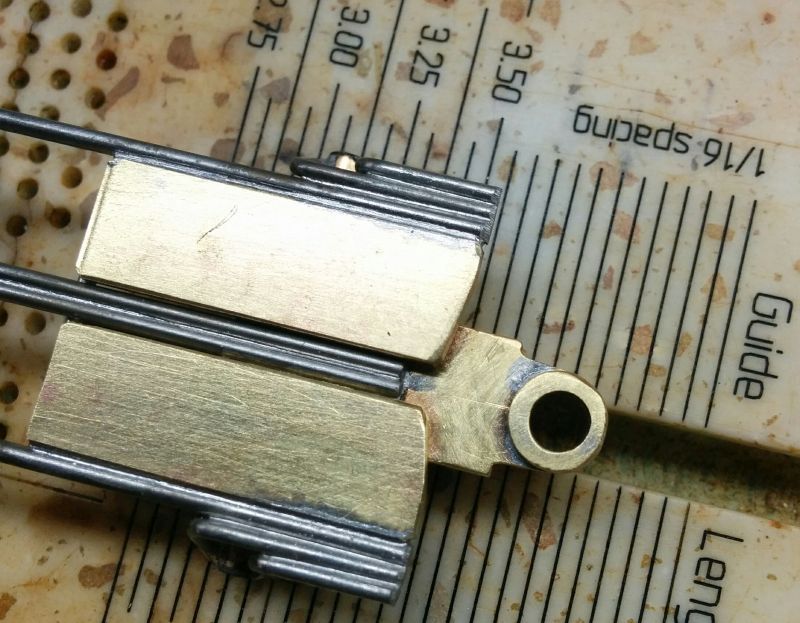
While I was busy with the iron, I also soldered on a brace over the joints for the guide mounting wires. It's a length of .015 brass strip 1/4" wide.

Image

This is what the front axle mounts look like from underneath, with the wire all nicely trimmed to length.

Image

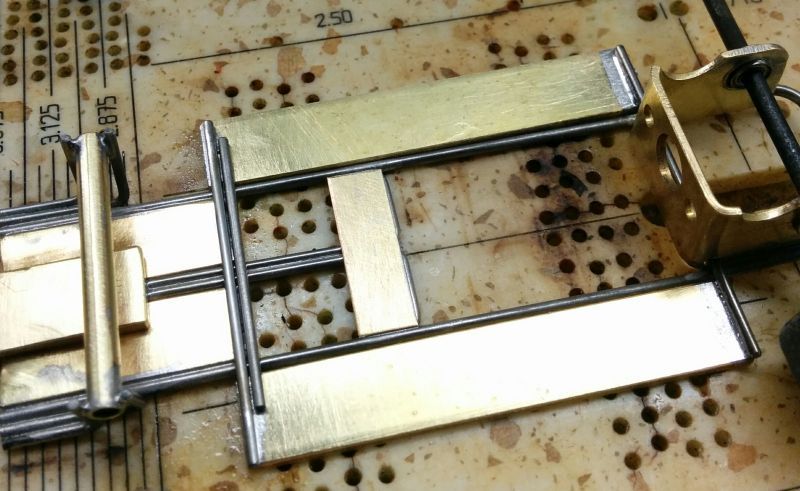
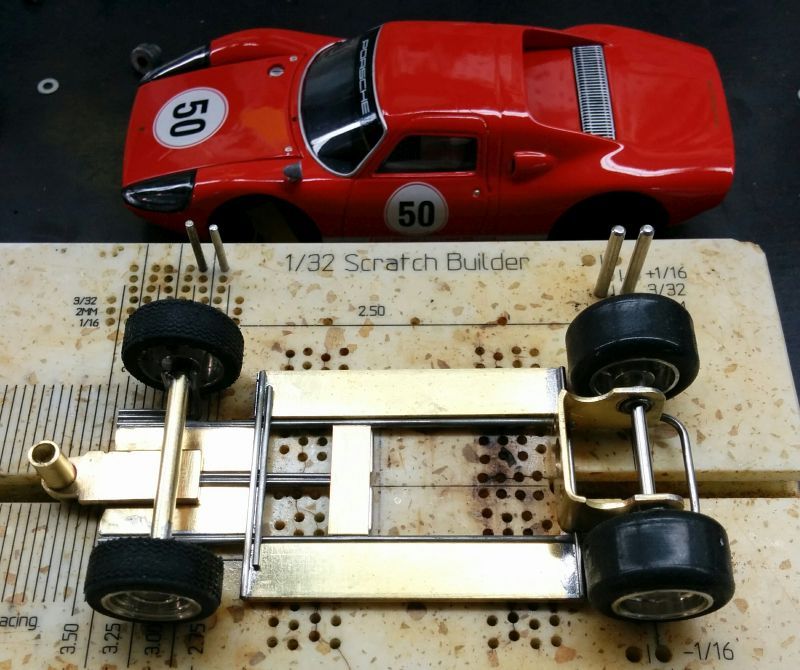
Next up - the side pans. In my designs, the body is always mounted to the pans, so the pans need some movement relative to the rest of the frame. The simplest way is to engineer a little "rattle" into the design. Here's the overall view:

Image

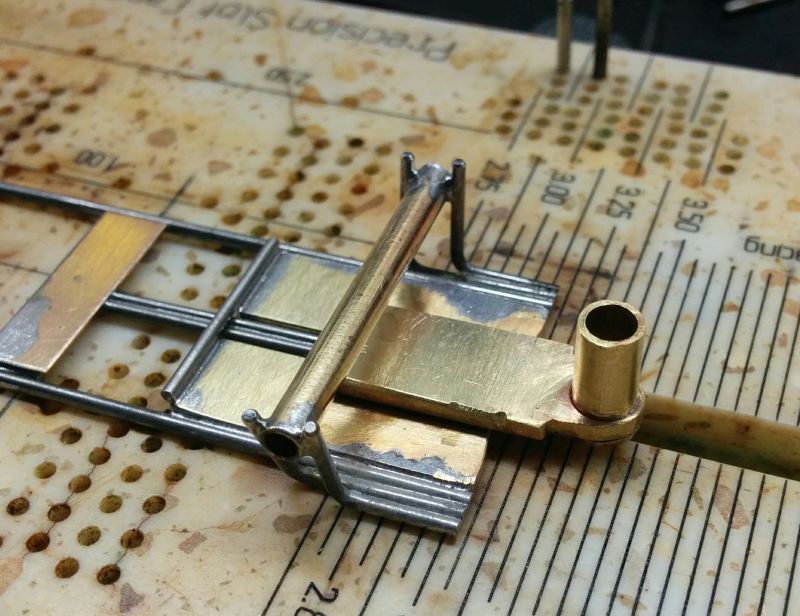
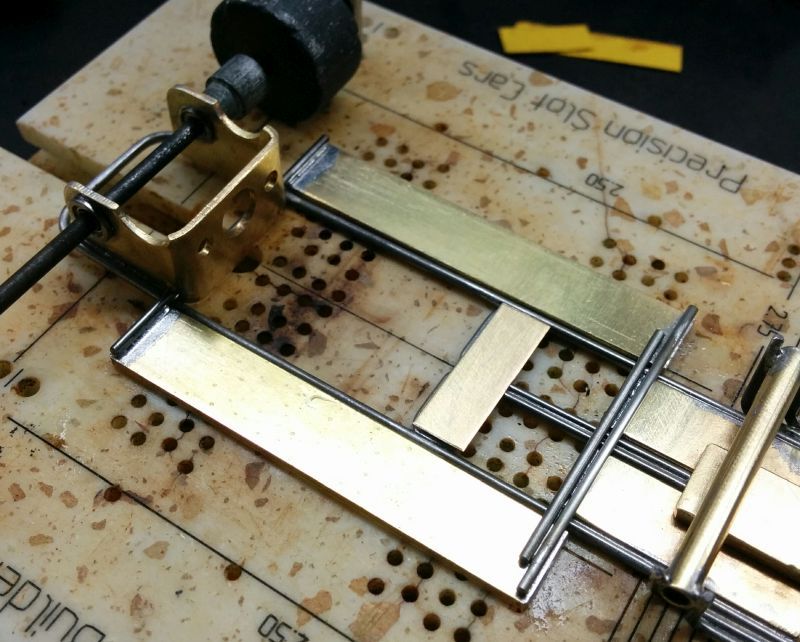
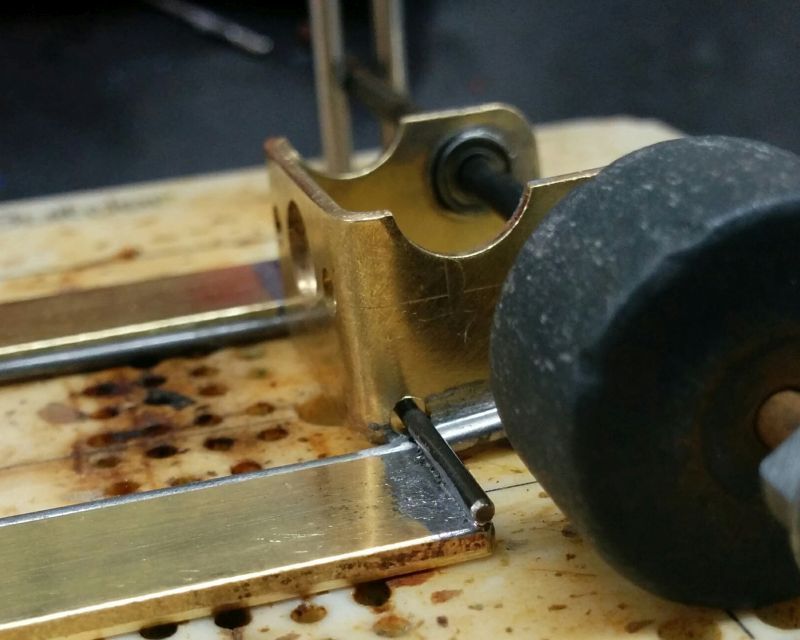
You will see that I changed out the short piece of wire across the rear of the front pans for a longer piece that proitrudes over the inner edges of the pans, This provides an "up stop" for the pan movement. Then there's a longer length of the same .047 wire that joins the pans and is spaced a little ahead of the up stop wire so there will be a bit of fore-and-aft movement. The majority of the pan movement will be at the rear:

Image

I drilled a 5/64" hole through both sides of the bracket right above the main rail. The rear wire is also .047 and joins the pans through these holes, so there's about .030 of lift at the rear of the pan. Here's another look:

Image

More in the next post!
Last edited by gascarnut on Mon Feb 06, 2017 9:14 am, edited 1 time in total.
User avatar
gascarnut
HRW SlotCar Veteran!
 
Posts: 611
Joined: Thu Sep 06, 2012 6:35 pm
Location: Irvine California

Re: Re-framed Porsche 904 GTS

Postby gascarnut » Sun Feb 05, 2017 6:01 pm

The "next post" got lost when the free Wi-Fi in the airport died on my laptop, so I will have to rewrite it later...
User avatar
gascarnut
HRW SlotCar Veteran!
 
Posts: 611
Joined: Thu Sep 06, 2012 6:35 pm
Location: Irvine California

Re: Re-framed Porsche 904 GTS

Postby Radarek » Sun Feb 05, 2017 9:32 pm

Dennis
That is a awesome tutorial. For sure I will use all of those good advices to build my first one brass chassis. can't wait to see more.
Thx.
Radarek
Radarek
HRW SlotCar Veteran!
 
Posts: 458
Joined: Sat Sep 10, 2016 6:00 pm

Re: Re-framed Porsche 904 GTS

Postby gascarnut » Mon Feb 06, 2017 7:42 am

OK, where were we?

About here:

Image

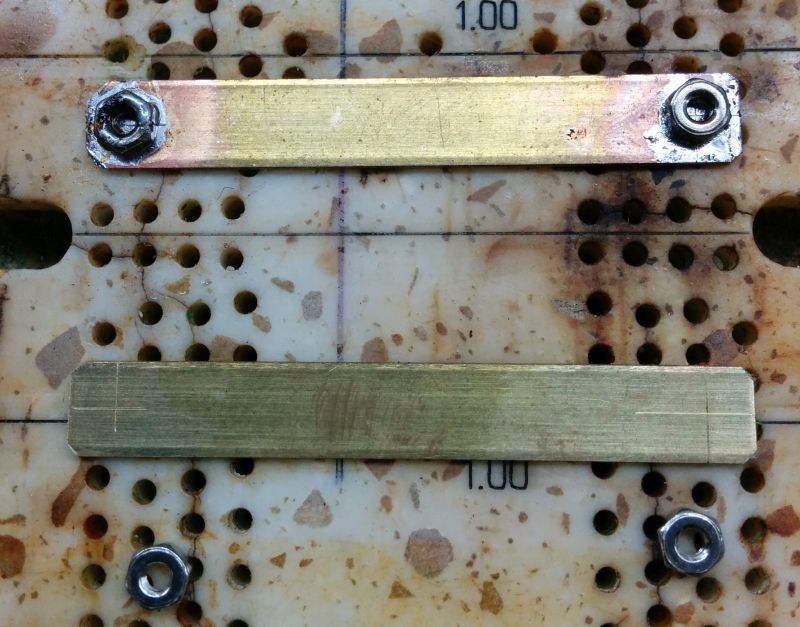
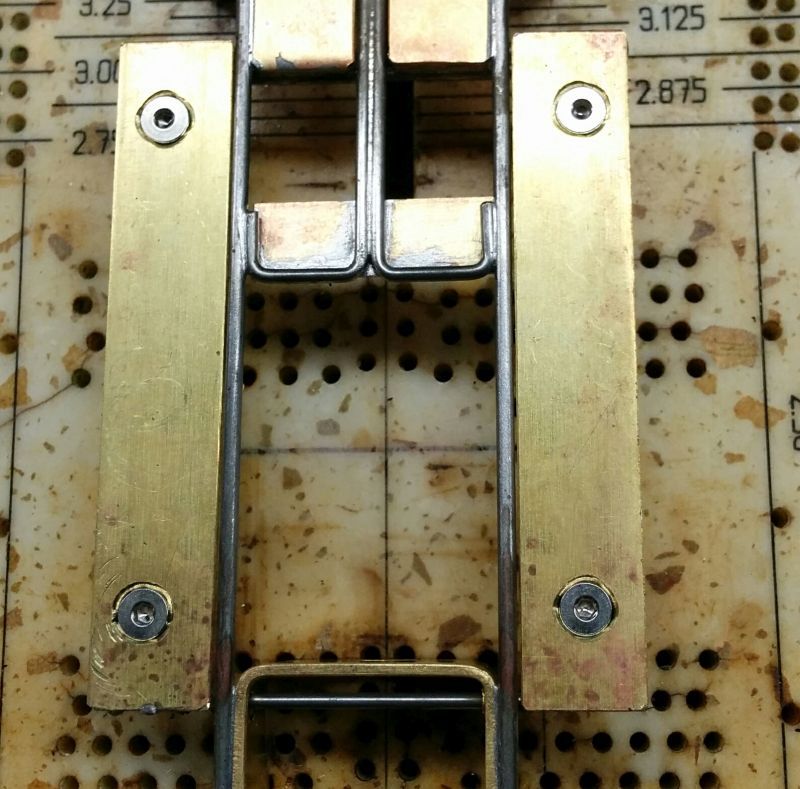
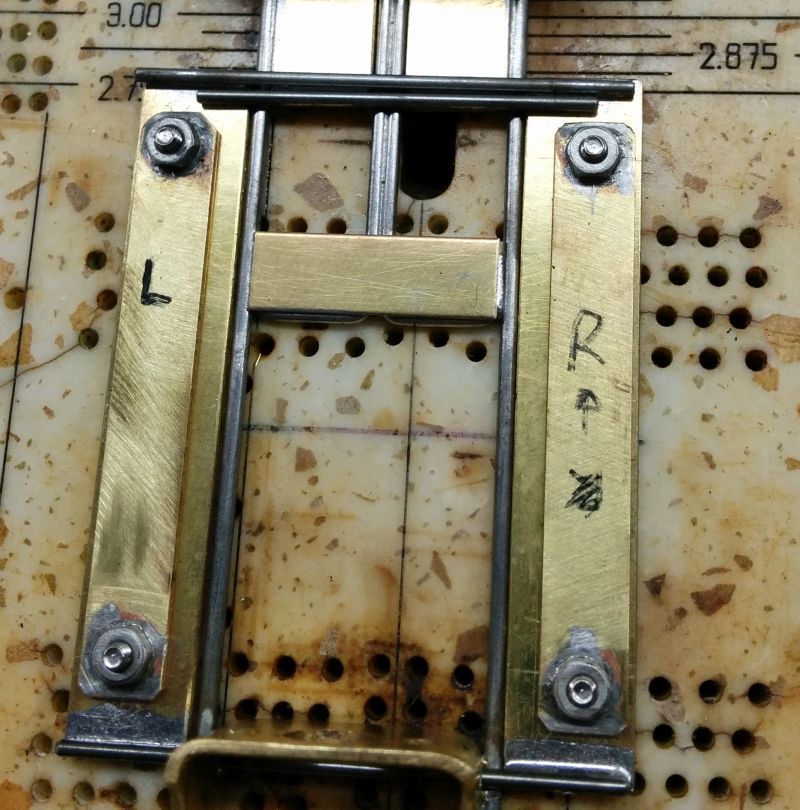
We have a completed frame, now the next thing is to attach the body. On pretty much all my cars, I fix the sides of the body to the frame, so this is one way to do it. I made up two little plates from .032 x 1/4" brass strip, marked for position of the M2 nuts I like to use. You can use #2-56 instead if they are easier to find, but anything else is going to be a bit too big:

Image

Once the nuts are soldered in position, I drill through the nut into the brass using the right size tapping drill for the thread of the nut, then run a tap through it to clean out any solder in the threads and to cut the thread into the brass.

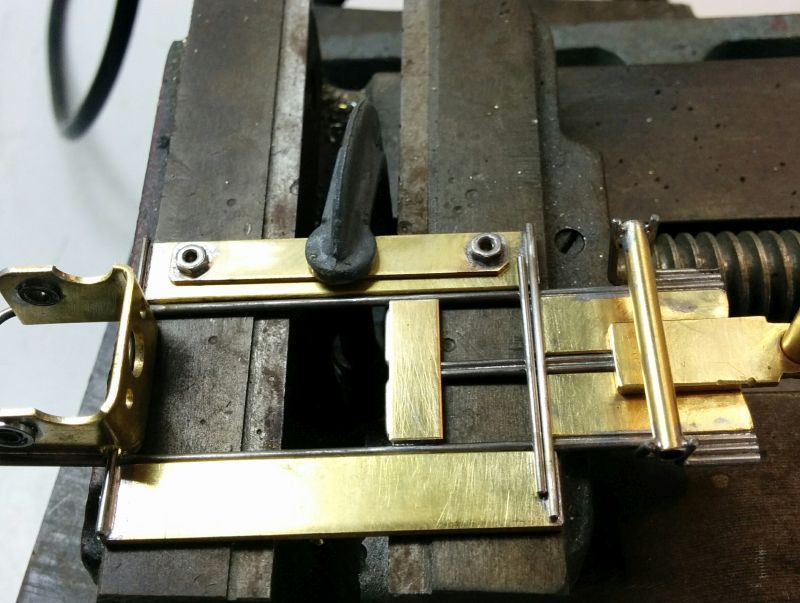
Then I clamp one strip to a side pan, about 1/32" in from the edge of the pan. This is because the pans are sized so the body sits on top of the outer edge of the pan.

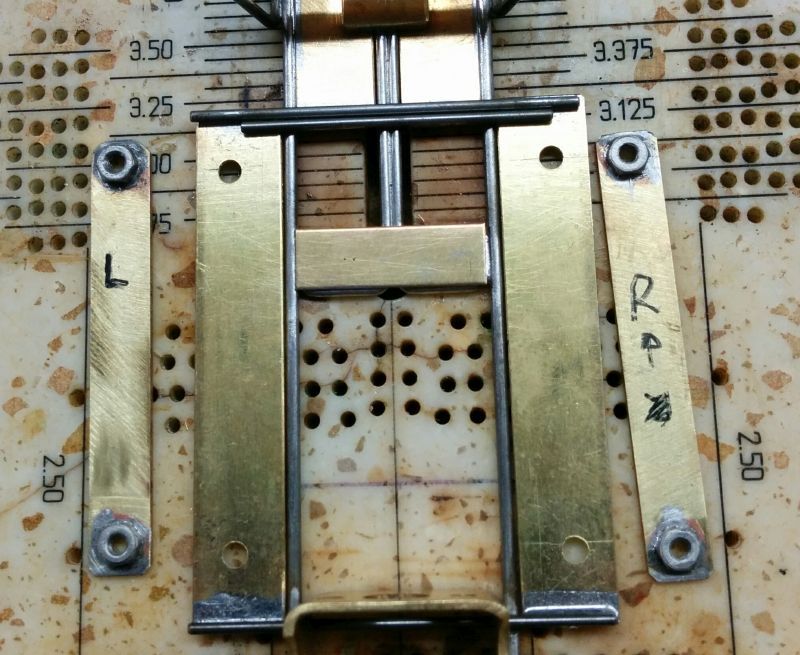
Image

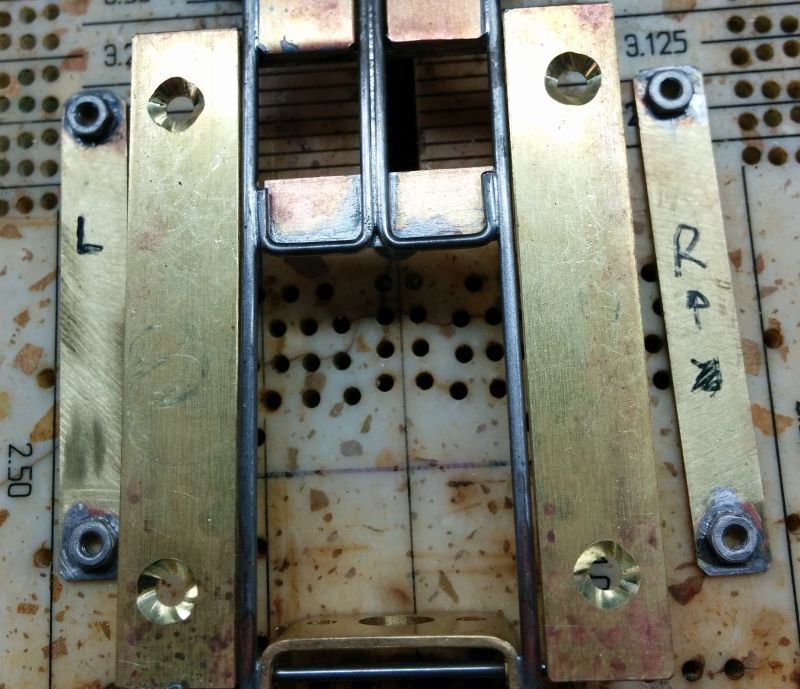
Then with the same drill, I just spot a mark on the pan where each nut is, and repeat on the other side. Once that's done, I change the drill to a 3/32" and drill through the pan so there will be clearance on the screw. Then from the underside, I countersink the hole.

Image

Image

Once this is done, fit the strips to the pans to check that everything lines up OK:

Image

Image

Time to save this and start a new post!
Last edited by gascarnut on Mon Feb 06, 2017 12:11 pm, edited 3 times in total.
User avatar
gascarnut
HRW SlotCar Veteran!
 
Posts: 611
Joined: Thu Sep 06, 2012 6:35 pm
Location: Irvine California

Next

Return to HRW All Scales Build-OFF!


Who is online

Users browsing this forum: No registered users and 2 guests

cron