This looks interesting! keep it coming.
Bob
132 Gift Card Chassis/ Porsche 911
Forum rules
Open to ALL SCALES!
1. Pictures of your starting materials. Choice of body, Chassis type and material (brass, plastic etc.)
2. Pictures of the tools you will be using, and any alternative ways to do the same thing. for example, tubing bender versus bent around a screwdriver handle. etc.
3. List where parts come from, or where they can be purchased from, or if they are homemade.
4. As many pictures of the build during the whole process as you can.
27 posts
• Page 1 of 2 • 1, 2
132 Gift Card Chassis/ Porsche 911
![]() by BARC 1 » Mon Jan 02, 2017 1:38 pm
by BARC 1 » Mon Jan 02, 2017 1:38 pm
Last edited by BARC 1 on Thu Jan 05, 2017 10:10 am, edited 1 time in total.
-

BARC 1 - HRW SlotCar Veteran!
- Posts: 2040
- Joined: Wed Dec 23, 2015 6:03 pm
- Location: NW Alberta
Re: 132 Gift Card Chassis/ Porsche 911
![]() by btaylor » Mon Jan 02, 2017 1:43 pm
by btaylor » Mon Jan 02, 2017 1:43 pm
-

btaylor - Uncle Bob
- Posts: 4519
- Joined: Mon Mar 24, 2014 3:50 am
Re: 132 Gift Card Chassis/ Porsche 911
![]() by BARC 1 » Tue Jan 03, 2017 12:02 pm
by BARC 1 » Tue Jan 03, 2017 12:02 pm
Work continues.
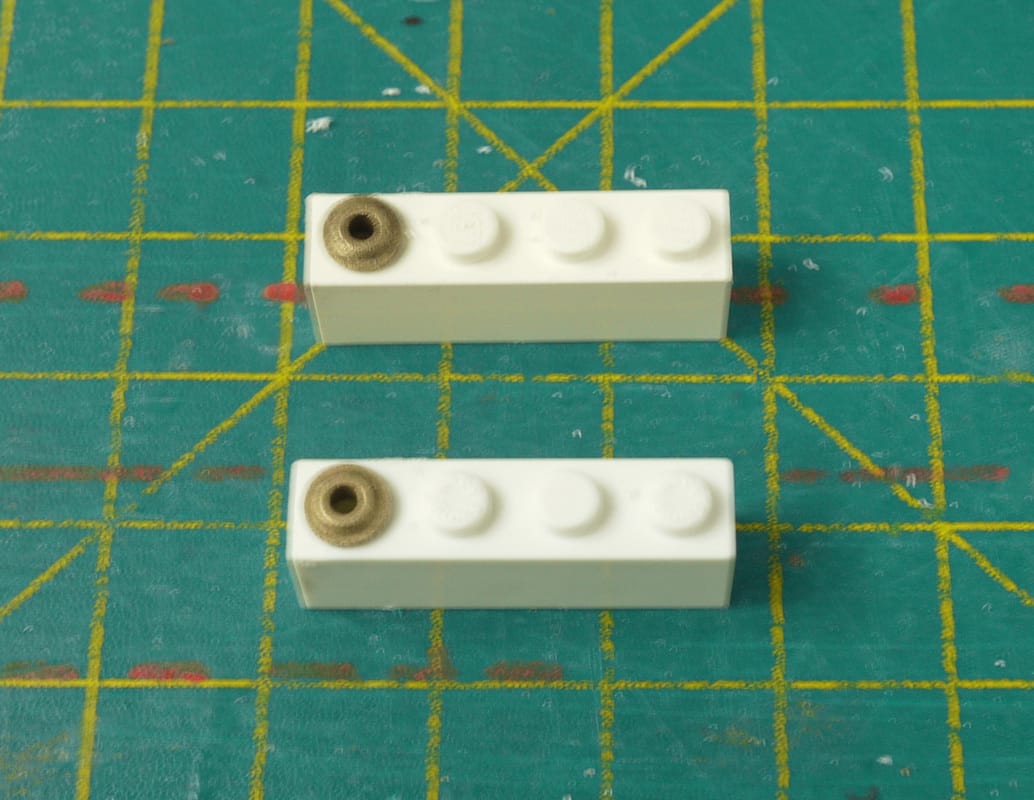
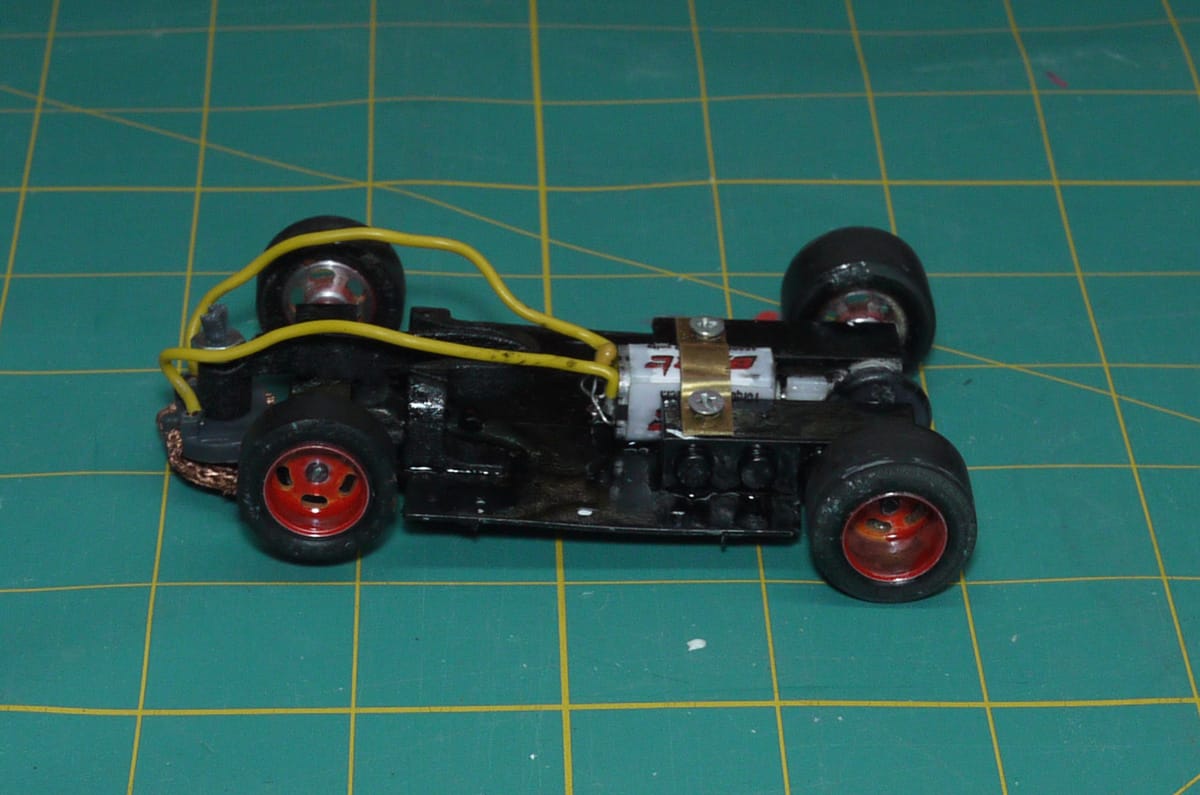
The 1X 4 lego pieces are used as rear struts. I slice the nubbin off of one end with an Exacto knife, and this leaves a nice pilot hole. This is then reamed out to 3/16". A bushing is then press fit into the reamed opening
Front 1X1 axles blocks are utilized the same way. The nubbing is removed leaving a proper 3/32 axle hole through it. I then take a nylon bushing and cut it in half with an Exacto knife resulting in 2 flanged nylon bushings. Believe it or not these press fit into the open square end of the 1X1 lego block.
Once the blocks have been prepared it is time to measure of up the Gift card and cut it to size to fit the slot car body.
First cut out the front wheel openings
Glue in the front Lego bearing blocks.
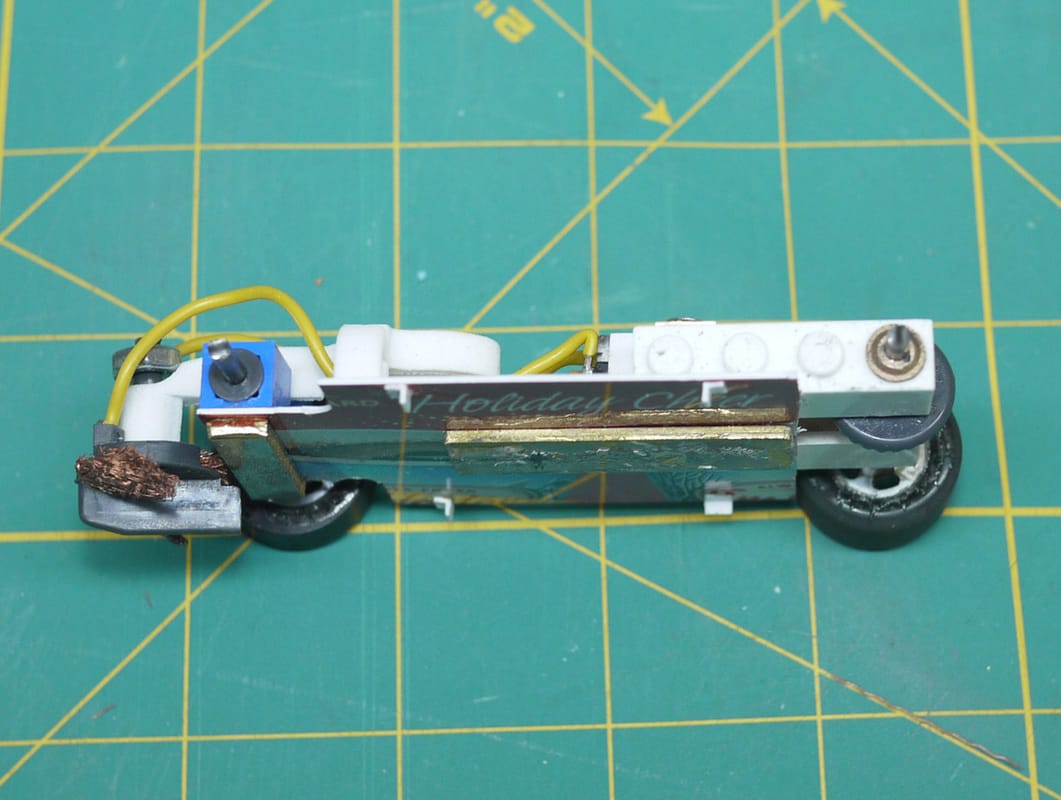
Once the front axle is positioned, measure out the distance required to the rear axle. The card can be cut straight across as the rear struts will be positioned to provide the clearance for the crown gear and proper wheelbase required for the body. I also use the rear struts to cradle the motor tightly so they are spaced accordingly. Of course you have to pay attention to the rear axle width required as well, but on this particular car everything worked out well. The rear struts were then glued into position.
I then added the new flex guide arm. This was test fit with the body to ensure there was no interference. Once this was confirmed the guide arm module was glued to the chassis.
Pioneer guide was fitted, braids installed and wired up to the motor.
Wheels were added, and the body test fit to ensure there is no wheel interference.
Once this was done the chassis was then taken to the track for testing. The track testing indicated that more weight was required so a Brass strip was cut to size and added by centering it in the middle of the chassis. The front end also required some addtional weight as the guide arm structure has some vertical flex as well as horizontal, and it just ran better with a front weight added underneath and in line with the front axle. The brass weights are all added temporarily using a drop of CA. Once the laptimes confirm improvement, then the weights will be fastened permanently using micro hardware.
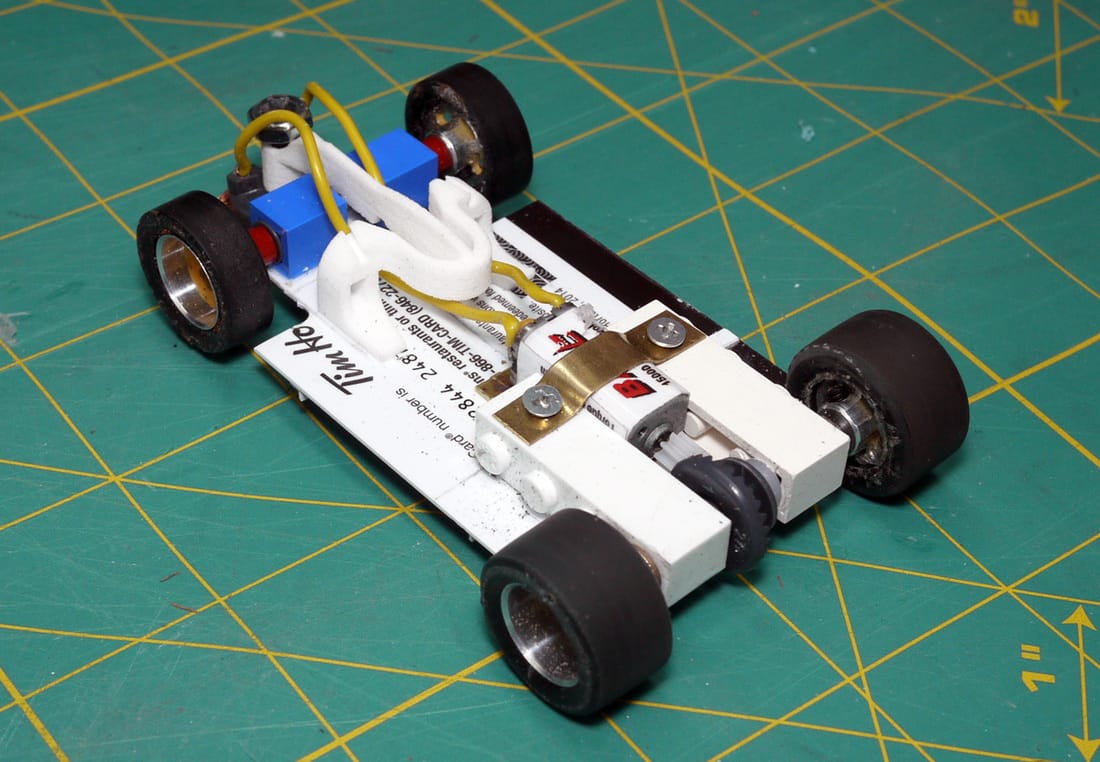
This is my first time using the flex guide arm. Currently the front axle blocks limit the lateral movement of the flex arm so I am not getting the full effect. The cornering is different, and it tends to be softer going into the corners and you don't get the normal pivoting like on a standard guide. I am going to cut back the front bearing blocks to give the arm more travel, and get the full effect of this flexible guide arm. I think I am going to like it
The 1X 4 lego pieces are used as rear struts. I slice the nubbin off of one end with an Exacto knife, and this leaves a nice pilot hole. This is then reamed out to 3/16". A bushing is then press fit into the reamed opening
Front 1X1 axles blocks are utilized the same way. The nubbing is removed leaving a proper 3/32 axle hole through it. I then take a nylon bushing and cut it in half with an Exacto knife resulting in 2 flanged nylon bushings. Believe it or not these press fit into the open square end of the 1X1 lego block.
Once the blocks have been prepared it is time to measure of up the Gift card and cut it to size to fit the slot car body.
First cut out the front wheel openings
Glue in the front Lego bearing blocks.
Once the front axle is positioned, measure out the distance required to the rear axle. The card can be cut straight across as the rear struts will be positioned to provide the clearance for the crown gear and proper wheelbase required for the body. I also use the rear struts to cradle the motor tightly so they are spaced accordingly. Of course you have to pay attention to the rear axle width required as well, but on this particular car everything worked out well. The rear struts were then glued into position.
I then added the new flex guide arm. This was test fit with the body to ensure there was no interference. Once this was confirmed the guide arm module was glued to the chassis.
Pioneer guide was fitted, braids installed and wired up to the motor.
Wheels were added, and the body test fit to ensure there is no wheel interference.
Once this was done the chassis was then taken to the track for testing. The track testing indicated that more weight was required so a Brass strip was cut to size and added by centering it in the middle of the chassis. The front end also required some addtional weight as the guide arm structure has some vertical flex as well as horizontal, and it just ran better with a front weight added underneath and in line with the front axle. The brass weights are all added temporarily using a drop of CA. Once the laptimes confirm improvement, then the weights will be fastened permanently using micro hardware.
This is my first time using the flex guide arm. Currently the front axle blocks limit the lateral movement of the flex arm so I am not getting the full effect. The cornering is different, and it tends to be softer going into the corners and you don't get the normal pivoting like on a standard guide. I am going to cut back the front bearing blocks to give the arm more travel, and get the full effect of this flexible guide arm. I think I am going to like it
Last edited by BARC 1 on Thu Jan 05, 2017 9:46 am, edited 1 time in total.
-
BARC 1 - HRW SlotCar Veteran!
- Posts: 2040
- Joined: Wed Dec 23, 2015 6:03 pm
- Location: NW Alberta
Re: 132 Gift Card Chassis/ Porsche 911
![]() by btaylor » Tue Jan 03, 2017 12:15 pm
by btaylor » Tue Jan 03, 2017 12:15 pm
I like it! That makes for a tidy package when assembled. should be a sharp looking and running car.
Bob
Bob
-
btaylor - Uncle Bob
- Posts: 4519
- Joined: Mon Mar 24, 2014 3:50 am
Re: 132 Gift Card Chassis/ Porsche 911
![]() by BARC 1 » Tue Jan 03, 2017 12:32 pm
by BARC 1 » Tue Jan 03, 2017 12:32 pm
Thanks Bob
Here is how I am going to fasten the body to the chassis
Styrene square tubing was cut to fit between the wheel wells of the body. Using an exacto knife I opened up a slot on one side of it. I made one for the left and right side, and attached them to the body using CA
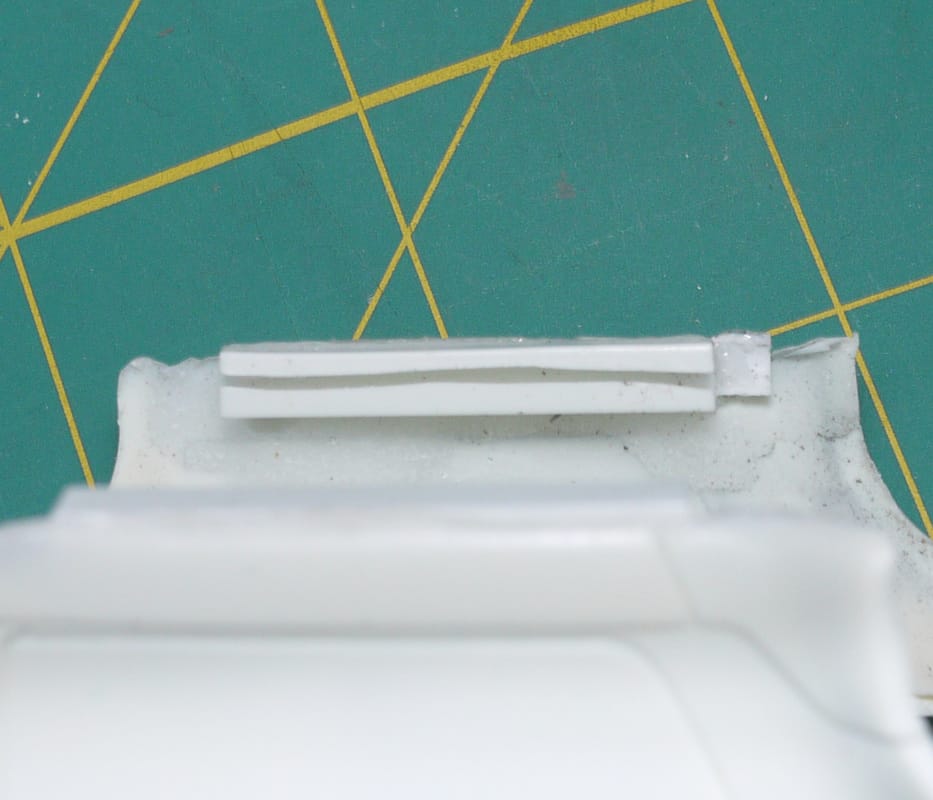
I then fitted the body to the chassis, and positioned the body to ensure I had the proper wheel clearance. Once this was confirmed, styrene tabs made from styrene angle stock were postioned and glued to the chassis bottom. This keeps the body correctly positioned on the chassis.
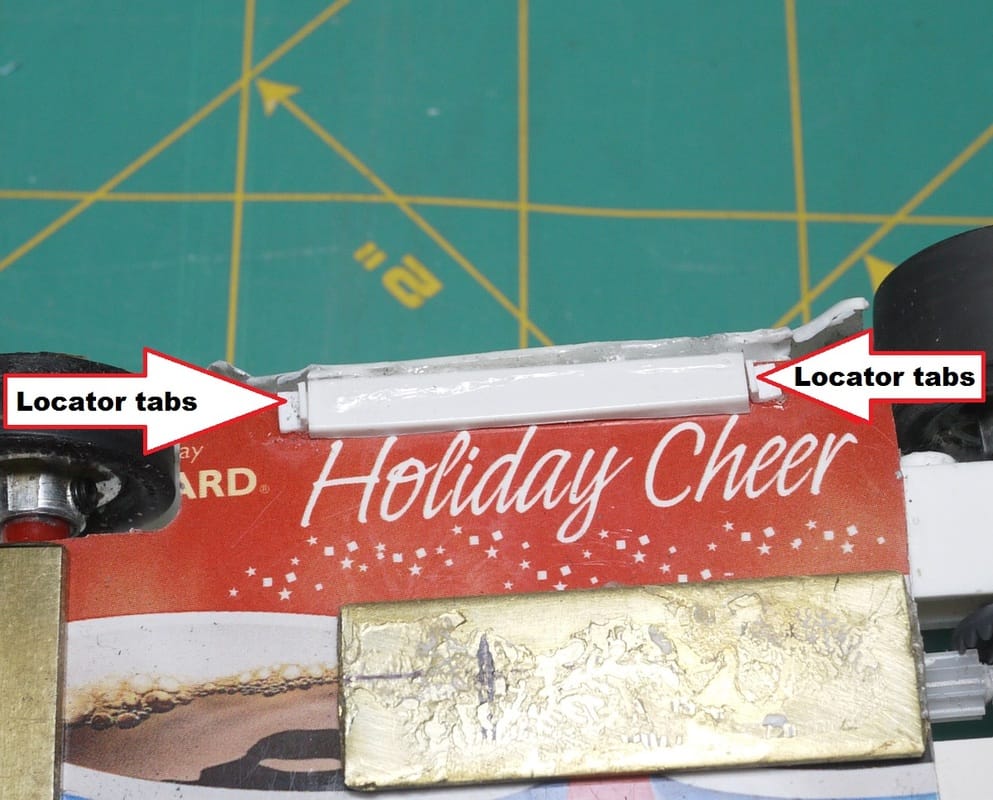
Time to turn it over and see how it sits.
So the basics are all done, and now it is time for prepping the body for paint and decals. I spent this morning doing up some customs decals and this car will be a tribute and memorial to our Friend Keith. I will think of him every time I run it.
So next up is paint.
Cheers
Dan
Here is how I am going to fasten the body to the chassis
Styrene square tubing was cut to fit between the wheel wells of the body. Using an exacto knife I opened up a slot on one side of it. I made one for the left and right side, and attached them to the body using CA
I then fitted the body to the chassis, and positioned the body to ensure I had the proper wheel clearance. Once this was confirmed, styrene tabs made from styrene angle stock were postioned and glued to the chassis bottom. This keeps the body correctly positioned on the chassis.
Time to turn it over and see how it sits.
So the basics are all done, and now it is time for prepping the body for paint and decals. I spent this morning doing up some customs decals and this car will be a tribute and memorial to our Friend Keith. I will think of him every time I run it.
So next up is paint.
Cheers
Dan
-
BARC 1 - HRW SlotCar Veteran!
- Posts: 2040
- Joined: Wed Dec 23, 2015 6:03 pm
- Location: NW Alberta
-

valie - HRW SlotCar Veteran!
- Posts: 346
- Joined: Thu Sep 06, 2012 2:26 am
- Location: Lemelerveld, The Netherlands
Re: 132 Gift Card Chassis/ Porsche 911
![]() by glasshorsevh » Tue Jan 03, 2017 3:12 pm
by glasshorsevh » Tue Jan 03, 2017 3:12 pm
Ya know Dan, my initial knee-jerk reaction to modeling with Leggo and a credit card is Really!!?? ... but then I have to ask myself "isn't just about everything in the world modeled in Leggo?" and I use a credit card in my modeling adventures all the time! So I guess when I really think about it, "Everything is Awesome!"..
Val
Val
-

glasshorsevh - HRW SlotCar Veteran!
- Posts: 395
- Joined: Tue Sep 08, 2015 2:49 pm
- Location: North Central Tejas
Re: 132 Gift Card Chassis/ Porsche 911
![]() by BARC 1 » Tue Jan 03, 2017 4:53 pm
by BARC 1 » Tue Jan 03, 2017 4:53 pm
Lego is engineered plastic blocks with precise tolerances. I first start using it in RC tanks. When you CA it together the stuff is as tough as nails. You want something square, nothing beats Lego, and it is CHEAP.
I have a Gift Card /Lego Chassis in the PanAmerican Proxy, and one will be in the TransAm Proxy, so it is getting tested under fire.
I got some other Lego pieces coming for a real interesting slot car project.
I don't normally paint the chassis, but to hide its humble beginnings, it gets a shot of black.
-
BARC 1 - HRW SlotCar Veteran!
- Posts: 2040
- Joined: Wed Dec 23, 2015 6:03 pm
- Location: NW Alberta
Re: 132 Gift Card Chassis/ Porsche 911
![]() by PipSlot » Wed Jan 04, 2017 5:11 pm
by PipSlot » Wed Jan 04, 2017 5:11 pm
Another member KRSPete pointed me to this awesome build, and I will follow with great interest how it will turn out! Thanks so much for trying out my little Pipguide invention :)
Cheers,
Pim
Cheers,
Pim
-

PipSlot - Posts: 27
- Joined: Wed Jan 04, 2017 4:03 pm
Re: 132 Gift Card Chassis/ Porsche 911
![]() by BARC 1 » Wed Jan 04, 2017 6:51 pm
by BARC 1 » Wed Jan 04, 2017 6:51 pm
The guide set up is quite innovative, and you can tune the amount of travel you want it to have. The car drives differently, and kind of floats into the corners a little more then a regular guide.
I had to give these a try. This car is quite light, so I am not getting the full effect that a bigger moving mass would have on them, I need to video a run and then slow it down to see what is happening. In real time it is hard to notice much moving on the front end. However I know from experience how hard it is to take in all the dynamics happening on a slot car at speed. Slow motion will be much more revealing.
Thanks for following along.
Cheers
Dan
-
BARC 1 - HRW SlotCar Veteran!
- Posts: 2040
- Joined: Wed Dec 23, 2015 6:03 pm
- Location: NW Alberta
Re: 132 Gift Card Chassis/ Porsche 911
![]() by BARC 1 » Fri Jan 06, 2017 12:57 pm
by BARC 1 » Fri Jan 06, 2017 12:57 pm
The build continues
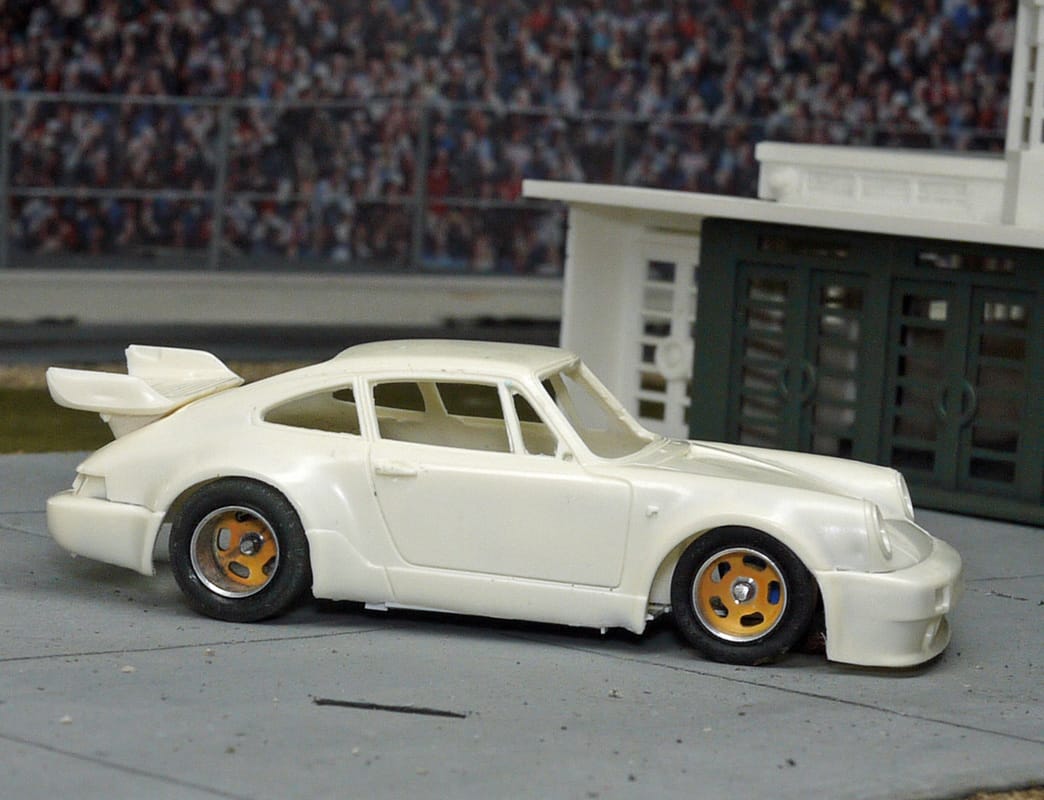
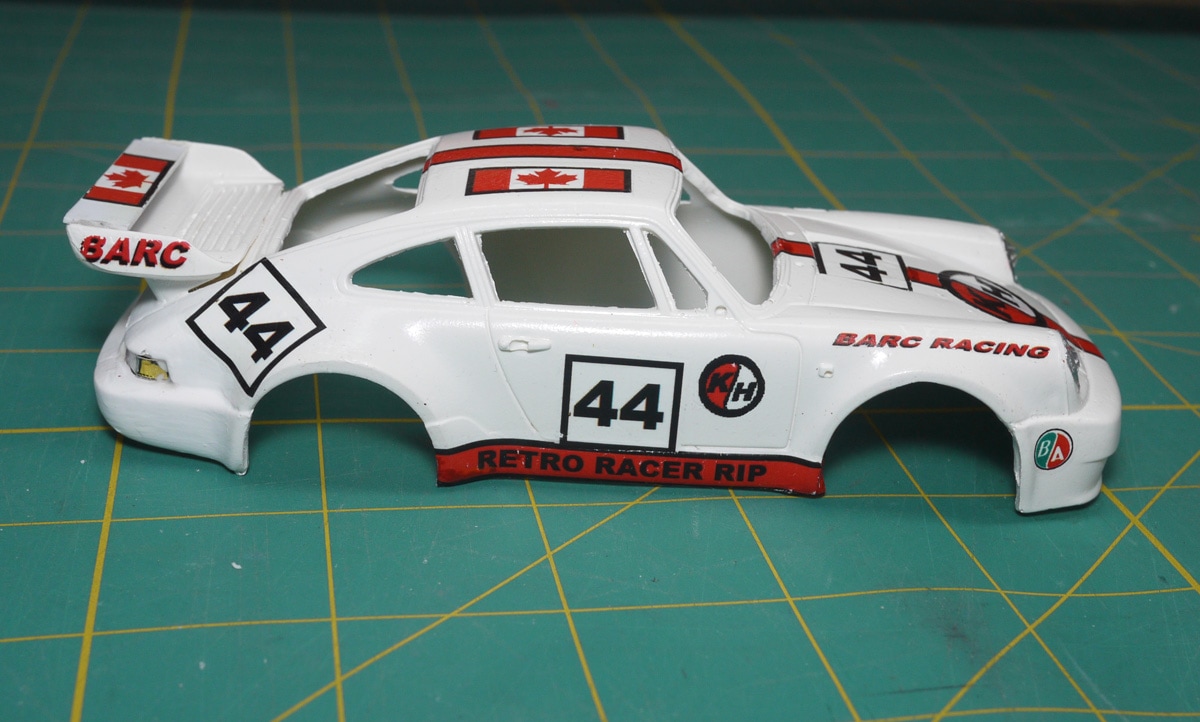
The Resin casting was washed in dish detergent and dried. A coat of white acrylic paint was airbrushed on
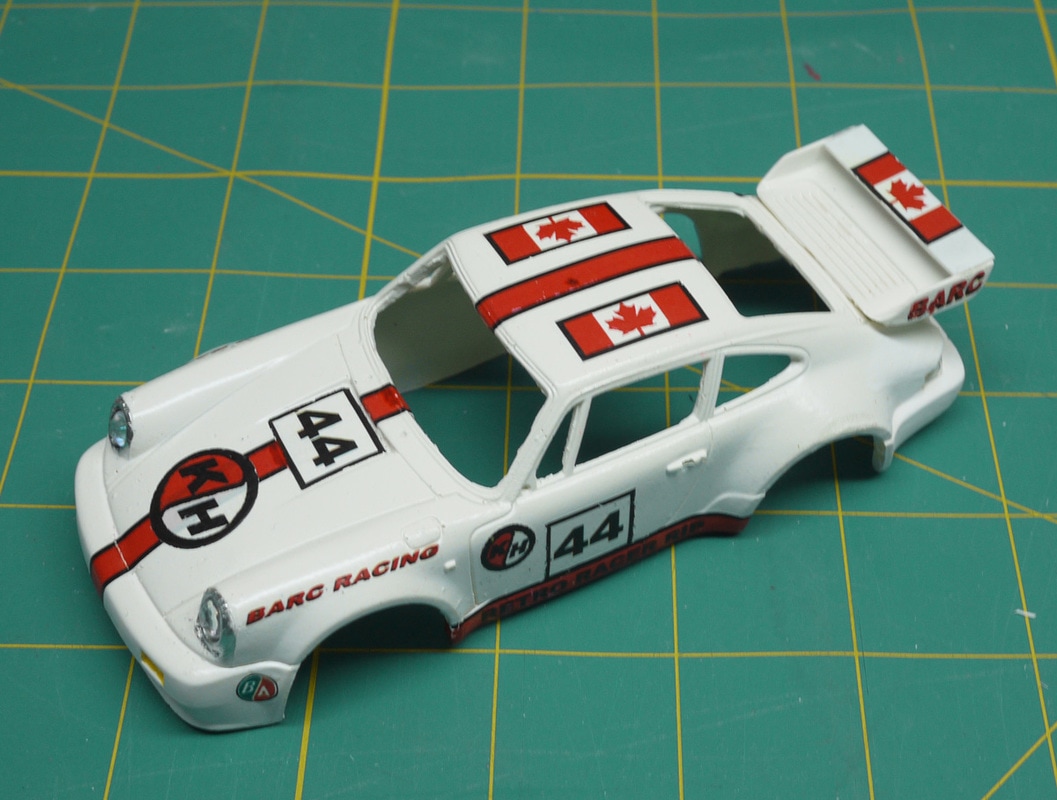
As I Tribute to Keith I made up some Retro 44 decals to be applied to this BARC Porsche. I noticed Keith was always pleased to show the flag so I made sure the Canadian Flag was part of this scheme. His initials are in the Roundal. Of course the car is carrying number 44 which is synonymous with Retro Racer
These decals were drawn up in MS Paint, and then printed out on my Laser Printer. A coat of Testors Gloss coat was applied to protect the ink.
Currently the decals have been applied and the car is waiting a coat of Clear coat. I will then add windows and move onto building the interior.
Cheers
The Resin casting was washed in dish detergent and dried. A coat of white acrylic paint was airbrushed on
As I Tribute to Keith I made up some Retro 44 decals to be applied to this BARC Porsche. I noticed Keith was always pleased to show the flag so I made sure the Canadian Flag was part of this scheme. His initials are in the Roundal. Of course the car is carrying number 44 which is synonymous with Retro Racer
These decals were drawn up in MS Paint, and then printed out on my Laser Printer. A coat of Testors Gloss coat was applied to protect the ink.
Currently the decals have been applied and the car is waiting a coat of Clear coat. I will then add windows and move onto building the interior.
Cheers
-
BARC 1 - HRW SlotCar Veteran!
- Posts: 2040
- Joined: Wed Dec 23, 2015 6:03 pm
- Location: NW Alberta
Re: 132 Gift Card Chassis/ Porsche 911
![]() by CrockettNZ » Fri Jan 06, 2017 1:16 pm
by CrockettNZ » Fri Jan 06, 2017 1:16 pm
loving the use of different materials for this build
great ingenuity there
great ingenuity there
-

CrockettNZ - HRW SlotCar Veteran!
- Posts: 475
- Joined: Sat Oct 17, 2015 2:11 pm
- Location: Napier New Zealand
Re: 132 Gift Card Chassis/ Porsche 911
![]() by PipSlot » Fri Jan 06, 2017 3:21 pm
by PipSlot » Fri Jan 06, 2017 3:21 pm
That paintjob and those decals look great even before the clear coat! Solid graphic design, I especially like the initials!
-
PipSlot - Posts: 27
- Joined: Wed Jan 04, 2017 4:03 pm
Re: 132 Gift Card Chassis/ Porsche 911
![]() by HomeRacingWorld » Fri Jan 06, 2017 3:32 pm
by HomeRacingWorld » Fri Jan 06, 2017 3:32 pm
I really like the Kieth tribute here. Bravo sir.
The rest is excellent, worthy of bookmarking.
The rest is excellent, worthy of bookmarking.
-

HomeRacingWorld - HRW Janitor
- Posts: 15569
- Joined: Wed Aug 08, 2012 2:05 pm
- Location: HRW Skunkworks
Re: 132 Gift Card Chassis/ Porsche 911
![]() by CJR » Sat Jan 07, 2017 12:20 am
by CJR » Sat Jan 07, 2017 12:20 am
Dan, I follow all of your threads with great interest. I think that the gift card/Lego chassis is brilliant.
- CJR
- HRW SlotCar Veteran!
- Posts: 257
- Joined: Tue Dec 22, 2015 8:16 am
27 posts
• Page 1 of 2 • 1, 2
Return to HRW All Scales Build-OFF!
Who is online
Users browsing this forum: No registered users and 42 guests

Powered by phpBB® Forum Software © phpBB Group