[phpBB Debug] PHP Warning: in file [ROOT]/includes/bbcode.php on line 543: preg_replace(): The /e modifier is no longer supported, use preg_replace_callback instead
[phpBB Debug] PHP Warning: in file [ROOT]/includes/bbcode.php on line 543: preg_replace(): The /e modifier is no longer supported, use preg_replace_callback instead
[phpBB Debug] PHP Warning: in file [ROOT]/includes/bbcode.php on line 543: preg_replace(): The /e modifier is no longer supported, use preg_replace_callback instead
[phpBB Debug] PHP Warning: in file [ROOT]/includes/bbcode.php on line 543: preg_replace(): The /e modifier is no longer supported, use preg_replace_callback instead
[phpBB Debug] PHP Warning: in file [ROOT]/includes/bbcode.php on line 543: preg_replace(): The /e modifier is no longer supported, use preg_replace_callback instead
[phpBB Debug] PHP Warning: in file [ROOT]/includes/bbcode.php on line 543: preg_replace(): The /e modifier is no longer supported, use preg_replace_callback instead
[phpBB Debug] PHP Warning: in file [ROOT]/includes/bbcode.php on line 543: preg_replace(): The /e modifier is no longer supported, use preg_replace_callback instead
[phpBB Debug] PHP Warning: in file [ROOT]/includes/bbcode.php on line 543: preg_replace(): The /e modifier is no longer supported, use preg_replace_callback instead
[phpBB Debug] PHP Warning: in file [ROOT]/includes/bbcode.php on line 543: preg_replace(): The /e modifier is no longer supported, use preg_replace_callback instead
[phpBB Debug] PHP Warning: in file [ROOT]/includes/bbcode.php on line 543: preg_replace(): The /e modifier is no longer supported, use preg_replace_callback instead
[phpBB Debug] PHP Warning: in file [ROOT]/includes/bbcode.php on line 543: preg_replace(): The /e modifier is no longer supported, use preg_replace_callback instead
[phpBB Debug] PHP Warning: in file [ROOT]/includes/bbcode.php on line 543: preg_replace(): The /e modifier is no longer supported, use preg_replace_callback instead
[phpBB Debug] PHP Warning: in file [ROOT]/includes/bbcode.php on line 543: preg_replace(): The /e modifier is no longer supported, use preg_replace_callback instead
[phpBB Debug] PHP Warning: in file [ROOT]/includes/bbcode.php on line 543: preg_replace(): The /e modifier is no longer supported, use preg_replace_callback instead
[phpBB Debug] PHP Warning: in file [ROOT]/includes/bbcode.php on line 543: preg_replace(): The /e modifier is no longer supported, use preg_replace_callback instead
[phpBB Debug] PHP Warning: in file [ROOT]/includes/bbcode.php on line 543: preg_replace(): The /e modifier is no longer supported, use preg_replace_callback instead
[phpBB Debug] PHP Warning: in file [ROOT]/includes/bbcode.php on line 543: preg_replace(): The /e modifier is no longer supported, use preg_replace_callback instead
[phpBB Debug] PHP Warning: in file [ROOT]/includes/bbcode.php on line 543: preg_replace(): The /e modifier is no longer supported, use preg_replace_callback instead
[phpBB Debug] PHP Warning: in file [ROOT]/includes/bbcode.php on line 543: preg_replace(): The /e modifier is no longer supported, use preg_replace_callback instead
[phpBB Debug] PHP Warning: in file [ROOT]/includes/bbcode.php on line 543: preg_replace(): The /e modifier is no longer supported, use preg_replace_callback instead
[phpBB Debug] PHP Warning: in file [ROOT]/includes/bbcode.php on line 543: preg_replace(): The /e modifier is no longer supported, use preg_replace_callback instead
[phpBB Debug] PHP Warning: in file [ROOT]/includes/bbcode.php on line 543: preg_replace(): The /e modifier is no longer supported, use preg_replace_callback instead
[phpBB Debug] PHP Warning: in file [ROOT]/includes/bbcode.php on line 543: preg_replace(): The /e modifier is no longer supported, use preg_replace_callback instead
[phpBB Debug] PHP Warning: in file [ROOT]/includes/bbcode.php on line 543: preg_replace(): The /e modifier is no longer supported, use preg_replace_callback instead
[phpBB Debug] PHP Warning: in file [ROOT]/includes/bbcode.php on line 543: preg_replace(): The /e modifier is no longer supported, use preg_replace_callback instead
[phpBB Debug] PHP Warning: in file [ROOT]/includes/bbcode.php on line 543: preg_replace(): The /e modifier is no longer supported, use preg_replace_callback instead
[phpBB Debug] PHP Warning: in file [ROOT]/includes/bbcode.php on line 543: preg_replace(): The /e modifier is no longer supported, use preg_replace_callback instead
[phpBB Debug] PHP Warning: in file [ROOT]/includes/bbcode.php on line 543: preg_replace(): The /e modifier is no longer supported, use preg_replace_callback instead
[phpBB Debug] PHP Warning: in file [ROOT]/includes/bbcode.php on line 543: preg_replace(): The /e modifier is no longer supported, use preg_replace_callback instead
[phpBB Debug] PHP Warning: in file [ROOT]/includes/bbcode.php on line 543: preg_replace(): The /e modifier is no longer supported, use preg_replace_callback instead
[phpBB Debug] PHP Warning: in file [ROOT]/includes/bbcode.php on line 543: preg_replace(): The /e modifier is no longer supported, use preg_replace_callback instead
[phpBB Debug] PHP Warning: in file [ROOT]/includes/bbcode.php on line 543: preg_replace(): The /e modifier is no longer supported, use preg_replace_callback instead
[phpBB Debug] PHP Warning: in file [ROOT]/includes/bbcode.php on line 543: preg_replace(): The /e modifier is no longer supported, use preg_replace_callback instead
[phpBB Debug] PHP Warning: in file [ROOT]/includes/bbcode.php on line 543: preg_replace(): The /e modifier is no longer supported, use preg_replace_callback instead
[phpBB Debug] PHP Warning: in file [ROOT]/includes/bbcode.php on line 543: preg_replace(): The /e modifier is no longer supported, use preg_replace_callback instead
[phpBB Debug] PHP Warning: in file [ROOT]/includes/bbcode.php on line 543: preg_replace(): The /e modifier is no longer supported, use preg_replace_callback instead
[phpBB Debug] PHP Warning: in file [ROOT]/includes/bbcode.php on line 543: preg_replace(): The /e modifier is no longer supported, use preg_replace_callback instead
[phpBB Debug] PHP Warning: in file [ROOT]/includes/bbcode.php on line 543: preg_replace(): The /e modifier is no longer supported, use preg_replace_callback instead
[phpBB Debug] PHP Warning: in file [ROOT]/includes/bbcode.php on line 543: preg_replace(): The /e modifier is no longer supported, use preg_replace_callback instead
[phpBB Debug] PHP Warning: in file [ROOT]/includes/bbcode.php on line 543: preg_replace(): The /e modifier is no longer supported, use preg_replace_callback instead
[phpBB Debug] PHP Warning: in file [ROOT]/includes/bbcode.php on line 543: preg_replace(): The /e modifier is no longer supported, use preg_replace_callback instead
[phpBB Debug] PHP Warning: in file [ROOT]/includes/bbcode.php on line 543: preg_replace(): The /e modifier is no longer supported, use preg_replace_callback instead
[phpBB Debug] PHP Warning: in file [ROOT]/includes/bbcode.php on line 543: preg_replace(): The /e modifier is no longer supported, use preg_replace_callback instead
[phpBB Debug] PHP Warning: in file [ROOT]/includes/bbcode.php on line 543: preg_replace(): The /e modifier is no longer supported, use preg_replace_callback instead
[phpBB Debug] PHP Warning: in file [ROOT]/includes/bbcode.php on line 543: preg_replace(): The /e modifier is no longer supported, use preg_replace_callback instead
[phpBB Debug] PHP Warning: in file [ROOT]/includes/bbcode.php on line 127: preg_replace(): The /e modifier is no longer supported, use preg_replace_callback instead
[phpBB Debug] PHP Warning: in file [ROOT]/includes/bbcode.php on line 127: preg_replace(): The /e modifier is no longer supported, use preg_replace_callback instead
[phpBB Debug] PHP Warning: in file [ROOT]/includes/bbcode.php on line 127: preg_replace(): The /e modifier is no longer supported, use preg_replace_callback instead
[phpBB Debug] PHP Warning: in file [ROOT]/includes/functions.php on line 4773: Cannot modify header information - headers already sent by (output started at [ROOT]/includes/functions.php:3887)
[phpBB Debug] PHP Warning: in file [ROOT]/includes/functions.php on line 4775: Cannot modify header information - headers already sent by (output started at [ROOT]/includes/functions.php:3887)
[phpBB Debug] PHP Warning: in file [ROOT]/includes/functions.php on line 4776: Cannot modify header information - headers already sent by (output started at [ROOT]/includes/functions.php:3887)
[phpBB Debug] PHP Warning: in file [ROOT]/includes/functions.php on line 4777: Cannot modify header information - headers already sent by (output started at [ROOT]/includes/functions.php:3887)
Home Racing World • View topic - Complete Northeast Mod build, Origami body and all
Page 3 of 3

Re: Complete Northeast Mod build, Origami body and all

PostPosted: Wed Dec 24, 2014 12:34 pm
by slotguy
Just a note .if you are running on a wood track why dont you use pro track tires yes they are foam but on my wood track we run them and we use a 40,000 h&r motor on 13.5 volts and the cars hookup great on my oval and for the price of a set of the wheels inserts and tires you use you can save about 25.00 on you build. I build you guys a rtr with a 26.000 h&r motor and pro track tires for about 100.00 plus shipping of 6.00 total 106.00 feel free to contact me on any questions on these 1/32 mods
At tonyslotcar@gmail.com would be happy to help with any questions
slotguy

Re: Complete Northeast Mod build, Origami body and all

PostPosted: Fri Jan 23, 2015 4:08 am
by tjkt46
Hi there,

Im so impressed by this post im going to give it a go myself, modifieds look awesome and my mates are interested in building one each as well so thankyou for the info its very well documented and there is a level if nostalgia with these cars I love. Any tips on folding the laminate and also sticking it neatly together?

Best regards
Tj from Tasmania

Re: Complete Northeast Mod build, Origami body and all

PostPosted: Fri Jan 23, 2015 5:35 pm
by slotguy
Tj if you follow the way turbo kev folded his you should have no problems . I fold them the same way when I build a car for someone here at the raceway.if you have any questions on the body or chassis please contact me at tonyslotcar@gmail.com for info I would be pleased to help you can also contact me to order them
Tony
slotguy

Re: Complete Northeast Mod build, Origami body and all

PostPosted: Sun Feb 01, 2015 10:04 am
by Vintage 1/24

Re: Complete Northeast Mod build, Origami body and all

PostPosted: Sun Feb 01, 2015 10:18 am
by HomeRacingWorld
This is the one I have coming. Thanks for offering a different design.

Re: Complete Northeast Mod build, Origami body and all

PostPosted: Mon Feb 15, 2016 2:55 pm
by woodman
What happened to all the photos on the first page? They were good instructions.....

Re: Complete Northeast Mod build, Origami body and all

PostPosted: Tue Feb 16, 2016 10:05 am
by nhdungeonracer
Kevin must have had the photos hosted on his own Flicker page, and as apparently took them out.
Or maybe Flicker has a time limit? I dunno... :think:

Re: Complete Northeast Mod build, Origami body and all

PostPosted: Tue Nov 28, 2017 7:51 pm
by Vintage 1/24
HOW TO FOLD NY MODIFIEDS BODIES-

Unfortunately the old links became broken on this thread, and I have been meaning to put up a thread to replace what Kevin had created some time ago. This post is focused more on the actual folding process and not so much on the general car build - but I have had a number of folks ask me about how these bodies go together - so the following is a tutorial set of instructions with photos to show how the Tour Type NY Modified bodies go together...

FLAT LAY -

Image

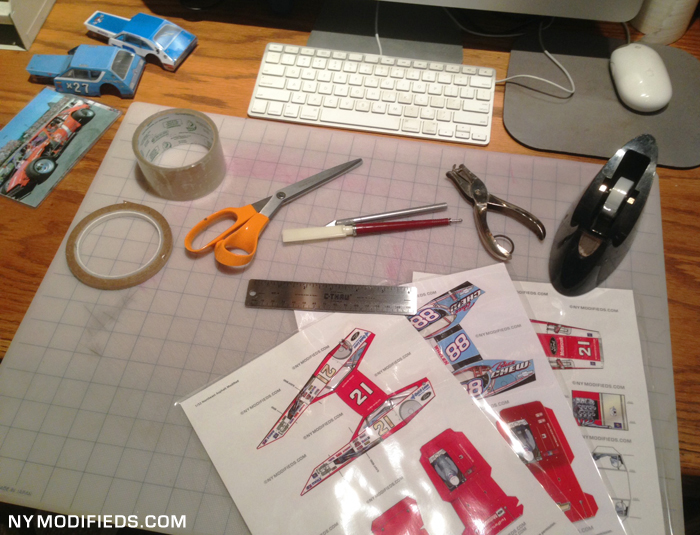
You will need scissors, an Exacto knife, straight edge, some tape - shown laid out here.
This is how the flat sheets arrive from NY Modifieds - these were selected directly from the online body lists. These particular body sheets are 1/32 scale and they fold up the same way as the 1/24 scale bodies (except the 1/24 bodies probably go together even easier because there's a little more room to work with).


FOUR PIECE MEAL -

Image

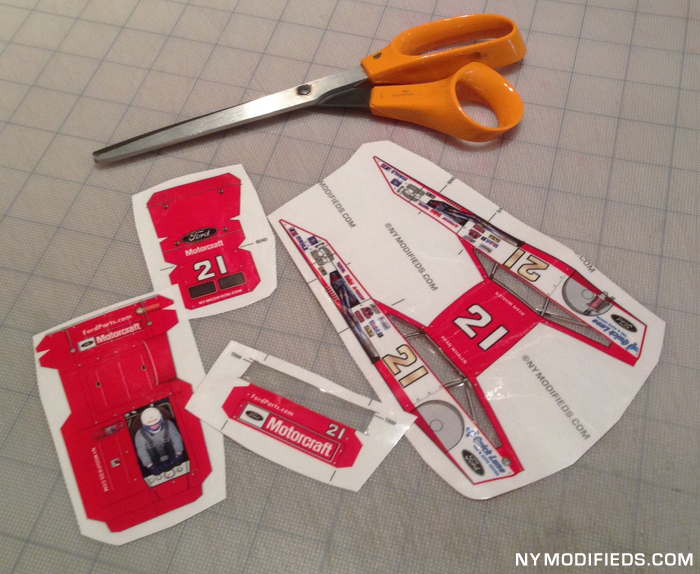
Just roughly trim the body parts from the flat sheet. This rough cut should give you four pieces to work with - the body is made up of just these four pieces.


SPOILER ALERT -

Image

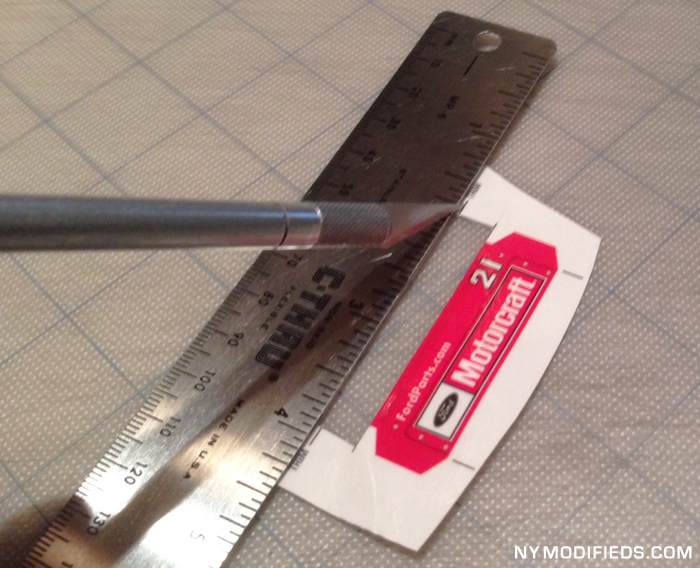
Cut carefully around the outline of the four shapes. The rear spoiler has to be trimmed according to the guide lines. This creates a clear spoiler on the back panel of the car - just like the real full size Tour Modifieds!


THE KINKS -

Image

Make a light fold or kink in the left side body work. Just a little pressure along a straight edge - nothing much. This will help the side panel conform to the offset hood and nose shape - just like the big cars.


SHEETS TO THE WIND -

Image

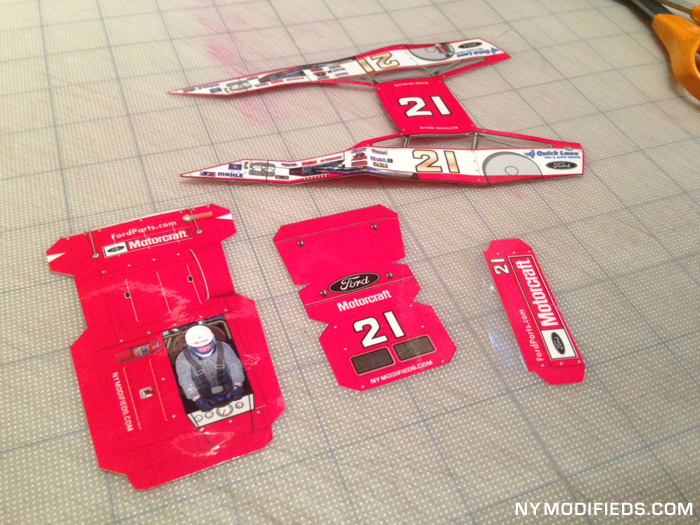
This is what you should have - four pieces of official Modified 'sheet metal' ready to fold and assemble.


THE BIG TRICK IS THE BIG SCORE -
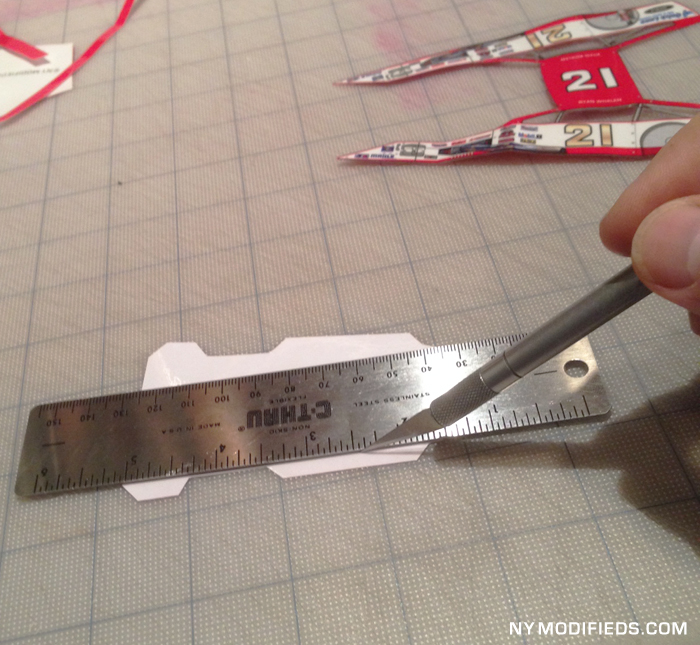
Image

This is the *big trick* - they key to getting these things to look right and go together easily. Lightly score the backside of the tabs with an exacto/hobby knife. Exert light pressure. Don’t press so hard you cut through the laminate. You just want to score it enough to have a straight fold line.


KEEPING TABS -

Image

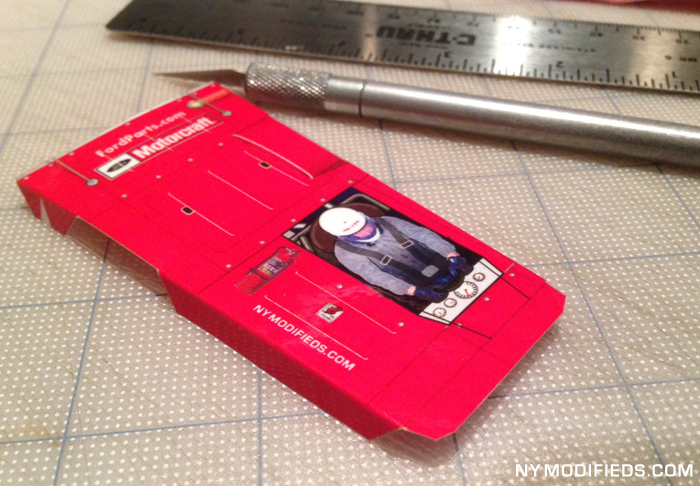
Fold the tab(s). The tab should fold sharply, straight, and precisely where you made the score. The score on the inside of the bend allows you to fold things exactly where you want them. This is the interior tray with the long tabs folded in position.


ROOFIES -

Image

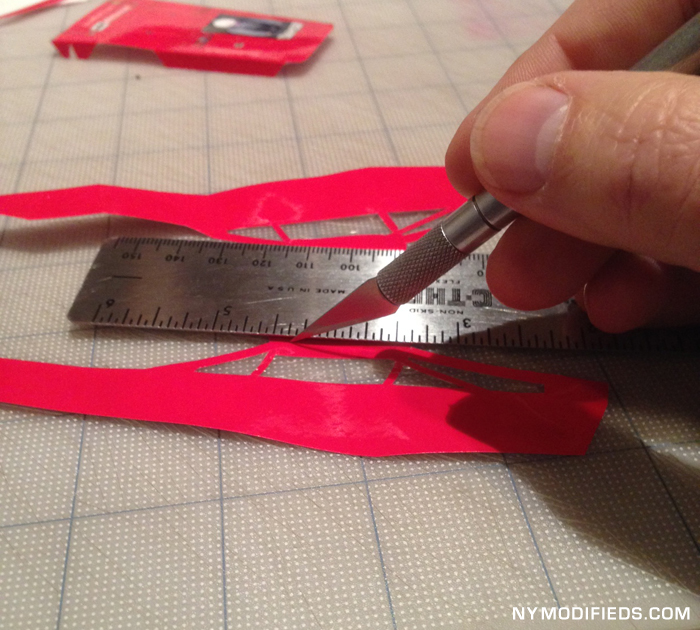
Again make a slight score, this time along the inside of the roof. A light pressure, scoring on the inside will make for a nice straight fold where you need it - from inside corner to inside corner.


A BODY OF WORK -

Image

Now you should have four folded body panels. There is a slight kink added to the nose with a straight edge. Similar to the left side kink we added earlier. This will allow the nose to conform to the side panel 'wedge' profile shape.


THE BASEMENT TAPES -

Image

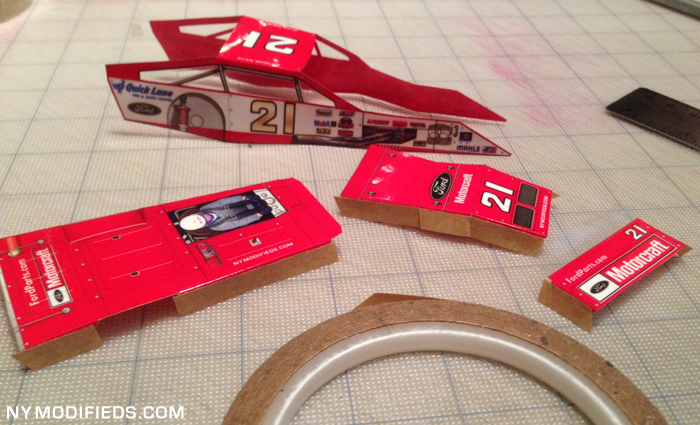
This is where folks will differ. Some put these together with staples. It is the fastest and maybe strongest method and it is fine for racing - I mean these are slot cars, not model contest finalists. I myself use double sided tape on the tabs. It allows me to position the panels exactly where I want them, and ultimately it looks cleaner and is more 'scale model appearing' without the staples being visible on the body work.


3M = MINNESOTA MINING MANUFACTURING -

Image

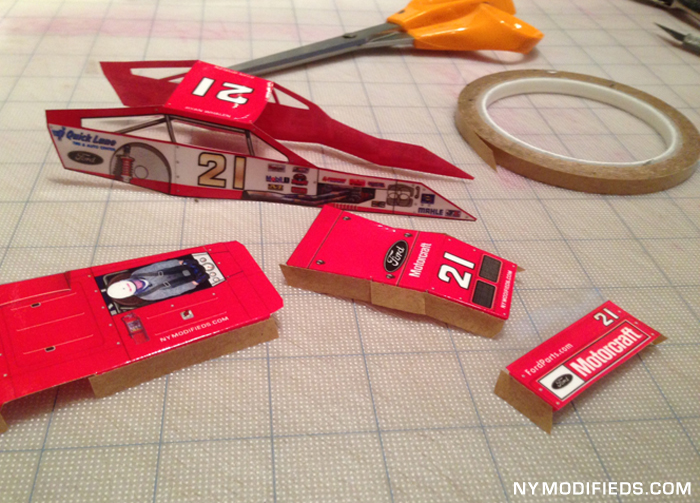
I actually use what is known as an 'adhesive transfer tape' - not strictly a double sided tape (although that would work if it is thin). The 3M brand adhesive transfer tape goes down and then the backing lifts off, leaving only the glue in place. We used this for mechanical art in the years BC (before computer) - back in the days when “cut and paste" was not just a keyboard command.


PLUMB AND SQUARE -

Image

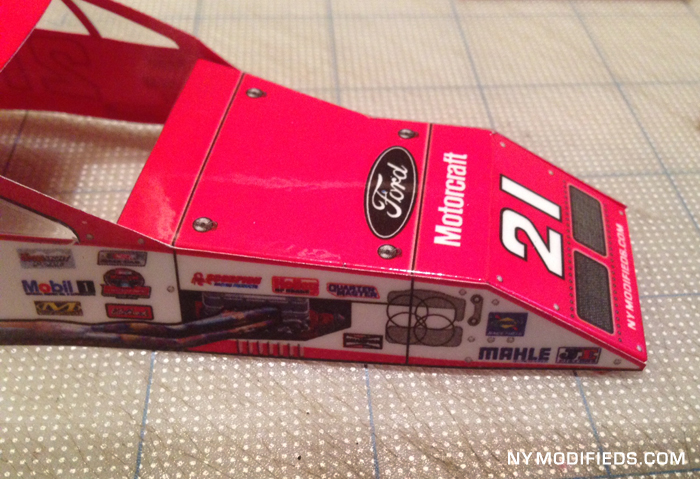
The next step is to start taping the parts together. Actually some guys just use scotch tape over the tabs, and it seems to work fine. For all the talk about staples and special 3M tape, This might be the simplest way of all. Start on the straight side of the body (the right side) first, and at the front section, toward the nose.


INSIDE JOB -

Image

There are guidelines to help you line everything up. Just keep working your way back along the right side. Once the tabs are stuck in the right place, you can add a scotch tape over them to keep them from "walking". Remember things can get rough in the 'bullpen’ when the racing gets serious.


TAB THROUGH -

Image

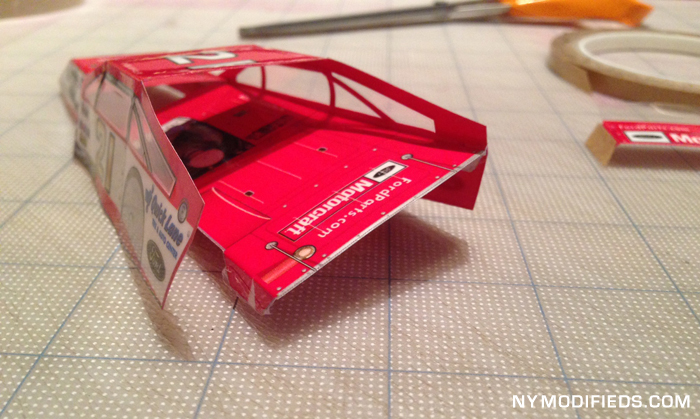
Once the nose tabs are taped off and assembled - position the interior tray panel flush to the rear corner and at the right height. Then just tape off the tabs.


COME TOGETHER -

Image

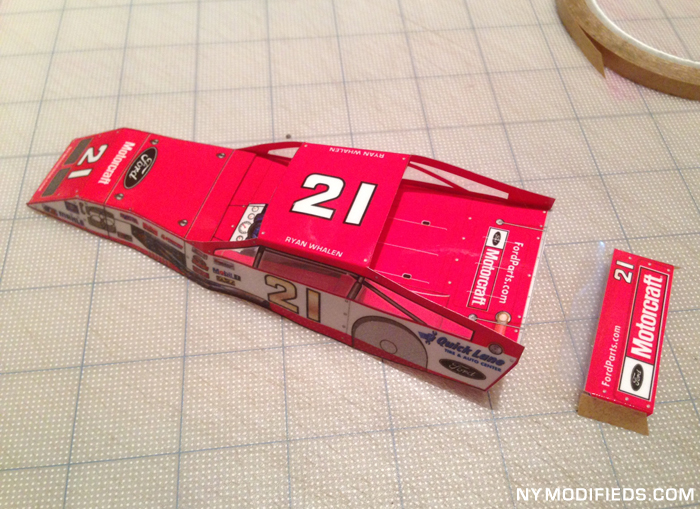
Affix the rest of the tabs and the car comes together.


BACK DOOR, MAN -

Image

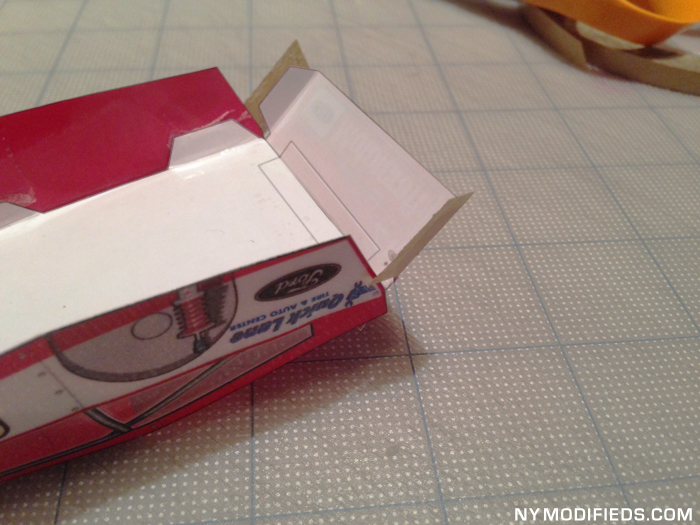
Use a piece of scotch tape to create a "hinge" for the back panel. Then tuck in the side tabs to make the back panel and spoiler secure.


THREE QUARTERS -

Image

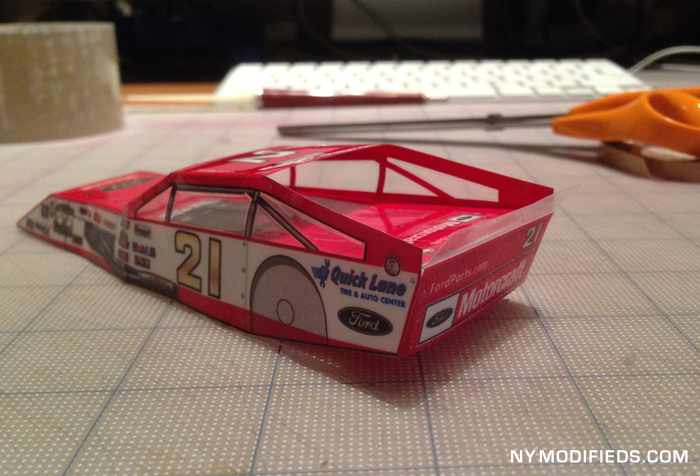
This is how it should look. Almost ready to race.


CALL IN THE REINFORCEMENTS -

Image

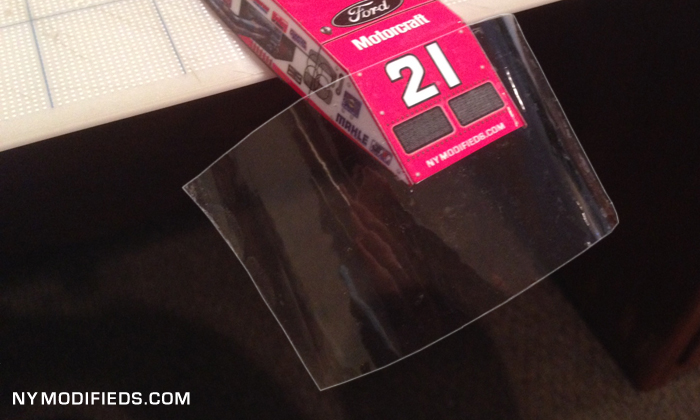
Although not necessary, it is a good practice if you want to race these hard, to go over the nose with a larger piece of tape (like packing tape). If you are careful it is easy to lay even a large piece and smooth it out so there are no air bubbles. It also tightens up the seams and seals them from the outside without really changing the look of the car.


ON THE EDGE -

Image

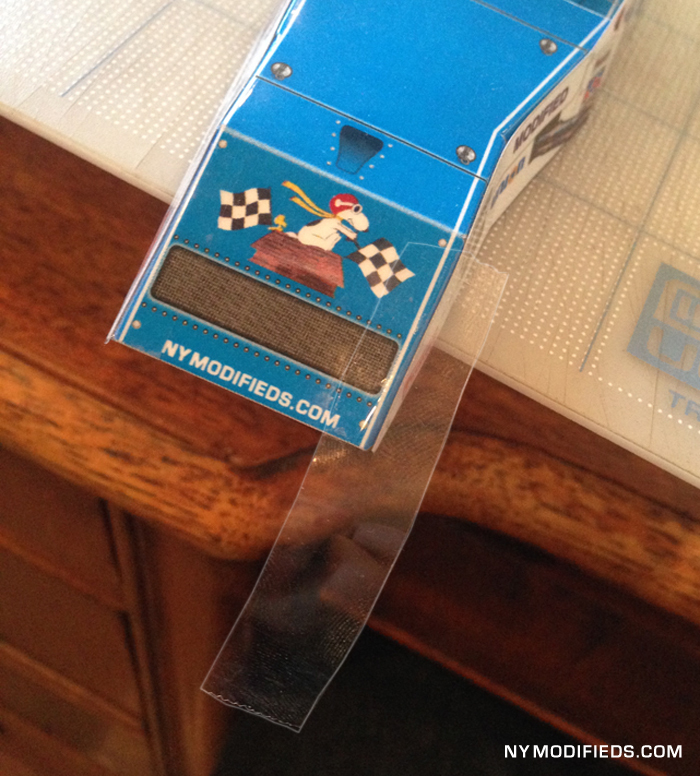
You can also just add a standard piece of scotch tape on the edge of the nose.Once you are done you can't even tell there is extra tape there.


TAIL OF THE TAPE -

Image

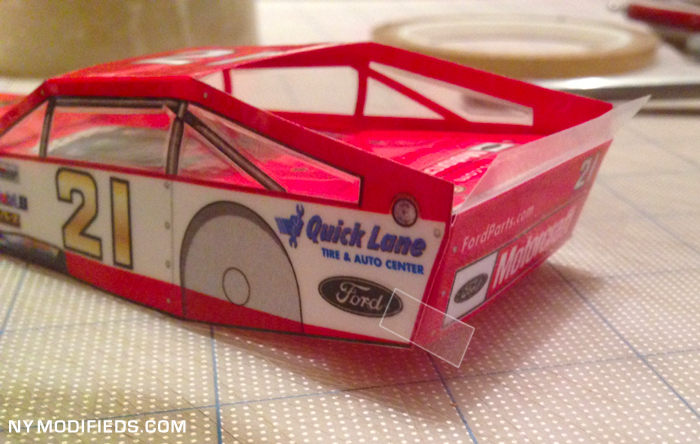
Same deal - a little tape on the back panel will help keep the body work in shape even when the car gets knocked around a bit.


SAFETY FAST -

Image

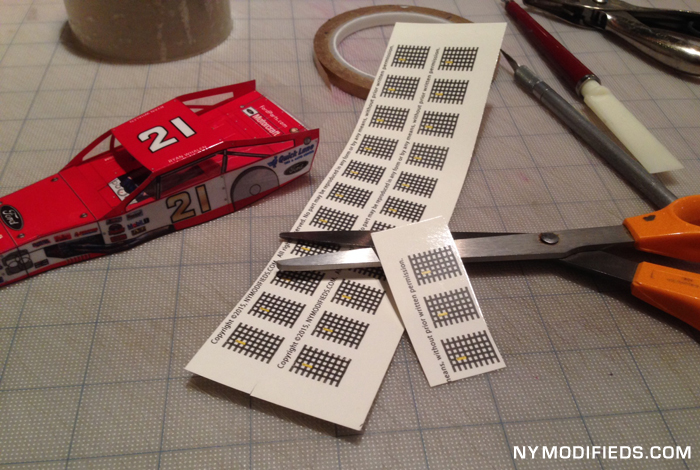
Trim the driver's window safety net decal very closely.


DECALMANIA -

Image

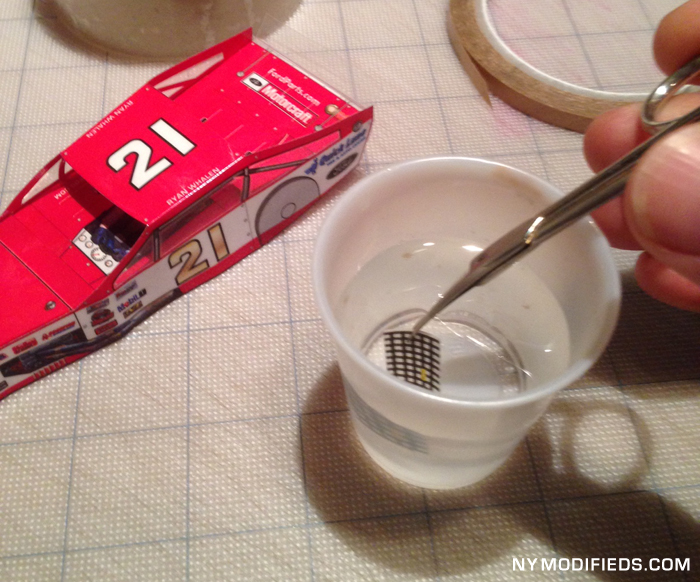
It is a water soluble decal and should start to move on its backing after about 30 seconds in water. You can apply the window net on the inside or the outside of the body. I started doing them on the inside, but lately I did a few with the decal on the outside and it may even look better.


HALF A WINDSHIELD -

Image

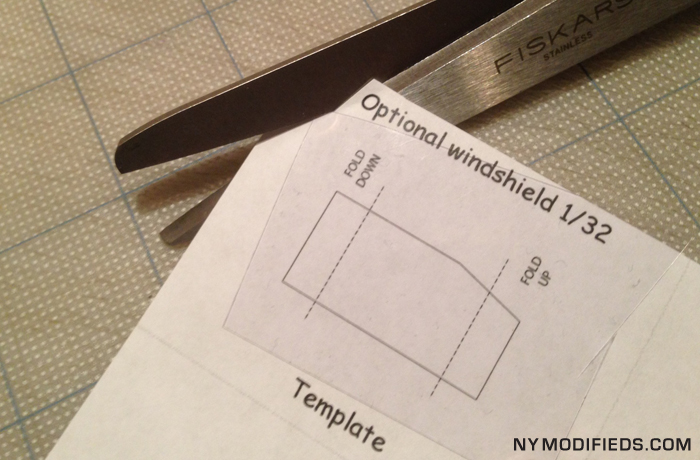
Trim the clear acetate type material to the template shape.

Image

Put a small fold on the top and bottom. To tuck under the hood and to the underside of the roof.

Image

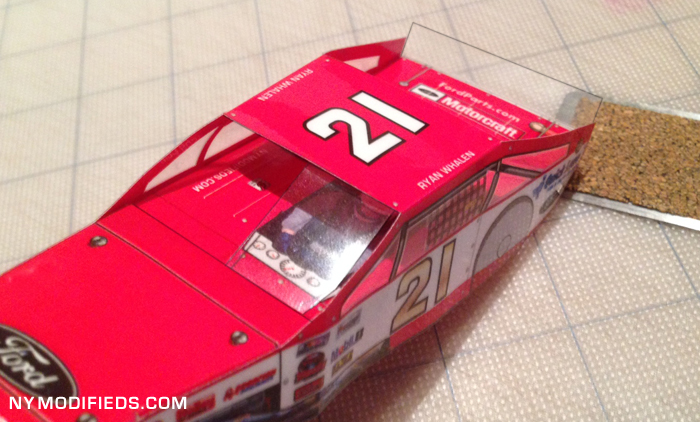
Tape the windshield in place.


FINAL ASSEMBLY -

Image

Trim out the rear wheel wells with a small curved scissor.


MAKER'S MARK -

Image

Mark where the front axle will fit the body.


A HOLE -

Image

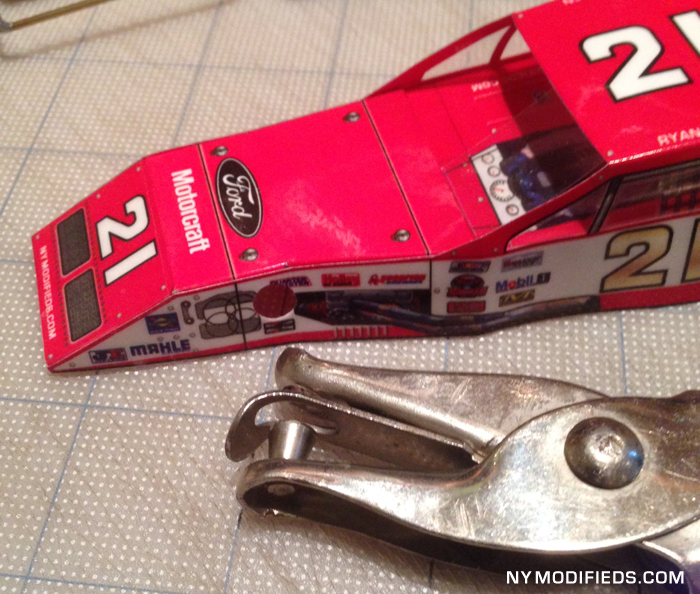
Punch a hole for the front axle.


FINAL FITTING -

Image

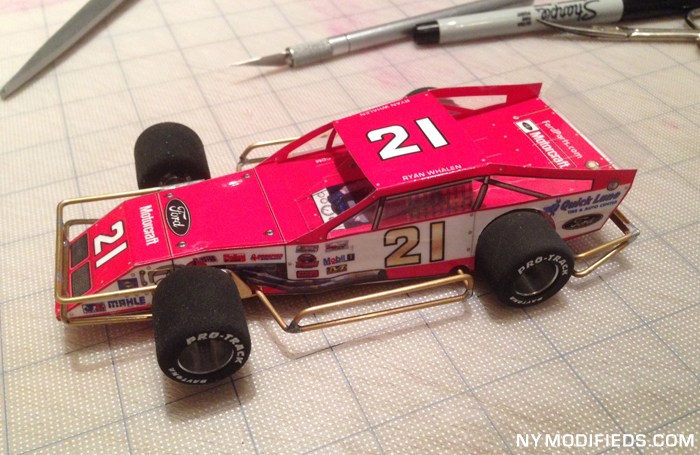
Fit the body to the chassis, then clip in place. Watch out for any interference of binding, trim and relieve if need be, you don’t want anything slowing you down on race day. I have had serious competitors tell me they will spend almost an hour fooling around with the final fit making sure nothing binds and things are loose but not too loose, and the body is positioned 'just so' - but then again these are the guys chasing thousandths of a single second around a giant wooden oval...

In the main though, the body should drop in place rather easily.

Overall, the body should go together in about 20 minutes - although I know they can be done quicker...

Re: Complete Northeast Mod build, Origami body and all

PostPosted: Tue Nov 28, 2017 8:14 pm
by HomeRacingWorld
Now how about THAT boys?

Well done sir!

Re: Complete Northeast Mod build, Origami body and all

PostPosted: Sat Dec 30, 2017 5:14 pm
by Vintage 1/24

Re: Complete Northeast Mod build, Origami body and all

PostPosted: Sun Dec 31, 2017 7:01 pm
by Broman62
WOW...those are just awesome and the picture tutorials are fantastic!!

Re: Complete Northeast Mod build, Origami body and all

PostPosted: Sun Dec 31, 2017 9:37 pm
by FC47
Wowza!, these are too cool, another beast that is bound to make it here, a trackful of these at speed would be a sight!!
Nice!!

Re: Complete Northeast Mod build, Origami body and all

PostPosted: Mon Jan 14, 2019 12:10 am
by Rastas