I just got 2 of the new Proxie Cyclone models and am going to start assembly soon. This thread is for builders to share thoughts and ask each other questions for mutual benefit.
For those planning to use silicone or urethane tires on the Pioneer Charger chassis, what are the appropriate Quick Slicks or Paul Gage part numbers?
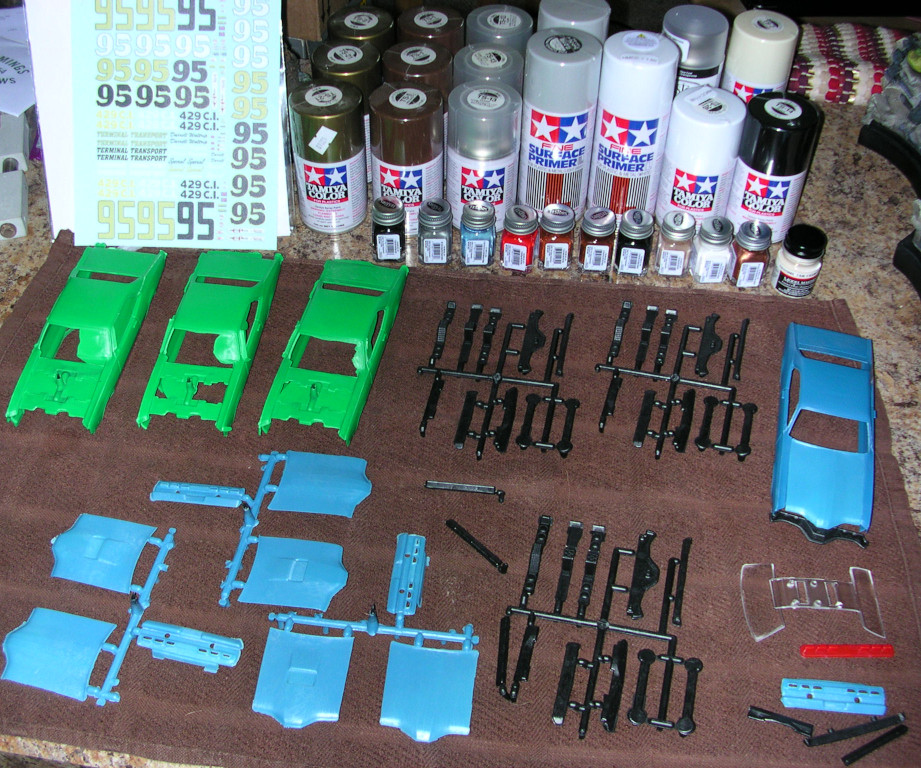
I'm going to paint one body white to go with the Purolator #21 decals, and one red to go with the #48 decals. Anyone doing the same who has decided on what spray paints to use? Looking for colors that will match well with the background colors of the decal sheets.
I plan to post progress reports of my builds and hope others will too.
Cyclone build and tune
Cyclone build and tune
![]() by slothead » Tue Jun 25, 2019 7:15 pm
by slothead » Tue Jun 25, 2019 7:15 pm
-
slothead - The Doctor is IN!
- Posts: 1560
- Joined: Sun Mar 17, 2013 7:04 pm
Re: Cyclone build and tune
![]() by slothead » Tue Jun 25, 2019 7:24 pm
by slothead » Tue Jun 25, 2019 7:24 pm
Wow, a first response so quickly!?
Went to the SCC website and looked up PG tires info:
Pioneer
Dodge Charger
(21093XD)
Part number : PGT-21093XD or XPG-21093XD
Went to the SCC website and looked up PG tires info:
Pioneer
Dodge Charger
(21093XD)
Part number : PGT-21093XD or XPG-21093XD
-
slothead - The Doctor is IN!
- Posts: 1560
- Joined: Sun Mar 17, 2013 7:04 pm
Re: Cyclone build and tune
![]() by FC47 » Tue Jun 25, 2019 7:58 pm
by FC47 » Tue Jun 25, 2019 7:58 pm
Just one here, Purolator. Still fitting and blending parts.
Might look for paint tomorrow if there's time.
Not sure if the Pioneer five point mag will give up its 'insert'?
I have some CG steelies I think I could get in there.
As far as silicone tires, there is Maxxtrac M10X.
And the guide on this one needs a little more stability I think...
Might look for paint tomorrow if there's time.
Not sure if the Pioneer five point mag will give up its 'insert'?
I have some CG steelies I think I could get in there.
As far as silicone tires, there is Maxxtrac M10X.
And the guide on this one needs a little more stability I think...
-

FC47 - HRW SlotCar Veteran!
- Posts: 644
- Joined: Sun Jun 25, 2017 7:48 pm
- Location: Berkshire foothills
Re: Cyclone build and tune
![]() by slothead » Wed Jun 26, 2019 12:35 am
by slothead » Wed Jun 26, 2019 12:35 am
Pioneer is not listed under 'brand' on the Quick Slicks Tire Selector.
I do have a bunch of Maxx Trax tires in a bin and hopefully can find 2 pairs of M10's. Thanks for letting me know what to look for. (And thanks to Maxx Trax for molding the part number into the tires.)
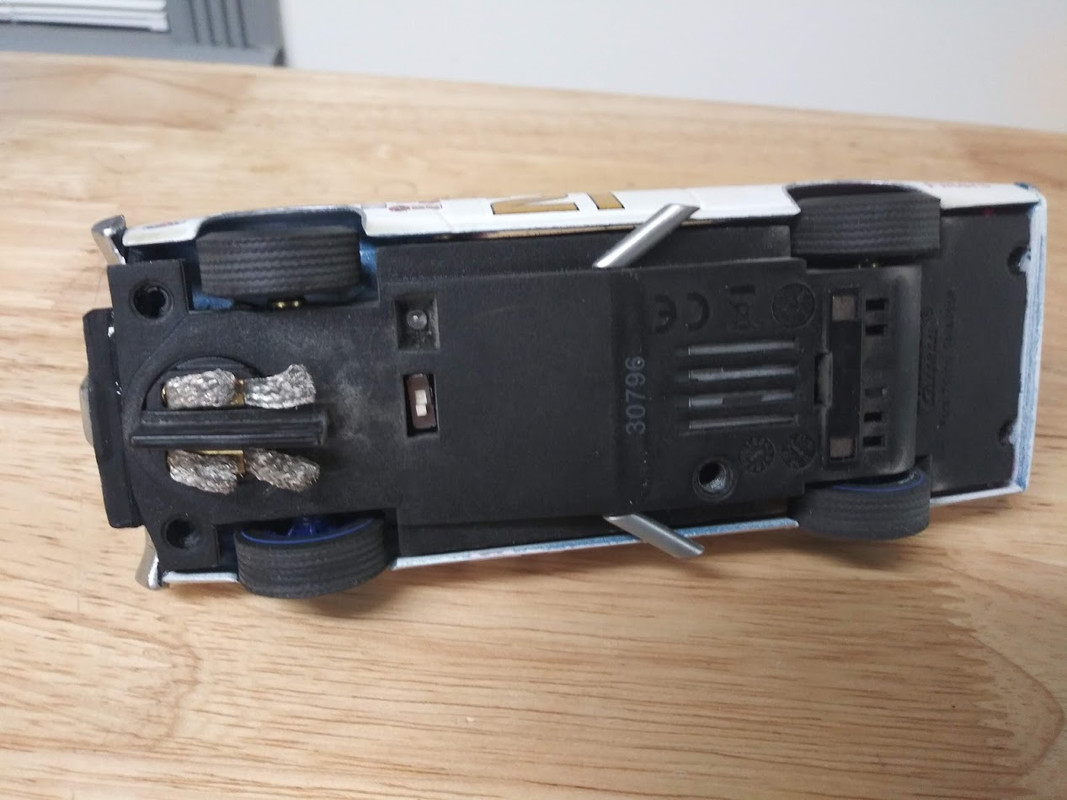
While waiting for the rain to subside and the humidity to drop I'll test fit one of the bodies together and think about the body mounts. I'll probably use double sided foam tape to mount the body posts to the body while the posts are screwed to the chassis. Permanent foam tape gives a strong bond, provides some flexibility, and can still be peeled off carefully if needed down the road.
The Pioneer chassis will remain stock to be on par with the cars it will race against so no wheel changes here, but I might paint the ones on the chassis for a different look. In most photos the #21 has black wheels, but I like the silver look in this photo.

I do have a bunch of Maxx Trax tires in a bin and hopefully can find 2 pairs of M10's. Thanks for letting me know what to look for. (And thanks to Maxx Trax for molding the part number into the tires.)
While waiting for the rain to subside and the humidity to drop I'll test fit one of the bodies together and think about the body mounts. I'll probably use double sided foam tape to mount the body posts to the body while the posts are screwed to the chassis. Permanent foam tape gives a strong bond, provides some flexibility, and can still be peeled off carefully if needed down the road.
The Pioneer chassis will remain stock to be on par with the cars it will race against so no wheel changes here, but I might paint the ones on the chassis for a different look. In most photos the #21 has black wheels, but I like the silver look in this photo.
-
slothead - The Doctor is IN!
- Posts: 1560
- Joined: Sun Mar 17, 2013 7:04 pm
Re: Cyclone build and tune
![]() by proxieken » Wed Jun 26, 2019 7:45 am
by proxieken » Wed Jun 26, 2019 7:45 am
Well here is my battered race car. This one had the older grill in it that was too difficult to assemble. I need to make a car with only the current kit components in it to show what it looks like now.

We race Carrera digital so it has been run off the road a few times. Pretty simple build. Since I used a Torino as a chassis donor this car has that driver and interior tray in it.
The chassis was trimmed front and rear and I just used hot glue to put it in place.
Not the best mounting method but it is fast and if you need to take it apart it can be pried open and re-glued.
Really is a simple method of adding a car to your Carrera digital fleet.
- proxieken
- HRW SlotCar Veteran!
- Posts: 403
- Joined: Sat Sep 08, 2012 1:22 pm
Re: Cyclone build and tune
![]() by williamg » Wed Jun 26, 2019 8:33 am
by williamg » Wed Jun 26, 2019 8:33 am
ProxieKen nice looking build. Sharp looking paint edges, nice work.
- williamg
- HRW SlotCar Veteran!
- Posts: 209
- Joined: Mon Jan 07, 2013 9:40 am
- Location: New England
Re: Cyclone build and tune
![]() by slothead » Wed Jun 26, 2019 2:25 pm
by slothead » Wed Jun 26, 2019 2:25 pm
The photo I posted above of the Wood Bros #21 Mercury with silver wheels is actually a Montego, not the Cyclone. I couldn't tell which
car it was before since they are very similar. So far all of the photos of the #21 Cyclone show it with black wheels, so I'll leave them as is on the Pioneer chassis.
Just found some Maxx Trax M10 tires in my bin, so that's taken care of. I can do some tuning on the chassis before starting the paint process on the first body.
-
slothead - The Doctor is IN!
- Posts: 1560
- Joined: Sun Mar 17, 2013 7:04 pm
Re: Cyclone build and tune
![]() by FC47 » Wed Jun 26, 2019 3:13 pm
by FC47 » Wed Jun 26, 2019 3:13 pm
They are close...got a 1:24/25 Montego in the pipeline too, decals already here.
Glad you found some sili's!
Ken that baby doesn't look too race weary :D
Nice car!
Glad you found some sili's!
Ken that baby doesn't look too race weary :D
Nice car!
-
FC47 - HRW SlotCar Veteran!
- Posts: 644
- Joined: Sun Jun 25, 2017 7:48 pm
- Location: Berkshire foothills
Re: Cyclone build and tune
![]() by waaytoomuchintothis » Wed Jun 26, 2019 4:23 pm
by waaytoomuchintothis » Wed Jun 26, 2019 4:23 pm
Got my decal today from Ken. Thanks! Its perfect.
I was amazed at the return address. I'm just few hours' drive away. There's even a great slot car guy between us. It'll be months before I can do it, maybe I'll come say hello and drool over your machinist artistry someday.
Now I'm going to go google every image of #21 I can find. I want this one to be spectacular. I'm old. It may take a while.
-

waaytoomuchintothis - "Seasoned SlotRacer"
- Posts: 7576
- Joined: Wed Aug 29, 2012 7:16 pm
- Location: Chesterfield, Virginia
Re: Cyclone build and tune
![]() by proxieken » Thu Jun 27, 2019 7:04 am
by proxieken » Thu Jun 27, 2019 7:04 am
Wanted to mention that the decals I am shipping are not the same as the ones available from Patto's.
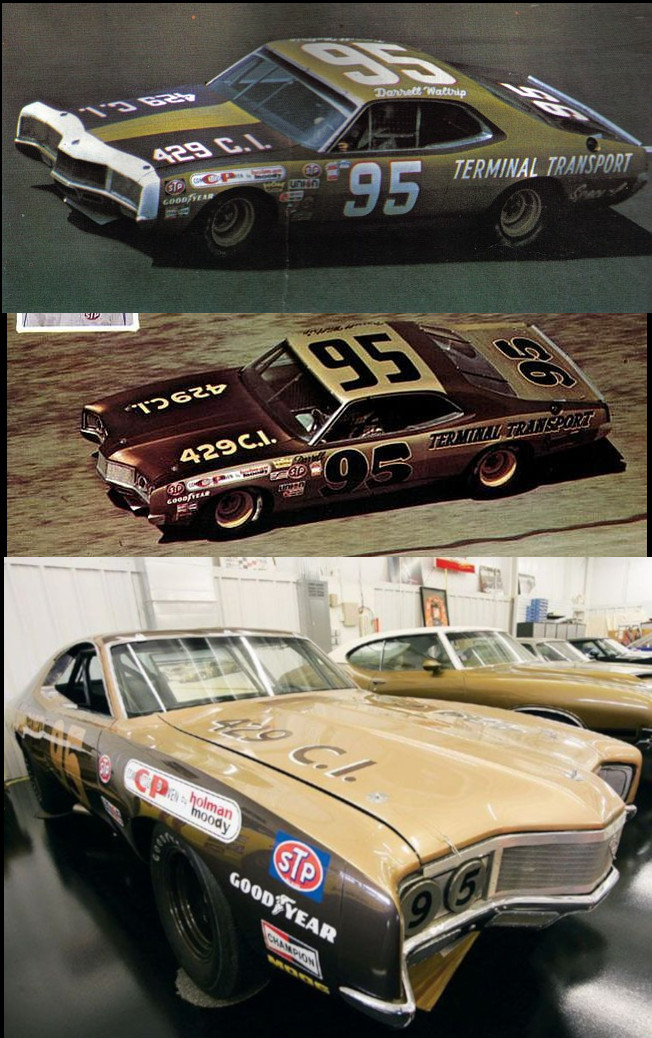
From Patto's you can build the variant #92 car, the Donnie Allison #21 and the #72 Pop Kola and #95 Darrel Waltrip.
My goal in making up sets of decals was to offer different options than what was available. I am going to try to print a set of Waltrip decals at some point that will build the version not available from Pattos.
Pattos decals are white printed so quite a bit easier to use.
I had some problems getting the street decal to work as it is quite fragile. The long 71 stripe is tough to get off in one piece. I sprayed it with clear gloss acrylic and soaked it in water for a shorter time and got better results. I think I will coat them in the future.
- proxieken
- HRW SlotCar Veteran!
- Posts: 403
- Joined: Sat Sep 08, 2012 1:22 pm
Re: Cyclone build and tune
![]() by proxieken » Fri Jun 28, 2019 5:48 am
by proxieken » Fri Jun 28, 2019 5:48 am
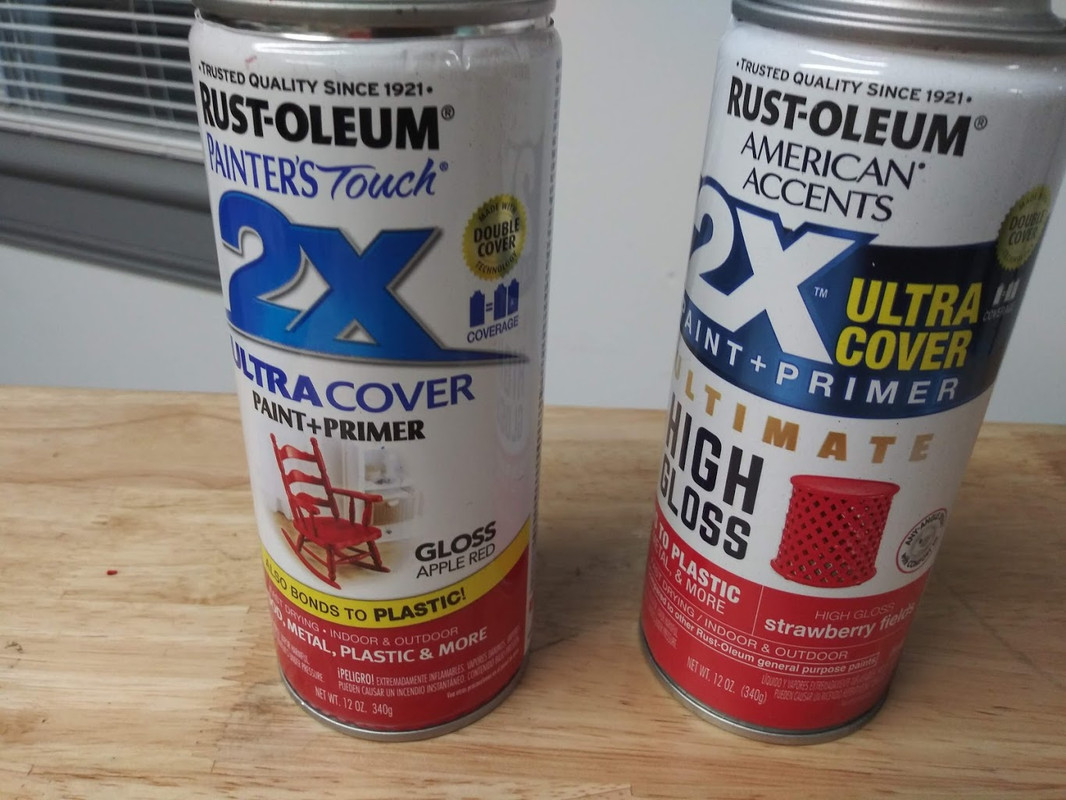
These are the paints I used to make the decals. I sprayed on a surface, scanned it, and then filled in the decal with that shade.
Apple Red is for the #21 car top and Strawberry is for the #48 car.
- proxieken
- HRW SlotCar Veteran!
- Posts: 403
- Joined: Sat Sep 08, 2012 1:22 pm
Re: Cyclone build and tune
![]() by goosenapper » Sat Jun 29, 2019 1:37 pm
by goosenapper » Sat Jun 29, 2019 1:37 pm
It begins...
As the Pattos decals include most of what is needed to build the three main variants of the Waltrip car, I'll have a go at them all and see what happens.
As the Pattos decals include most of what is needed to build the three main variants of the Waltrip car, I'll have a go at them all and see what happens.
-

goosenapper - HRW SlotCar Veteran!
- Posts: 1252
- Joined: Thu Sep 06, 2012 7:12 am
Re: Cyclone build and tune
![]() by proxieken » Sat Jun 29, 2019 2:35 pm
by proxieken » Sat Jun 29, 2019 2:35 pm
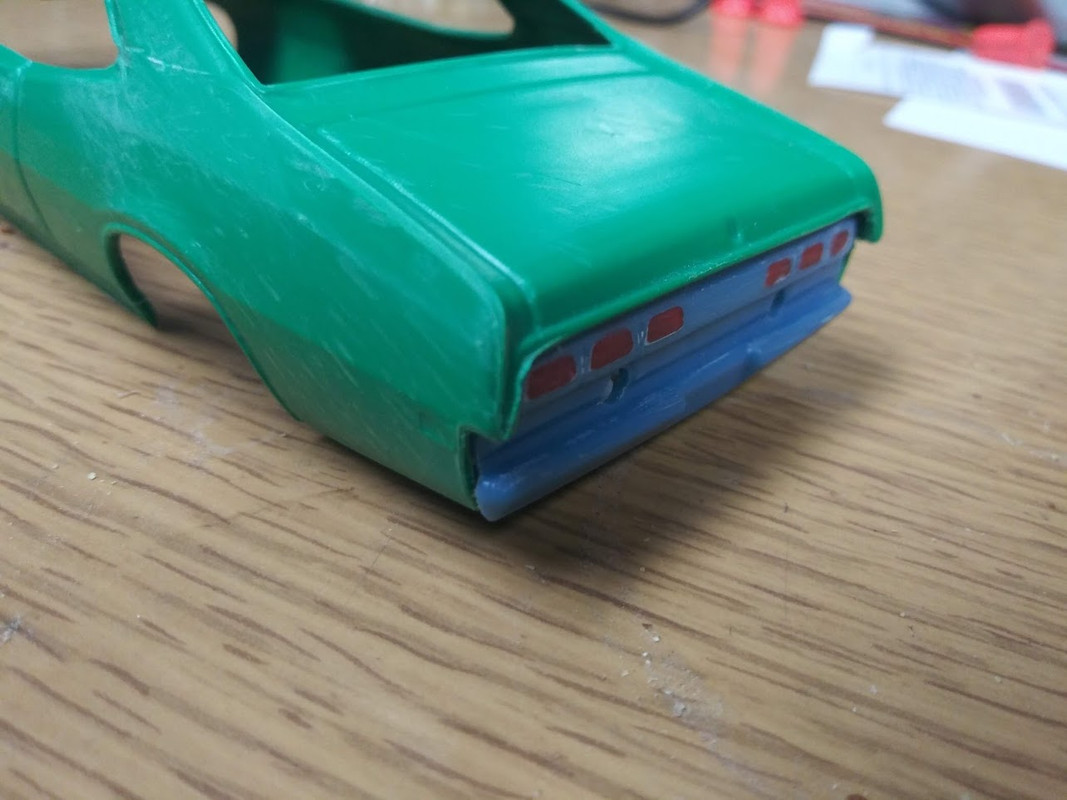
One of the least requested decal sets has been the 92. At first I thought it was going to be hard to make and the first car ended in wrinkles. If someone decides to have a go at the 92 here are some issues I had and how they were fixed.
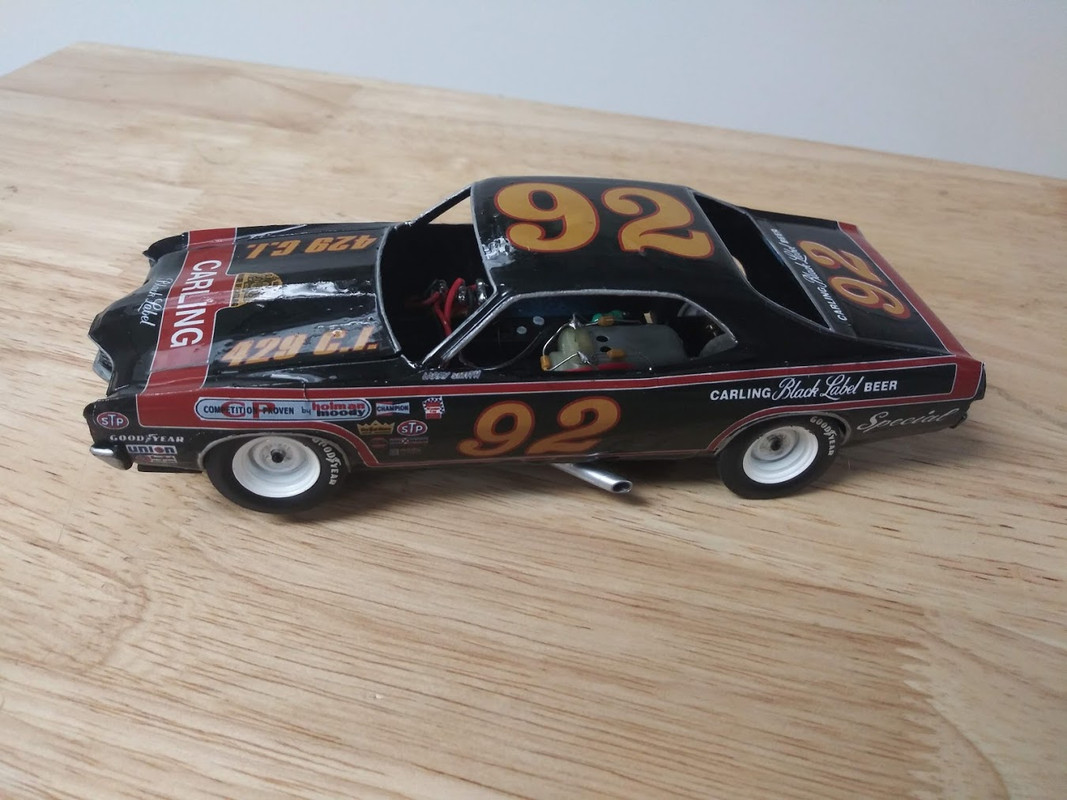
The driver name pushes the stripe down too low and the door handle wrinkles things up. This car was ruined by the clear coat cracking all over so it is now in the tub to be stripped.
I started a new one with a couple new ideas.
The door handles were filed off and the rear panel was also filed flat after gluing in the tail lights.

I sprayed with black and then applied decals. The driver name was relocated to the roof. The word "special" and the sponsors in front of the front tire were cut off the side decal. The STP on the front logo bunch was also cut off to allow for better application.
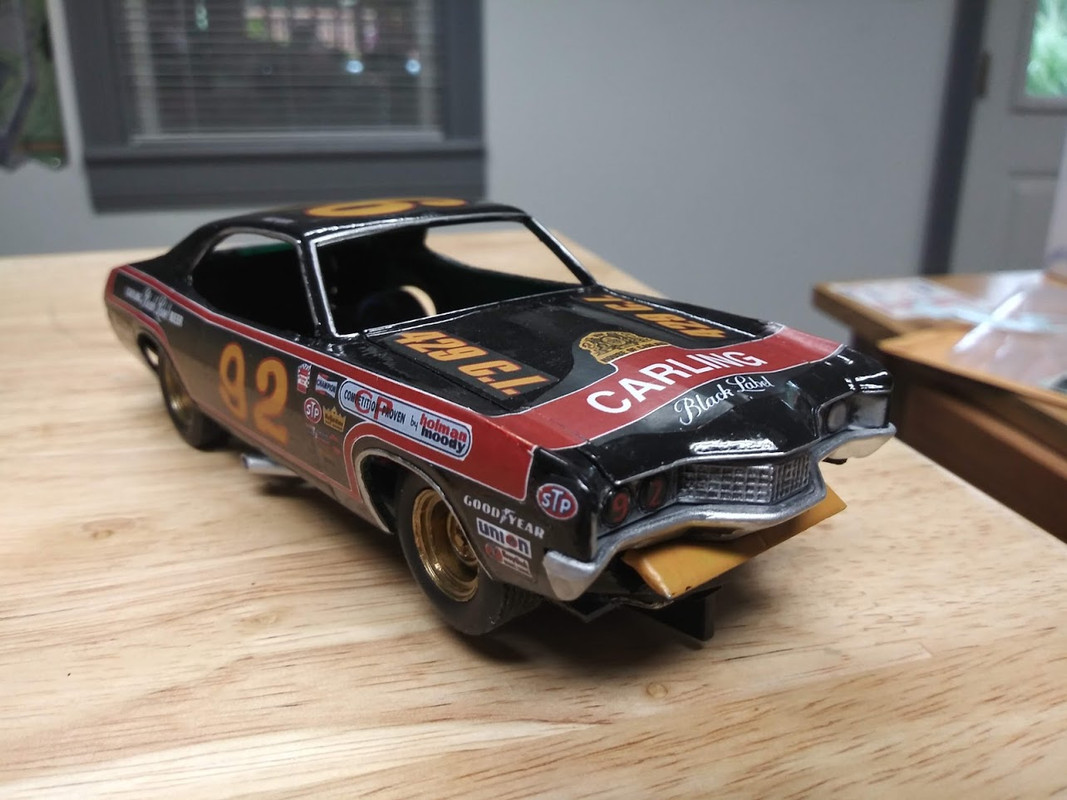
The front spoiler was painted to match the numbers. The grill was sprayed silver and rubbed with antiquing to create some shadowing.
The rear is now another place for the sponsor to be placed.
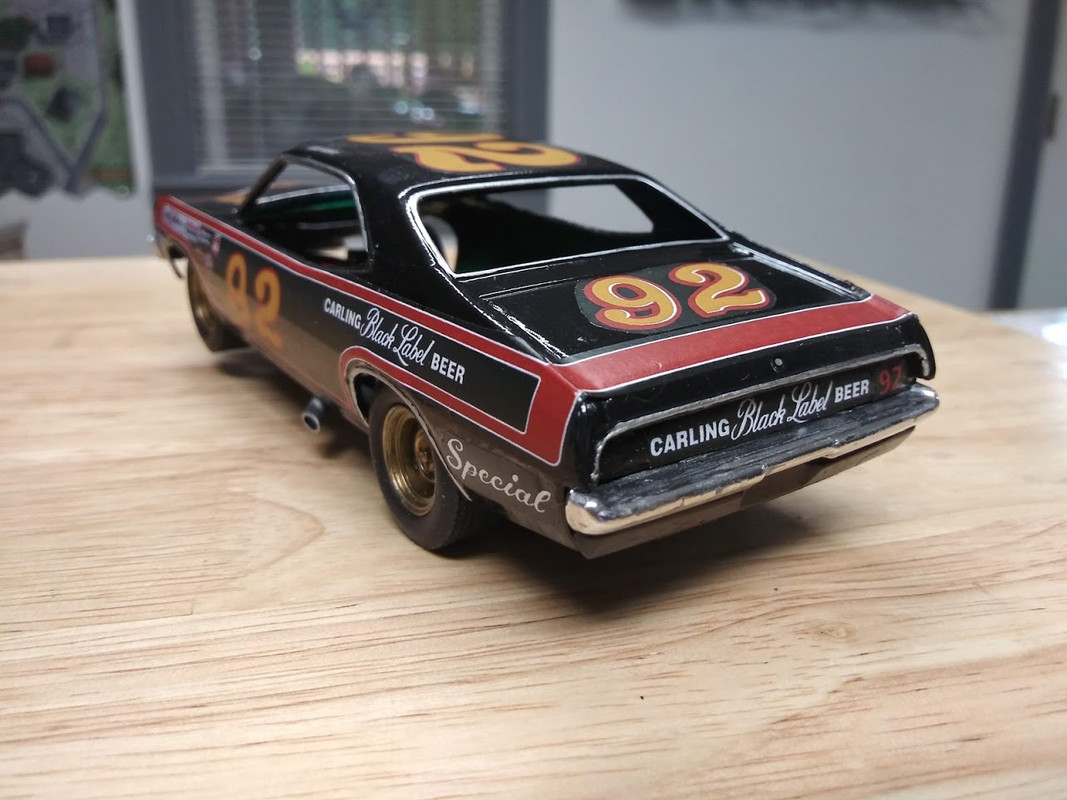
When applying the decals I cut them out and used a black sharpie to run around the edge to better hide the white under color that is often visible at the edges when it is cut.
Now to clear coat and hope it does not again get ruined. I use floor polish but it sometimes cracks all to pieces on me. I think it happens if the underlying paint is not completely dry.
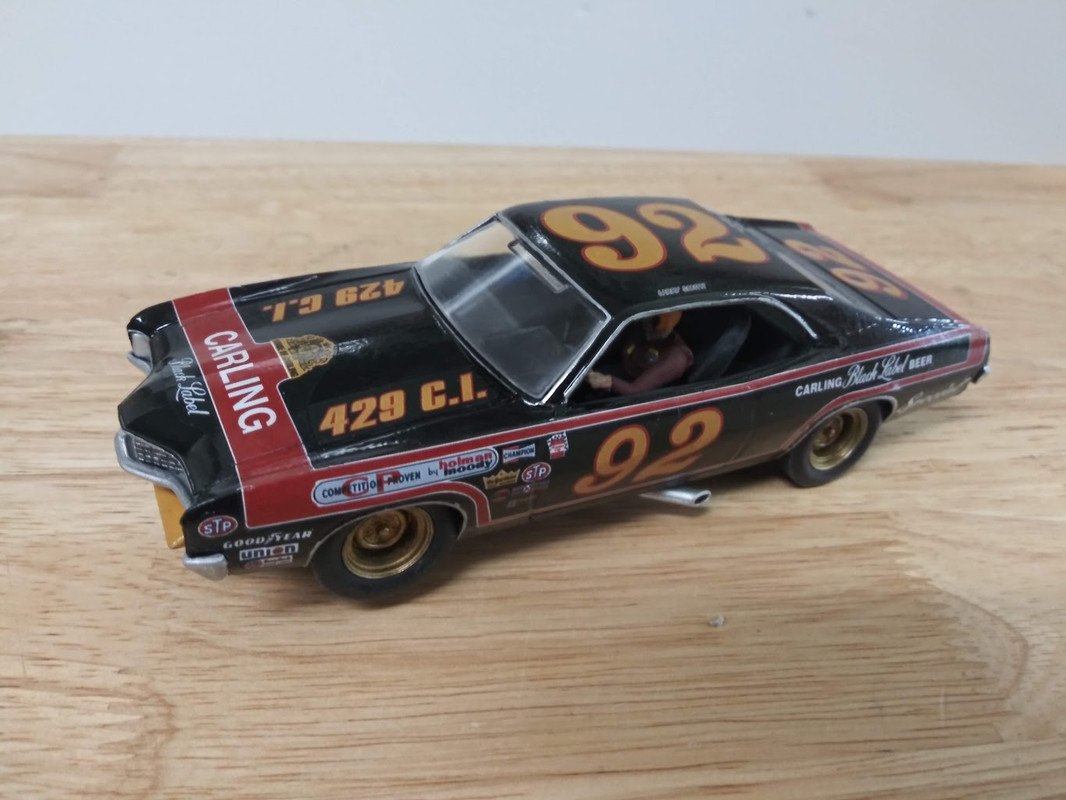
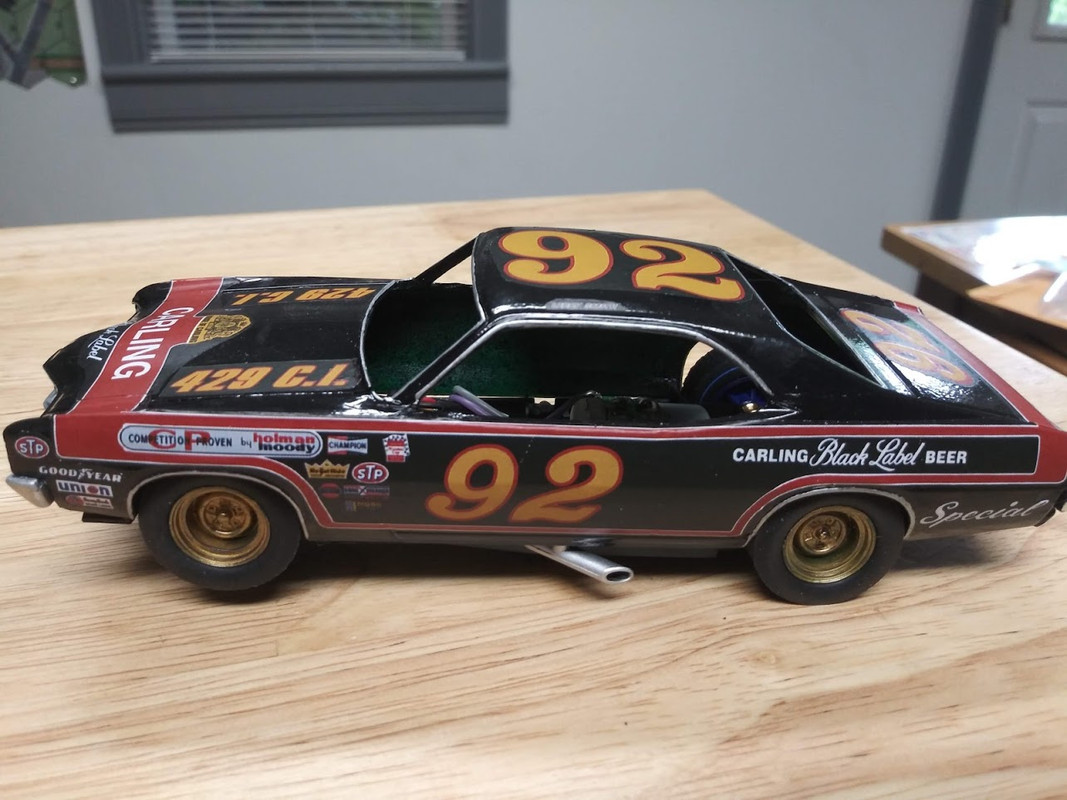
Here it is cleared and ready to race. Not too bad. I normally avoid black slot cars but this just adds to my urge to paint the track finally.
The driver name pushes the stripe down too low and the door handle wrinkles things up. This car was ruined by the clear coat cracking all over so it is now in the tub to be stripped.
I started a new one with a couple new ideas.
The door handles were filed off and the rear panel was also filed flat after gluing in the tail lights.
I sprayed with black and then applied decals. The driver name was relocated to the roof. The word "special" and the sponsors in front of the front tire were cut off the side decal. The STP on the front logo bunch was also cut off to allow for better application.
The front spoiler was painted to match the numbers. The grill was sprayed silver and rubbed with antiquing to create some shadowing.
The rear is now another place for the sponsor to be placed.
When applying the decals I cut them out and used a black sharpie to run around the edge to better hide the white under color that is often visible at the edges when it is cut.
Now to clear coat and hope it does not again get ruined. I use floor polish but it sometimes cracks all to pieces on me. I think it happens if the underlying paint is not completely dry.
Here it is cleared and ready to race. Not too bad. I normally avoid black slot cars but this just adds to my urge to paint the track finally.
Last edited by proxieken on Mon Jul 01, 2019 4:10 pm, edited 1 time in total.
- proxieken
- HRW SlotCar Veteran!
- Posts: 403
- Joined: Sat Sep 08, 2012 1:22 pm
Re: Cyclone build and tune
![]() by FC47 » Sat Jun 29, 2019 2:47 pm
by FC47 » Sat Jun 29, 2019 2:47 pm
Looking forward to seeing those three DW cars!
Ken, the 92 looks great, hope it settles out too!
Picked up the Apple Red today, appreciate the hint on the shade,
Still fittin bits, enjoying it!
Thanks
Ken, the 92 looks great, hope it settles out too!
Picked up the Apple Red today, appreciate the hint on the shade,
Still fittin bits, enjoying it!
Thanks
-
FC47 - HRW SlotCar Veteran!
- Posts: 644
- Joined: Sun Jun 25, 2017 7:48 pm
- Location: Berkshire foothills
Re: Cyclone build and tune
![]() by TuscoTodd » Sat Jun 29, 2019 4:30 pm
by TuscoTodd » Sat Jun 29, 2019 4:30 pm
OH! Like the second go around with the Black Label car! That is turning out NICE!
Great tip about using a black sharpie on the cut edges to hide the white! I'll have to remember that!
I have started playing with kit one - she is going to be a street version - so far - so good! Pictures to come! :D
Great tip about using a black sharpie on the cut edges to hide the white! I'll have to remember that!
I have started playing with kit one - she is going to be a street version - so far - so good! Pictures to come! :D
-

TuscoTodd - HRW Bouncer
- Posts: 7145
- Joined: Sat Aug 17, 2013 11:25 am
- Location: Rural Ohio
Who is online
Users browsing this forum: No registered users and 156 guests

Powered by phpBB® Forum Software © phpBB Group