[phpBB Debug] PHP Warning: in file [ROOT]/includes/bbcode.php on line 543: preg_replace(): The /e modifier is no longer supported, use preg_replace_callback instead
[phpBB Debug] PHP Warning: in file [ROOT]/includes/bbcode.php on line 543: preg_replace(): The /e modifier is no longer supported, use preg_replace_callback instead
[phpBB Debug] PHP Warning: in file [ROOT]/includes/bbcode.php on line 543: preg_replace(): The /e modifier is no longer supported, use preg_replace_callback instead
[phpBB Debug] PHP Warning: in file [ROOT]/includes/bbcode.php on line 543: preg_replace(): The /e modifier is no longer supported, use preg_replace_callback instead
[phpBB Debug] PHP Warning: in file [ROOT]/includes/bbcode.php on line 543: preg_replace(): The /e modifier is no longer supported, use preg_replace_callback instead
[phpBB Debug] PHP Warning: in file [ROOT]/includes/bbcode.php on line 543: preg_replace(): The /e modifier is no longer supported, use preg_replace_callback instead
[phpBB Debug] PHP Warning: in file [ROOT]/includes/bbcode.php on line 543: preg_replace(): The /e modifier is no longer supported, use preg_replace_callback instead
[phpBB Debug] PHP Warning: in file [ROOT]/includes/bbcode.php on line 543: preg_replace(): The /e modifier is no longer supported, use preg_replace_callback instead
[phpBB Debug] PHP Warning: in file [ROOT]/includes/bbcode.php on line 543: preg_replace(): The /e modifier is no longer supported, use preg_replace_callback instead
[phpBB Debug] PHP Warning: in file [ROOT]/includes/bbcode.php on line 543: preg_replace(): The /e modifier is no longer supported, use preg_replace_callback instead
[phpBB Debug] PHP Warning: in file [ROOT]/includes/bbcode.php on line 543: preg_replace(): The /e modifier is no longer supported, use preg_replace_callback instead
[phpBB Debug] PHP Warning: in file [ROOT]/includes/bbcode.php on line 543: preg_replace(): The /e modifier is no longer supported, use preg_replace_callback instead
[phpBB Debug] PHP Warning: in file [ROOT]/includes/bbcode.php on line 543: preg_replace(): The /e modifier is no longer supported, use preg_replace_callback instead
[phpBB Debug] PHP Warning: in file [ROOT]/includes/bbcode.php on line 543: preg_replace(): The /e modifier is no longer supported, use preg_replace_callback instead
[phpBB Debug] PHP Warning: in file [ROOT]/includes/bbcode.php on line 543: preg_replace(): The /e modifier is no longer supported, use preg_replace_callback instead
[phpBB Debug] PHP Warning: in file [ROOT]/includes/bbcode.php on line 543: preg_replace(): The /e modifier is no longer supported, use preg_replace_callback instead
[phpBB Debug] PHP Warning: in file [ROOT]/includes/bbcode.php on line 543: preg_replace(): The /e modifier is no longer supported, use preg_replace_callback instead
[phpBB Debug] PHP Warning: in file [ROOT]/includes/bbcode.php on line 543: preg_replace(): The /e modifier is no longer supported, use preg_replace_callback instead
[phpBB Debug] PHP Warning: in file [ROOT]/includes/bbcode.php on line 543: preg_replace(): The /e modifier is no longer supported, use preg_replace_callback instead
[phpBB Debug] PHP Warning: in file [ROOT]/includes/bbcode.php on line 543: preg_replace(): The /e modifier is no longer supported, use preg_replace_callback instead
[phpBB Debug] PHP Warning: in file [ROOT]/includes/bbcode.php on line 543: preg_replace(): The /e modifier is no longer supported, use preg_replace_callback instead
[phpBB Debug] PHP Warning: in file [ROOT]/includes/bbcode.php on line 543: preg_replace(): The /e modifier is no longer supported, use preg_replace_callback instead
[phpBB Debug] PHP Warning: in file [ROOT]/includes/bbcode.php on line 543: preg_replace(): The /e modifier is no longer supported, use preg_replace_callback instead
[phpBB Debug] PHP Warning: in file [ROOT]/includes/bbcode.php on line 543: preg_replace(): The /e modifier is no longer supported, use preg_replace_callback instead
[phpBB Debug] PHP Warning: in file [ROOT]/includes/bbcode.php on line 543: preg_replace(): The /e modifier is no longer supported, use preg_replace_callback instead
[phpBB Debug] PHP Warning: in file [ROOT]/includes/bbcode.php on line 543: preg_replace(): The /e modifier is no longer supported, use preg_replace_callback instead
[phpBB Debug] PHP Warning: in file [ROOT]/includes/bbcode.php on line 543: preg_replace(): The /e modifier is no longer supported, use preg_replace_callback instead
[phpBB Debug] PHP Warning: in file [ROOT]/includes/bbcode.php on line 543: preg_replace(): The /e modifier is no longer supported, use preg_replace_callback instead
[phpBB Debug] PHP Warning: in file [ROOT]/includes/bbcode.php on line 543: preg_replace(): The /e modifier is no longer supported, use preg_replace_callback instead
[phpBB Debug] PHP Warning: in file [ROOT]/includes/bbcode.php on line 543: preg_replace(): The /e modifier is no longer supported, use preg_replace_callback instead
[phpBB Debug] PHP Warning: in file [ROOT]/includes/bbcode.php on line 543: preg_replace(): The /e modifier is no longer supported, use preg_replace_callback instead
[phpBB Debug] PHP Warning: in file [ROOT]/includes/bbcode.php on line 543: preg_replace(): The /e modifier is no longer supported, use preg_replace_callback instead
[phpBB Debug] PHP Warning: in file [ROOT]/includes/bbcode.php on line 543: preg_replace(): The /e modifier is no longer supported, use preg_replace_callback instead
[phpBB Debug] PHP Warning: in file [ROOT]/includes/bbcode.php on line 543: preg_replace(): The /e modifier is no longer supported, use preg_replace_callback instead
[phpBB Debug] PHP Warning: in file [ROOT]/includes/bbcode.php on line 543: preg_replace(): The /e modifier is no longer supported, use preg_replace_callback instead
[phpBB Debug] PHP Warning: in file [ROOT]/includes/bbcode.php on line 543: preg_replace(): The /e modifier is no longer supported, use preg_replace_callback instead
[phpBB Debug] PHP Warning: in file [ROOT]/includes/bbcode.php on line 543: preg_replace(): The /e modifier is no longer supported, use preg_replace_callback instead
[phpBB Debug] PHP Warning: in file [ROOT]/includes/bbcode.php on line 543: preg_replace(): The /e modifier is no longer supported, use preg_replace_callback instead
[phpBB Debug] PHP Warning: in file [ROOT]/includes/bbcode.php on line 543: preg_replace(): The /e modifier is no longer supported, use preg_replace_callback instead
[phpBB Debug] PHP Warning: in file [ROOT]/includes/bbcode.php on line 543: preg_replace(): The /e modifier is no longer supported, use preg_replace_callback instead
[phpBB Debug] PHP Warning: in file [ROOT]/includes/bbcode.php on line 543: preg_replace(): The /e modifier is no longer supported, use preg_replace_callback instead
[phpBB Debug] PHP Warning: in file [ROOT]/includes/bbcode.php on line 543: preg_replace(): The /e modifier is no longer supported, use preg_replace_callback instead
[phpBB Debug] PHP Warning: in file [ROOT]/includes/bbcode.php on line 543: preg_replace(): The /e modifier is no longer supported, use preg_replace_callback instead
[phpBB Debug] PHP Warning: in file [ROOT]/includes/bbcode.php on line 543: preg_replace(): The /e modifier is no longer supported, use preg_replace_callback instead
[phpBB Debug] PHP Warning: in file [ROOT]/includes/bbcode.php on line 543: preg_replace(): The /e modifier is no longer supported, use preg_replace_callback instead
[phpBB Debug] PHP Warning: in file [ROOT]/includes/bbcode.php on line 127: preg_replace(): The /e modifier is no longer supported, use preg_replace_callback instead
[phpBB Debug] PHP Warning: in file [ROOT]/includes/bbcode.php on line 127: preg_replace(): The /e modifier is no longer supported, use preg_replace_callback instead
[phpBB Debug] PHP Warning: in file [ROOT]/includes/bbcode.php on line 127: preg_replace(): The /e modifier is no longer supported, use preg_replace_callback instead
[phpBB Debug] PHP Warning: in file [ROOT]/includes/functions.php on line 4773: Cannot modify header information - headers already sent by (output started at [ROOT]/includes/functions.php:3887)
[phpBB Debug] PHP Warning: in file [ROOT]/includes/functions.php on line 4775: Cannot modify header information - headers already sent by (output started at [ROOT]/includes/functions.php:3887)
[phpBB Debug] PHP Warning: in file [ROOT]/includes/functions.php on line 4776: Cannot modify header information - headers already sent by (output started at [ROOT]/includes/functions.php:3887)
[phpBB Debug] PHP Warning: in file [ROOT]/includes/functions.php on line 4777: Cannot modify header information - headers already sent by (output started at [ROOT]/includes/functions.php:3887)
Home Racing World • View topic - Gift Card Chassis

Gift Card Chassis

For 1/43rd Scale Models

Gift Card Chassis

Postby BARC 1 » Sun Jan 10, 2016 2:06 pm

OK, I have already made changes to this design with the first being the name. Gift card probably more accurately describes the card in use as there are no embossed numbers or name.

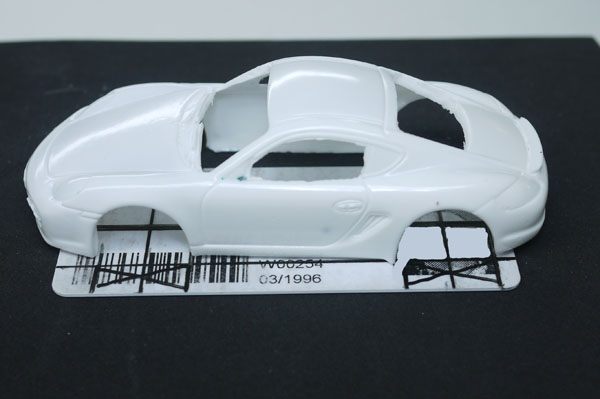
I had an old medical health card sitting on my work bench, and as I was working on a 1/43 scale car, it occurred to me that these cards were a perfect size for 1/43 scale slot cars. Wafer thin, durable and the cost was right. I had to try it.

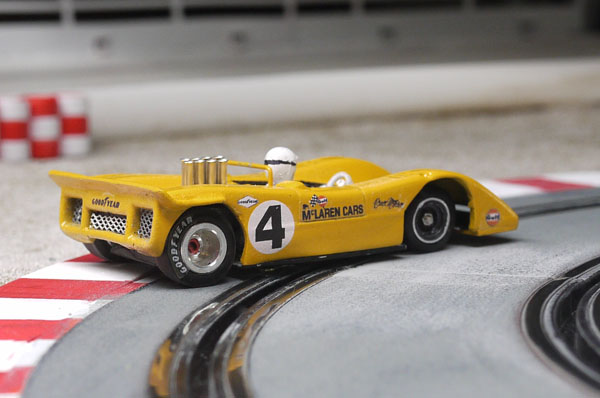
So I built the first chassis which was a sidewinder affair, but didn't take any pictures. The results were very good so I abandoned my own custom resin chassis and focused on the Gift Card Chassis.(GCC) My McLaren M8 is built on a this first sidewinder chassis, and the Cayman uses the second.

This third Chassis is being purpose built for the ProNOMag proxy race that Peter is hosting. For this race I wanted as much torque and speed as possible so am going with the N20 size of motor. Also A little different in that it is an inline chassis and the first attempt of this on the GCC. Because it was very much a learn as you go process, I didn't capture as many pictures as I would have liked to , but I will try and fill in the blanks with text

So here it goes.


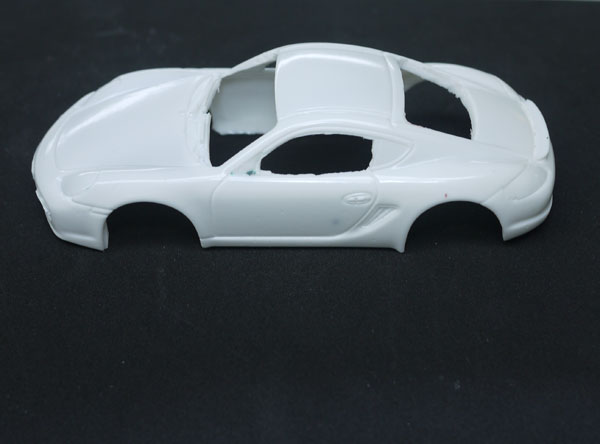
Select the car model that the chassis is being built for. In this example I am sending in a pair of Racing Cayman's. This body is a resin cast I pulled off a Diecast Caymen I had purchased. The body has not been cleaned up yet, but will be before paint

Image


Cut the gift card to the right width, and then mark out the wheel well openings.

Image

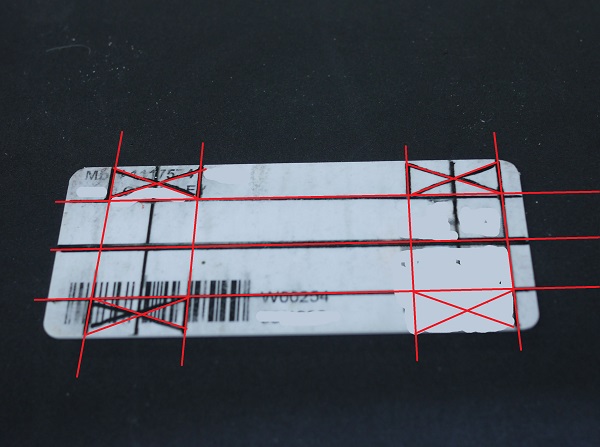
Take the the rough opening marks and then using a square straight edge mark out all the important cuts with a marker I like to make the marks on the opposite side of the card from the gift card logo. The colorful logos are nice feature on the bottom of the chassis.

Image

This is where the pictures dry up as I was building as I go with the inline chassis, and not sure of the results I didn't want to waste any time with pictures. Basically all the marks line are cut making the wheel wheels, and guide arm. This was something new I tired and it worked very well. A whole guide arm is cut out. This allows you to adjust the guide height to whatever height you need to ensure a proper car ride height. No measuring is required once the arm is cut as it flexes to the height you need.( More on that later)

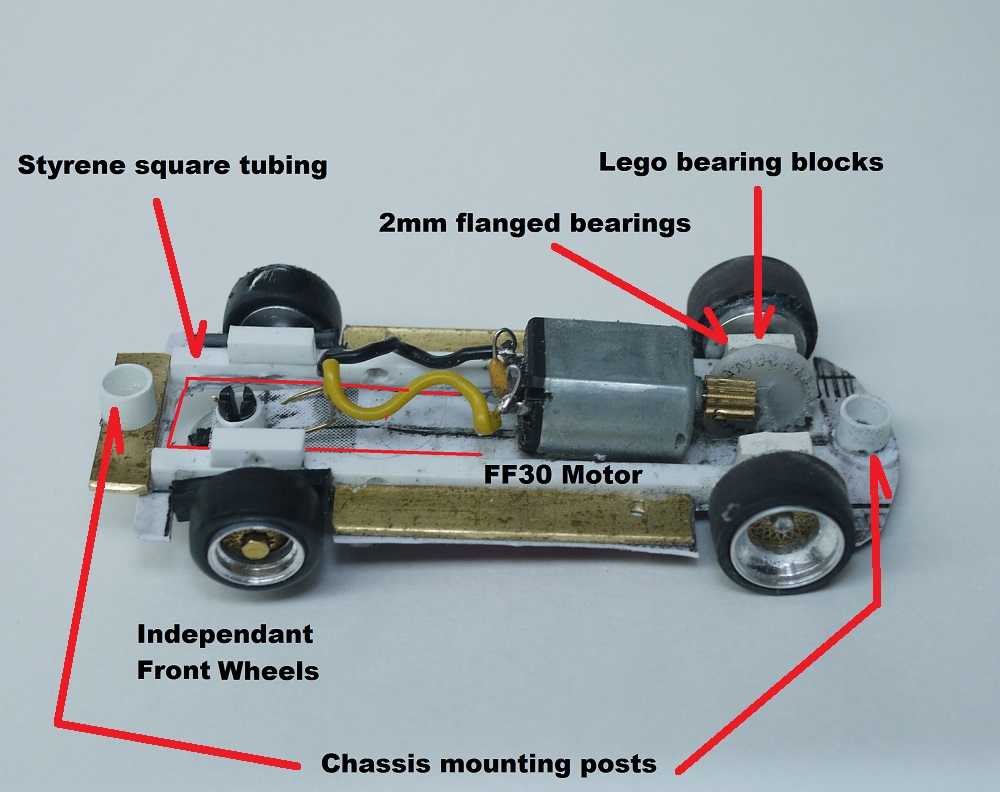
I also use small one piece lego block . I cut the nubbin off and it leaves you with a perfectly centered hole at the exact height you need. This hole is then enlarged to accept the 2mm flanged bearings for the rear axle. On the sidewinder these "Bearing Blocks" don't even need to be cut as they fit perfectly between the wheel wells, as shown on this earlier chassis.

Image

For the inline chassis these blocks need to be trimmed down to fit. In this first attempt I cut them down to the minimum size, but after the build realized that I could have left the crown gear side block longer to act as a support stop to keep the crown gear at the right spot.

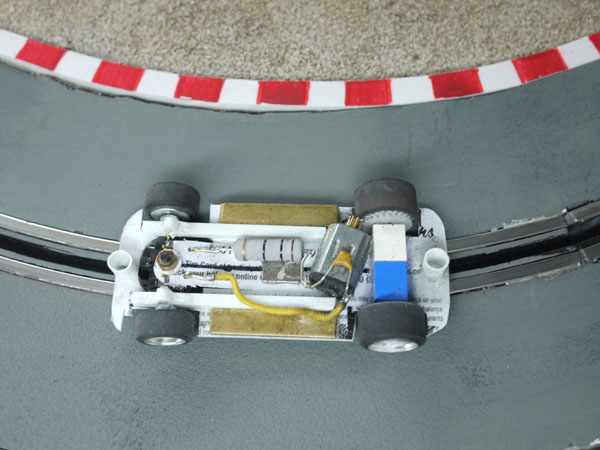
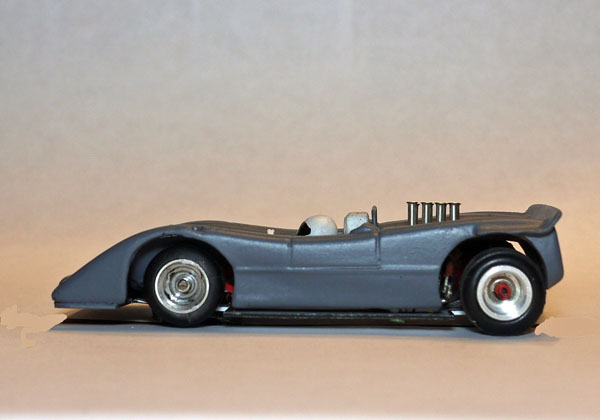
The end result is a chassis that looks like this. I have tired to identify all the parts and as a pictures says a thousand words, I hope you can see for yourself what I might have left out.

Image

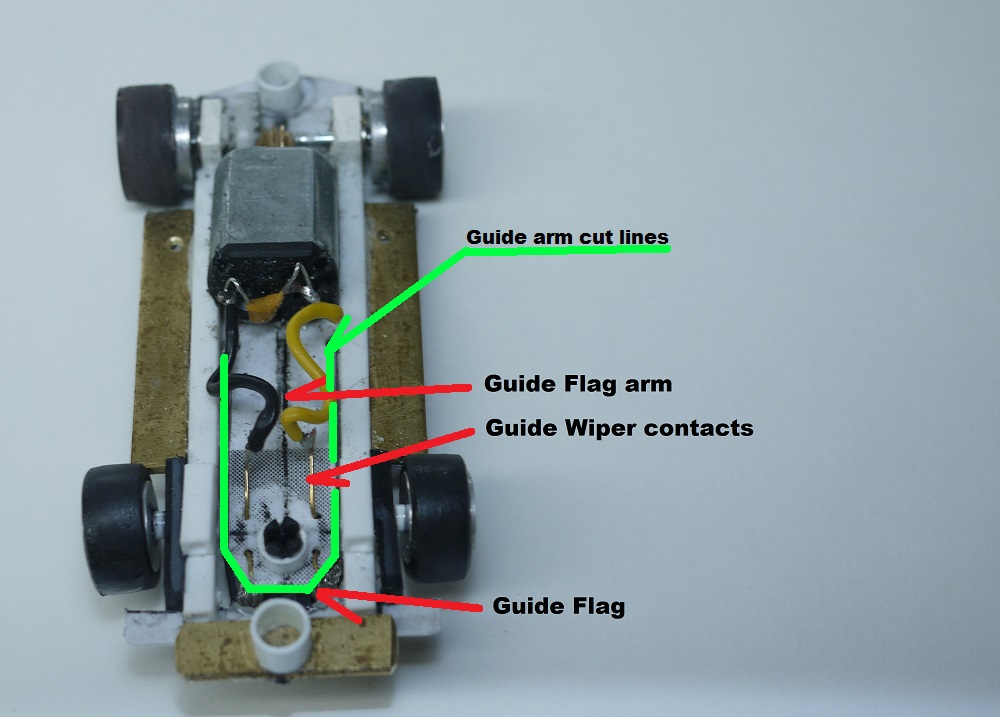
I will pay some extra attention to the guide flag arm. This arm is cut back to a point about midway in the chassis. I learned to drill end stop holes, before scribing the card with a hobby knife. The end stop holes provide a crucial stop point, so that even if the knife gets away on you it won't scribe past the hole. Now the good thing about this guide arm is that it now allows you adjust the height of the guide flag for you particular build. I go ahead and build the rest of the chassis, and add the wheels and then make the adjustment to the guide flag. First attempt I left the flag arm flexible, but it resulted in a "hoppy ride" . To prevent this I find the right height and then just a couple of drops of hot glue near the Flag end secure the guide, so the chassis now longer hops up when under acceleration.

Image

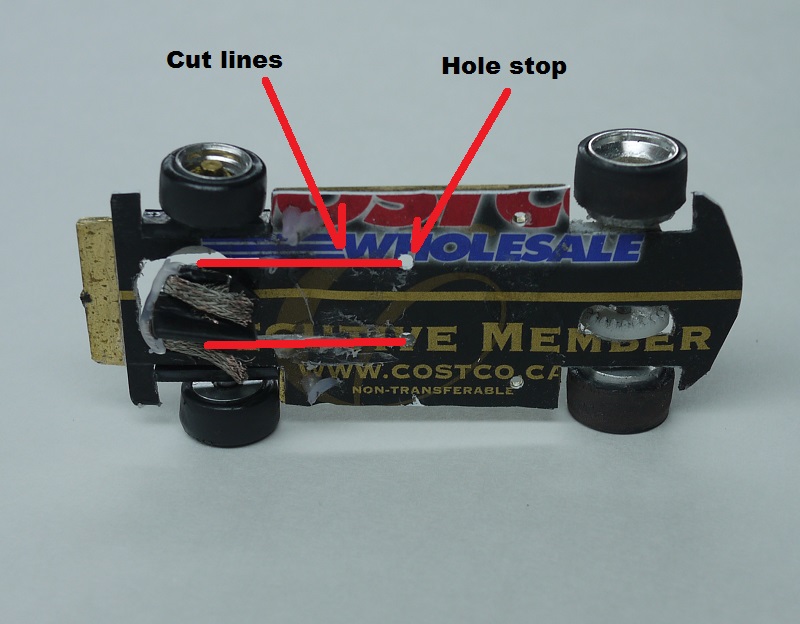
See the eye catching Costco graphic :lol:

Image


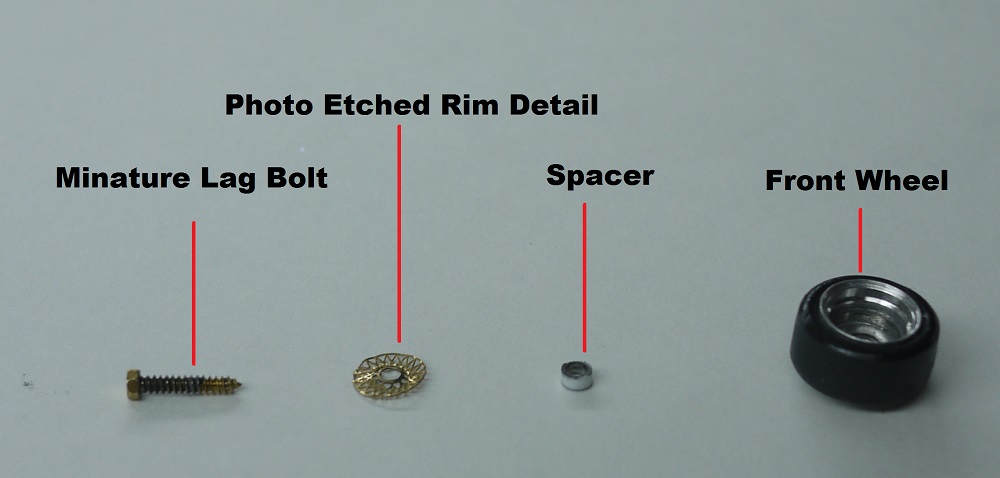
Finally as the guide flag is in a position between the front wheels it becomes necessary to go to an independent front wheel assembly as you can not have a continuous front axle. Here is the assembly that I came up with. I had tiny brass lag bolts( Builders in Scale) that I use in my other hobby, These become the front axle pins. Guide holes are pre-drilled in the square styrene stringers on the chassis and these lag bots are just torqued in. Using the the scale wheels I found it is necessary to build a small spacer, so when you tighten down the lag bolt you don't damage the fine photo etch brass inserts. The one in the picture is a little worse for wear as I made this discovery the hard way. The spacer however prevents this from happening.

Image


So that basically covers off what the GCC chassis is all about. OK What did I forget?... I use liquid styrene cement to glue the Lego blocks to the card, and once dry the bond is( so far) permanent. Brass plates are added on the pan to lower the center of gravity. This make a chassis that you can flat spin on the corners without rolling. No wires are connected directly to the flag. Instead I use brass wiper wires to pass the current for the guide flag back to the motor. In this small scale guide wires can cause resistance to guide flag movement, so I did away with them

Now turning to the rubber for a moment. The rubber that comes with the wheels is of good quality and actually performs well on the track, but not quite as good as UT tires. I never had any UT tires that would fit these rims, but made a discovery last night. I took the Gel Claw NASCAR tires and turned them inside out. You are left with the flat side against the rim and the two out side ridges are now exposed. You can then just these sand off. I use a n over sized rim chucked in a motor tool for this, but the urethane sands easily and this could be done after the tires are installed, using the chassis and some sandpaper on the track. The width is not quite right, but I use silicone to adhere the UT tires to the rim and just line up the tire to the outside edge of the rim. Not perfect but it puts the necessary UT rubber on this rims which is important for No Mag racing.

Two of these chassis are being entered into the ProNoMag that Peter is hosting. So I will find out how they perform. I can tell you that if you add a magnet to these, they will kick the ass off a Stock go car.

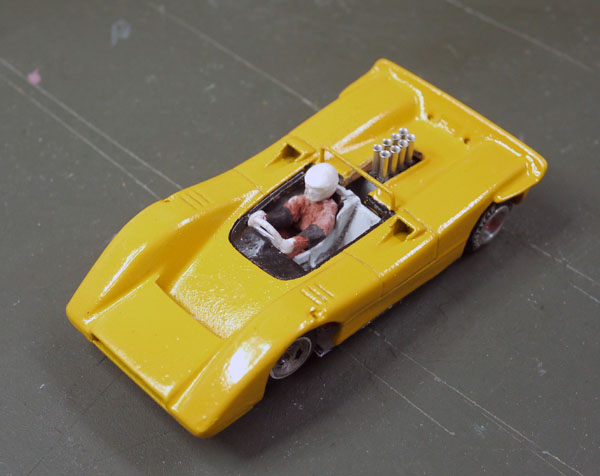
Here are some pictures of the GCC(sidewinder) showing how low the profile is and the fact there is room to add an interior even in this small open top racers.

Image

Image

Image

Finally I want to say something about 1/43 scale. It is not mainsteam and does not get mentioned much, but I want to say I am enjoying my time in the scale immensely. I am an Old guy and have been around slot cars since the old Cox Mag chassis back in the 60's. I am here to say that 1/43 scale cars can be built and run. With the fact it is close to O scale, there are numerous buildings and structures for creating a layout. I am also a model railroader so believable track to scenery ratio's are important to me. 1/43 scale fits the bill nicely for this requirement, without it taking up a whole room if you don't have it. My recently constructed Klusken Hills track sits on top of some storage room shelves and measures 4'X12'. It provides a good entertaining track plan, and affords me lots of areas to satisfy my desire for realistic scenery.

All the gears, motors and other parts I have picked up off eBay. Literally I have bought bagfuls of motors, gear, bearings etc. I bet I got enough parts now to build 30 cars, and i doubt I spent $150 buying them.

Finally there is a vast array of 1/43 scale diecast cars for sale. Learn to cast resin and you will never be short of a car to model, but this is where it gets expensive. These diecasts go from $8 to $200, so I am always on the look out for cost effective models. This is where forums, cottage industries and sharing comes into play. Tutorials on building , casting, painting, etc go along way to making the hobby enjoyable. At the end of the day that is what a hobby should be. Enjoyable, fun that doesn't cost an arm an leg. 1/43 slot cars are doing that for me.

If you have any questions just ask.

Dan

BARC Racing
Last edited by BARC 1 on Sun Jan 10, 2016 3:40 pm, edited 2 times in total.
User avatar
BARC 1
HRW SlotCar Veteran!
 
Posts: 2040
Joined: Wed Dec 23, 2015 6:03 pm
Location: NW Alberta

Re: Gift Card Chassis

Postby RV Racing » Sun Jan 10, 2016 3:09 pm

A brilliant post! Very informative and inspiring. I see a bright future for all of the hotel key cards I have collected.

My question: How did you secure the motor to the chassis?

Excellent, many thanks.
Rick V.
RV Racing
HRW SlotCar Veteran!
 
Posts: 196
Joined: Thu Sep 06, 2012 4:01 pm

Re: Gift Card Chassis

Postby HomeRacingWorld » Sun Jan 10, 2016 3:12 pm

:text-goodpost:
User avatar
HomeRacingWorld
HRW Janitor
 
Posts: 15569
Joined: Wed Aug 08, 2012 2:05 pm
Location: HRW Skunkworks

Re: Gift Card Chassis

Postby MikeySlotCars » Sun Jan 10, 2016 4:04 pm

Great! thread , pictures & build :music-rockout: :text-bravo:

One question , what is the difference between styrene sheet/tubing & foam board?
Is one more solid or heavier then the other one?

BTW: I know what foam board is I used them before but Styrene I have no idea just look the same thing to me

Mikey
User avatar
MikeySlotCars
HRW SlotCar Veteran!
 
Posts: 190
Joined: Thu Oct 02, 2014 10:49 am
Location: Montréal/Québec/Canada

Re: Gift Card Chassis

Postby BARC 1 » Sun Jan 10, 2016 4:51 pm

User avatar
BARC 1
HRW SlotCar Veteran!
 
Posts: 2040
Joined: Wed Dec 23, 2015 6:03 pm
Location: NW Alberta

Re: Gift Card Chassis

Postby HomeRacingWorld » Sun Jan 10, 2016 5:32 pm

User avatar
HomeRacingWorld
HRW Janitor
 
Posts: 15569
Joined: Wed Aug 08, 2012 2:05 pm
Location: HRW Skunkworks

Re: Gift Card Chassis

Postby MikeySlotCars » Sun Jan 10, 2016 5:49 pm

Thanks for link HRW but too late...
After doing some research I found out it's something I already know about but around here we call that Plexiglass not styrene...
I got this confused with Polystyrene rigid isolation sheet...which is in reality is only a dense foam...

Mikey
User avatar
MikeySlotCars
HRW SlotCar Veteran!
 
Posts: 190
Joined: Thu Oct 02, 2014 10:49 am
Location: Montréal/Québec/Canada

Re: Gift Card Chassis

Postby HomeRacingWorld » Sun Jan 10, 2016 6:56 pm

User avatar
HomeRacingWorld
HRW Janitor
 
Posts: 15569
Joined: Wed Aug 08, 2012 2:05 pm
Location: HRW Skunkworks

Re: Gift Card Chassis

Postby BARC 1 » Mon Jan 11, 2016 7:44 am

The motor is held in position with CA. Not to proud of that but it works. I did receive some motor mounts that I can use with a smaller can. Also on the next inline I build I think I will cut an opening to drop the motor through the chassis and perhaps run an end bell block between the square tubing rails.

Cheers

Dan
User avatar
BARC 1
HRW SlotCar Veteran!
 
Posts: 2040
Joined: Wed Dec 23, 2015 6:03 pm
Location: NW Alberta


Return to 1/43rd Scale Showcase


Who is online

Users browsing this forum: No registered users and 4 guests

cron